


In addition to its SAM capabilities, did you know that Sassafras AllSight also has all the Hardware Asset Management (HAM) functionality you need to manage computers and printers from purchase order to disposal: including purchase tracking, lifecycle management, asset fields, computer attribute reports, data visualization widgets, and more?
If you’ve been using AllSight for lab management and usage tracking, but are now interested in hardware asset management features as well, check to see whether you’re using MAC Address or Computer Name as your Computer ID Type before going any further (is Computer Name above MAC Address on the left side of the Computer ID Types window in KeyConfigure?). Identifying computers by name is a common way to make availability maps easier to maintain, as new hardware “takes over” pre-existing computer records, instead of creating “duplicates” with the same name (and therefore leaving an “old” record behind that you can salvage or retire). With Name-based IDs, Hardware details like MAC address, processor, etc., are simply updated to reflect the configuration of the new hardware, and the old computer, in effect, disappears. This creates a seamless transition of usage data for a given location in a lab, but it makes using some of our hardware asset management features much more difficult. If you’re currently using Computer Name but would like to switch to MAC address, to take advantage of hardware management features, reach out to us to discuss the process before making any changes to the Computer ID Type lists.
Hardware Attributes
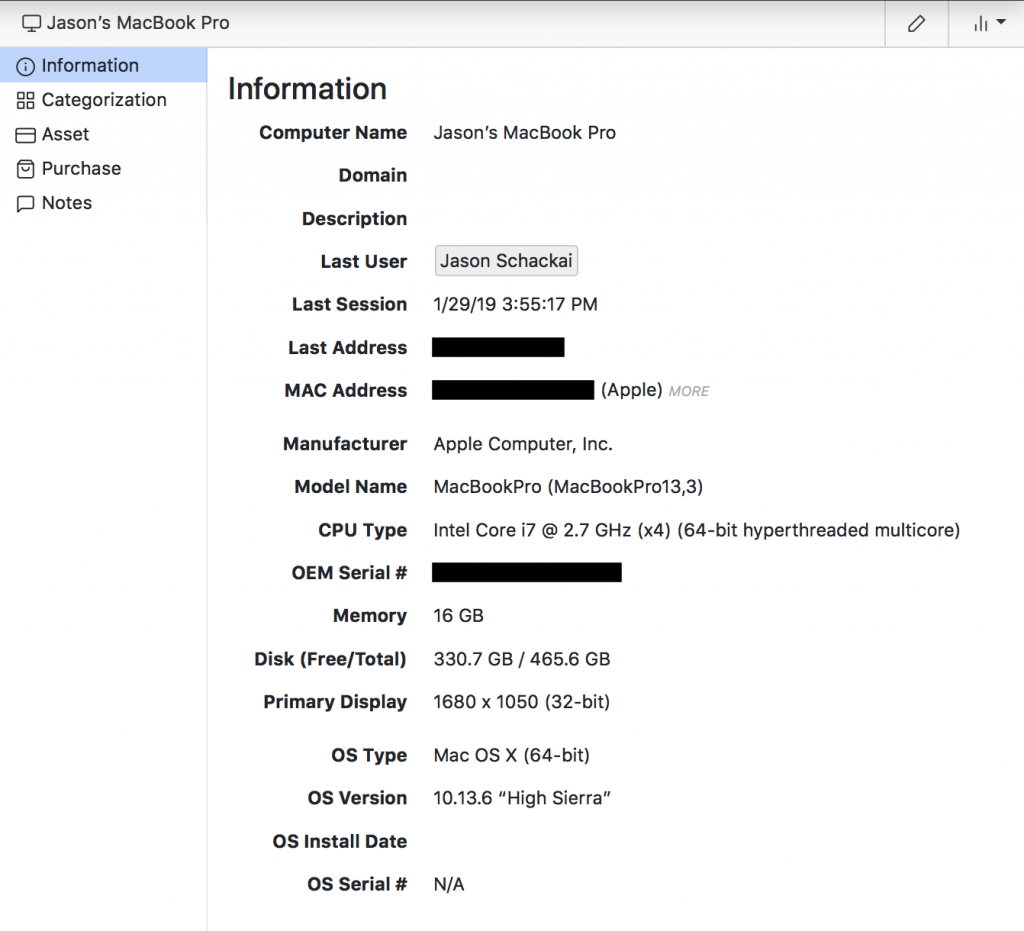
The Sassafras client (KeyAccess) automatically gathers details for each Windows, Mac, and Linux computer and/or server. Processor type and speed, RAM capacity, disk size, free space, and more than 50 additional attributes are automatically discovered. Another 20 or so non-discoverable fields are available for additional asset management data, such as owner, department, etc., while 10 more fields are set aside for custom needs. Data can be easily imported into any of these fields from a csv file, and available javascript plugins make many operations–like purchase and warranty date lookups for Dell and Lenovo computers–automatic and easy. Note that if you import into an automatically populated field, the imported data will likely be overwritten the next time the computer logs in.
Importing Computer Asset Data
Some fields, such as Asset ID fields and data in the 10 optional Custom fields, cannot be discovered automatically by the KeyAccess client (though they can be “pushed” by the client per the instructions here). Data can be hand entered into these fields manually of course, but did you know that you can also import data into these fields from a spreadsheet/csv file? For more information about this simple procedure, click here.
Lifecycle Stage
The Lifecycle Stage dropdown allows you to set each computer’s current stage manually, selecting from the following list:
- Deployed
- Maintenance
- Retired
- Ordered
- Acquired
- Stocked
- Missing
- Disposed
- Salvaged
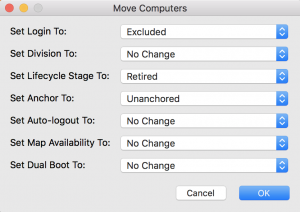
You can change the Lifecycle stage for many computers at once by selecting the computers in the Computers window in KeyConfigure and running either the Change Lifecycle Stage javascript or the Move Computers javascript, either of which can be installed from the Manage Scripts window in KeyConfigure (File > Manage Scripts). If you have a list of computers in a text file, and you need an easy way to “select” them without having to manually find and CMD- or CTRL-click each one in the Computers Window, the List Computers javascript can help. Once installed, simply select it from the Tasks menu in KeyConfigure, browse to the text file that contains your computer list, and click OK. A new window will open containing all computers with matching names. You can then easily select all of the computers from this window, right-click and run one of the scripts mentioned above.
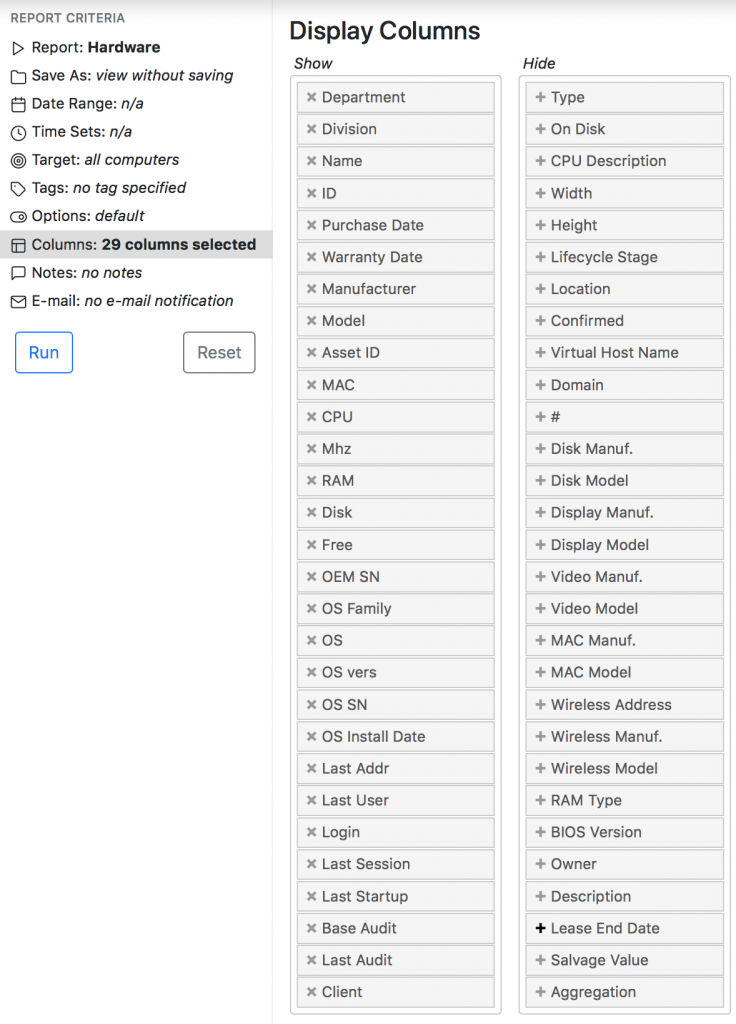
Hardware Report
In addition to login and software usage reports, a versatile report for pulling hardware data is the customizable Hardware Report (Reports > Miscellaneous > Hardware in KeyConfigure). This report contains 59 of the most important hardware fields, and can be customized to include only the columns you need. Target specific computers or divisions by dragging into the Target panel in KeyConfigure. In KeyReporter, target a specific computer group with the filter next to the search bar. The hardware report is a great way to pull specific details out of the system into an excel spreadsheet or text file for further data analysis.
Missing Clients Report
The Missing Clients report (Reports > Miscellaneous > Missing Clients), queries Active Directory for a list of computers, and then presents the list of those known to AD, which don’t have a corresponding record in KeyServer. It’s a great way to track down computers that don’t have KeyAccess installed or configured properly.
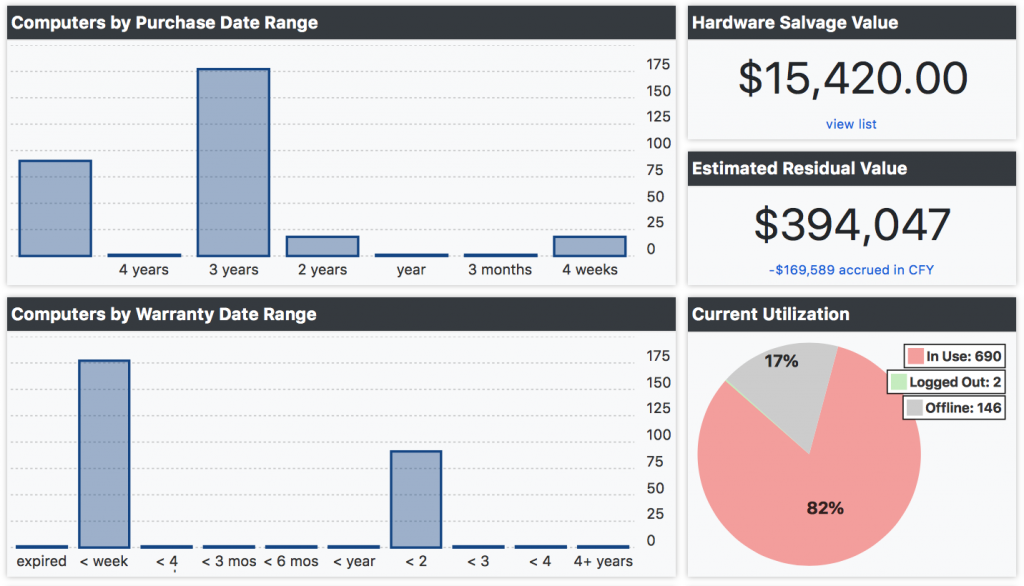
Hardware Purchase Records
Purchase records can now be created and associated with hardware as well as software. In addition to the obvious record-keeping use case, the data also helps to populate a number of dashboard hardware widgets (see image below). After a hardware purchase has been created, simply drag the computer (or printer) selection to the appropriate Purchase record, to associate the computer(s) with the correct purchase. Use the List Computers script mentioned above for easy computer selection. Once the computers have been added to the purchase, you can see the full list by clicking on the Computers button in the Rights and Conditions panel in the purchase record in KeyConfigure. From within each Computer record, you can also find the associated purchase from within the Purchase pane. Although you can locate the purchase record with the Find Purchase Widget in the KeyReporter web interface, you can’t get to the full computer list from there as of the time of this writing.
Printers and PaperCut Integration
The printers database was added to the KeyServer platform because many admins requested the ability to manage printer hardware alongside computer records in KeyServer. Printers can be added in one of three ways.
- Automatically with our official PaperCut printer management integration
- By import from a csv file
- Manual entry in either KeyReporter or KeyConfigure
In addition to automatically populating printer details, our PaperCut integration also maintains live printer status information that can be presented on lab and classroom floorplans in our Maps functionality.
Status information can also be retrieved directly without PaperCut, via direct IPP communication with the printers themselves. If you don’t have PaperCut, this approach works whether printers are imported or entered manually. Imports are done from a csv file, in exactly the same manner as computers and purchase records, discussed above.
KeyReporter Web Interface
The web interface provides a number of ways to consume and visualize hardware asset data. In particular, dashboard widgets and One-click reports give you direct access to hardware stats with easy-to-digest charts and graphs that can be clicked for more granular “raw” data, that can then be exported to Excel, text, xml, or pdf files. With the filter icon next to the search bar, you can even scope the entire page to specific computer groups, updating all of the widgets and reports instantly.
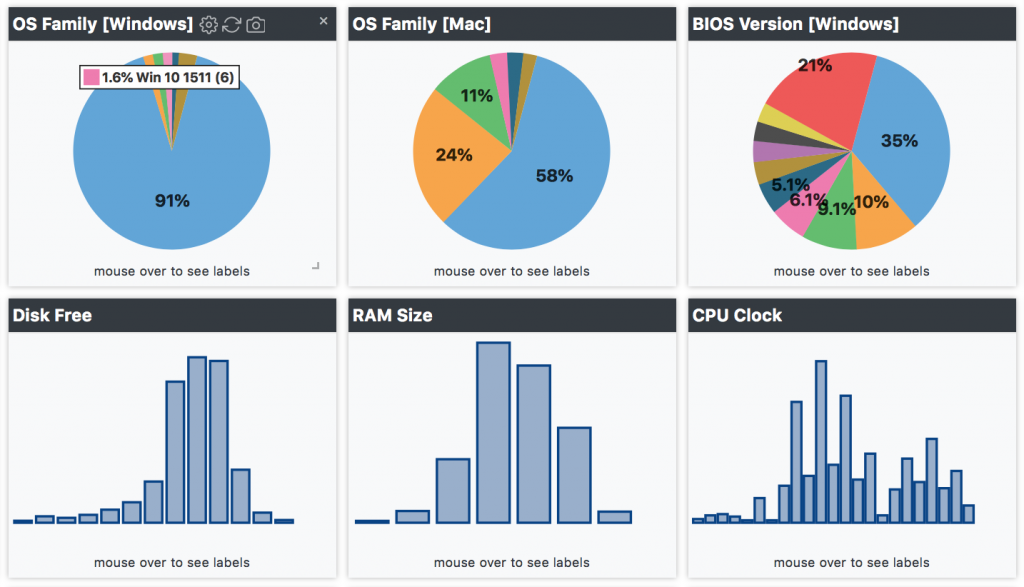
Hardware Property Widget
For example, the “Hardware Property” widget allows you to select from a list of over 30 hardware properties, and breaks down your computer groups into groups that share similar attributes. Hover over each bar or pie slice for details, or click for raw data. All six of the widgets below are actually the same widget with a different property selected for each.
Retiring Hardware
When managing hardware in any system, it’s good to understand how to retire and/or remove computer and printer records without deleting useful historical usage stats. The fact that a computer is no longer on your network doesn’t necessarily mean you won’t want access to the login or software usage data associated with it. At the same time, you don’t want retired hardware filling up your KeyServer Divisions and throwing off computer counts and other data.
Assuming you haven’t changed the Computer ID Type from MAC Address (the default) to Computer Name, the steps for retiring hardware are pretty straightforward. In most cases, you won’t want to immediately delete retired computers, because once a record is gone, you can’t report on it. So, if you think you might need usage or login data associated with old computer records, step one is don’t delete them. Instead, move them to the Dormant or Excluded login type (to free up their KeyServer seats), and then move them to another computer Division (to keep computer counts accurate), and change the Lifecycle Stage to Retired or Salvaged. Note that you can do all of this at once with the Move Computers script.
As long as the records exist, you can access the login and usage data with various reports. However, once computers have been moved from one division to another, the usage data associated with old computers will move with it. So, how do you make sure Division-based login and/or usage reports contain data for computers that are no longer in the target division?
If you run a Division-based report, such as Logins (DIV x comp) using default options, divisions are just treated as “buckets” and the data in the report will contain usage information for all computers currently in the division across the entire time period of the report, regardless of where the computers were when the usage was recorded. Computers that are no longer in the division will not be included in the report, even if they were there during part of the selected date range.
Luckily, there is a way to include login and usage data for computers that have been moved into different divisions. In the Options panel of many reports, you will find an option to “Use Division from usage event.” With this option checked, KeyServer will scan the usage database itself for entries that include the targeted division(s), instead of simply treating the Division as a list of computers and running the report on only that list.
Service Management Integrations
If you have TeamDynamix or ServiceNow, you may already be using one of those tools to manage your hardware inventory. That doesn’t mean you can’t take advantage of Sassafras automatically gathered, highly accurate hardware asset data, however. Our official service management integrations with TeamDynamix and Service Now (coming soon) allow you to not only to create records automatically, syncing hardware details and software installations, but to keep them up to date over time.
Conclusion
If you’re not already using Sassafras AllSight for hardware asset management, I hope the information here encourages you to consider it. From purchase records and asset tracking to lifecycle management and service management integrations, AllSight provides all the tools you need to track and manage computer and printer hardware from cradle to grave.

Subscribe
Subscribe:
Follow:


 See K2 First-hand:
Follow: