

With the popularity (necessity) of remote access in recent months, our customers have faced numerous challenges. Sassafras added remote links to availability maps before remote mandates started, and has been constantly adding and improving related features. We get a lot of questions about what is standard or recommended or what other customers do. The answer is, every organization is different. However, there are common considerations and high level examples that can help you make the right decision for your environment. Here we’ll explore these various use cases and options, and some related topics. Buckle up, this isn’t a quick discussion!
Open to Guests
The first and easiest option is allowing open guest access to the web UI. By default in 7.7 guests can see maps, but allowing remote access is optional. If you upgraded from 7.6 or earlier, remote access should be enabled (to maintain behavior from earlier versions). If you have a fresh 7.7 install, you will need to add the Remote Connection Role to the KeyReporter Guest account. Next you simply open access through any firewalls from the world to the Sassafras Web UI. While very easy and convenient, it does pose some security concerns. All data in the guest view is then open to anyone in the world, and the web service is an exposed vector to possible attacks. In addition, for the remote links to work seamlessly you would need to have RDP/VNC/etc open to your workstations from the world. That tends to be even more concerning. This leads us to the second option.
VPN
If you have a VPN, it’s probably a good idea to use it. If the Sassafras Web Service is behind VPN, then step one is get on the VPN. After that you’re simply in the above Guest scenario. The system is open to casual browsing, but only because you’re on the VPN. You can then remote connect to workstations because you’re on the VPN (i.e. firewalls allow RDP from VPN pool). One stop shop for all your security concerns. But what if you don’t have a VPN or enough licenses to go around?
Members Only
This is where setup gets more interesting. At this level there is no public access, you must authenticate to the Web UI to see anything. If you disable the KeyReporter Guest account (easily done with a slider in 7.7 in Settings – Accounts, or the traditional method in KeyConfigure – Admin Access – uncheck Enabled on the account) the default page load is the login screen. But what happens once you log in? An easy mechanism for this was added in 7.7 by way of the Community preset account. This is the same functionality as guest, and you can simply default all unknown logins to this account. Previous methods as documented here will still work but require more steps.
A couple points of clarity here:
– All authentication of this nature is handled in Admin Authentication / Settings – Accounts. Don’t let the name fool you, it’s not just for admin level users. This is a catch all for logging in to the Web and/or KeyConfigure.
– “Unknown” means there is no absolute reference to the account via a group correlation to a role or existing account in our software. It does not mean any random set of credentials. Users must have a valid login to the authentication system configured.
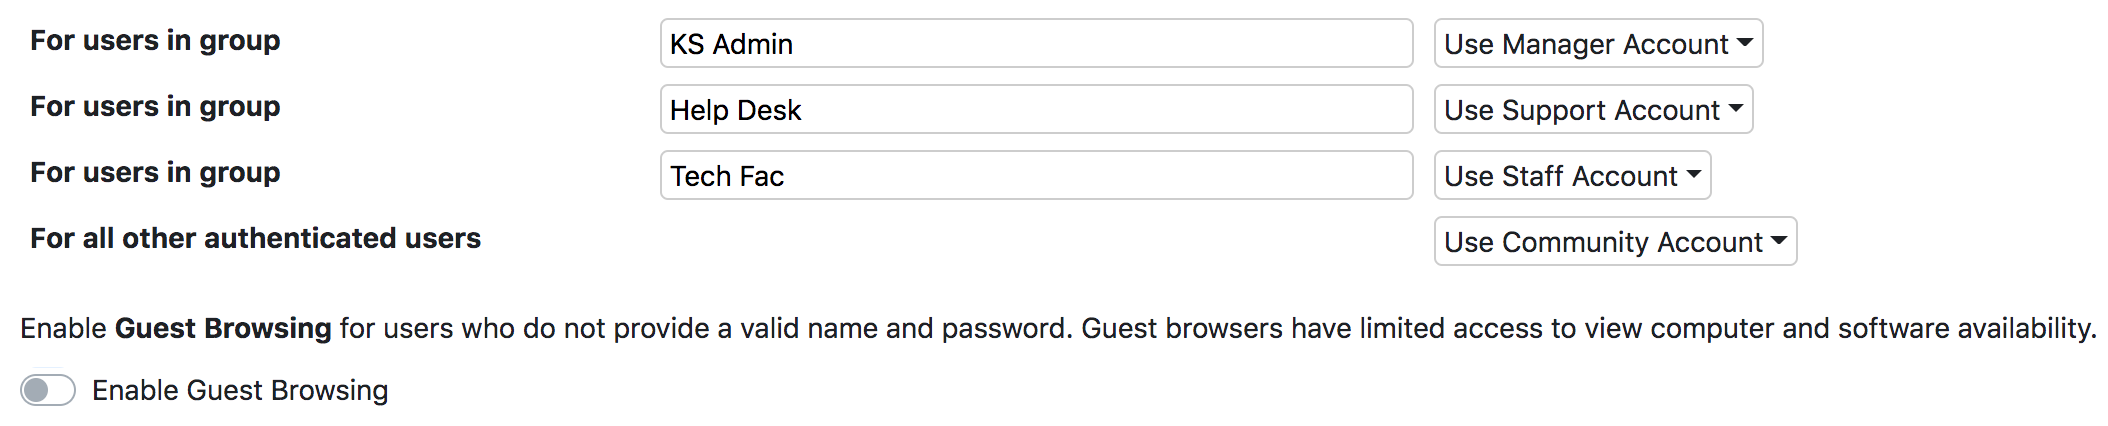
Note this screenshot is the Web UI under Settings – Accounts and makes it easy to manage both aspects we’re discussing above. You can do this in KeyConfigure using the Config – Admin Authentication window coupled with the aforementioned Enabled option in the KeyReporter Guest account in Admin Access. We have added many options and configuration settings to the Web UI, but they are still in the old places in KeyConfigure as well. Remember this dual nature as we go through more details in this post.
So, what this means is you can simply turn on Active Directory and everyone who authenticates gets Community access. You can then specify a group for Manager access, which has full admin rights. Additionally 7.7 brings the ability to use Azure and Gsuite authentication for even more options.
Side of Guacamole
In 7.7 we added the ability to use a Guacamole broker server, which provides an in browser remote session for RDP and VNC. That’s right, no client application, no file downloads. This gains you several benefits over traditional connections:
– No file downloads for RDP. The problem with files is that someone can just open it days later rather than checking for a currently open computer. That system could now be in use by someone else, which causes issues.
– Streamline VNC to Mac. Screen sharing by default needs a local account to make the connection, followed by OS login (usually a network account), so the experience can be confusing if not technically challenging.
– Seamless in browser experience with no need for client side files or applications.
– Security of a single connection point. Instead of needing the firewalls to allow access to your whole VPN pool to access the workstations, it can just allow connection from the Guacamole server.
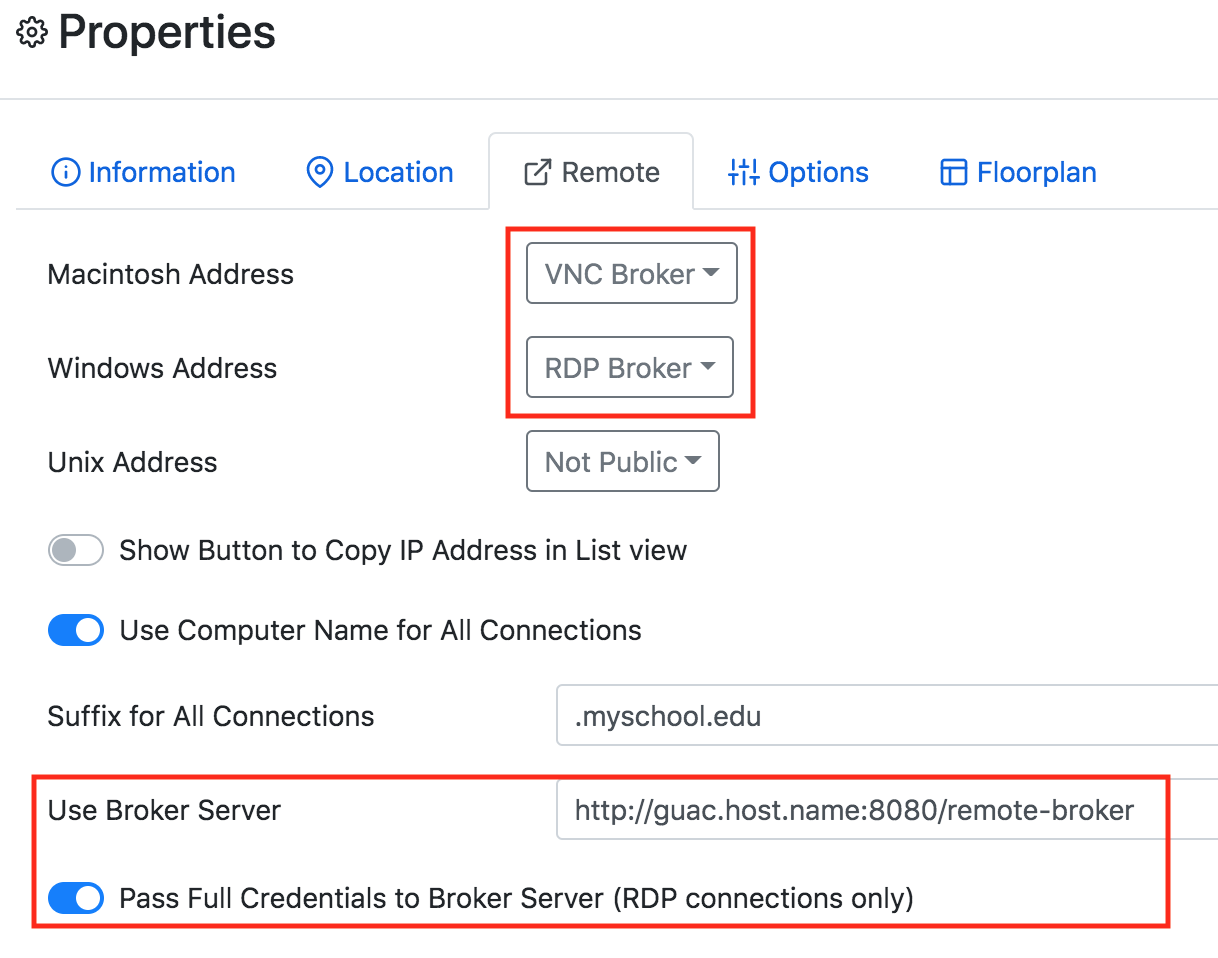
Optimally you layer this behind VPN or Required Web Authentication, but at the very least it’s better than open Guest. In an ideal configuration, the user logs in to the Sassafras Web UI, clicks on a computer, and is taken directly to the remote desktop. No further login needed because all credentials are passed to the broker and on to the workstation, all of which are bound to the same directory.
Other Scenarios
One customer is using a Citrix environment in a similar manner to the Guacamole broker (shout out with permission to Fermin Romero at SUNY Broome Community College). Because that environment has an AD authenticated Web UI, it was already operational and serving virtual applications to the community. They added an “application” that was simply the Sassafras Web page for their list of remote computers. Clicking the RDP link in this setting pulls down the file in the Citrix environment and launches it there. This means there is no local file download, and no easy access to the old download files. It also means users are already inside the secure walls of the organization and simply remote over to the workstations.
The question of VNC with Mac systems is frequent. Screen Sharing wants to use one account to connect to the machine, and another potentially to log in. The former can be automated in a Guacamole setup (above), or in customizing a connection type (see below). One customer published a blog on how to tie it in to AD authentication.
Reframe the Situation
A very popular aspect of the Sassafras Web UI is that it can be easily embedded in other sites. This allows you to completely customize the user experience by using an existing website and design aesthetic and putting out content in an iframe. Instead of navigating through another site, you can simply embed the list of Divisions or even individual lists of Computers on another page. With 7.7, there is a quick connect button in the Floorplan list view (Map Set page) that will attempt to connect you to any available computer in that group. Because our web system is handling the requests, there would be no collision of requests as there might be with users clicking on individual computers in a lab.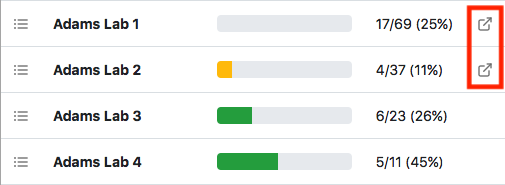
Follow Protocols
The Remote options have expanded rapidly in the last few months. We started with just RDP, quickly added VNC, and then expanded to include RGS and now Splashtop, NoMachine, and the Guacamole broker. This has led to a more modular design under the hood which allows greater customization. In fact, it’s entirely possible to add your own protocol at this point! The only criteria is a standard connection pattern using known data (like name, ip, MAC) in either url or file template form. It is important to note this is all because we do not handle the connections directly. Sassafras is not a broker itself per se, nor do we in any way add a new remote protocol. In every case we are simply handing off to a 3rd party, be it standard like RDP or custom like Splashtop. The connection is direct from the user’s machine to the workstation or connection mechanism (broker, cloud service) and does not go through the Sassafras Server. Keep this topology in mind when designing your Firewall rules.

Another question that comes up about Mac systems is given the limitations of VNC are there other connection options. This question is what has led to the addition of Splashtop and NoMachine support based on customer requests. We’re aware of an open source xRDP option for Mac, but reports from those who tried it are not encouraging when it comes to performance. Feel free to test in your environment!
Customs Check
A lot of customization options have been added over time as well. Initially it was simply on or off. Today we have a rich assortment of options for remote connections, both in the UI and at the file level. The latter has already been touched on, but let’s outline all the things that are available, and why you might use them.
Name vs IP
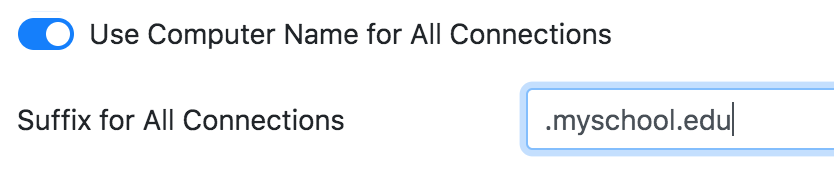
Many sites are concerned about the security of their IP addresses, or they just want a more friendly view for users. The Remote functionality uses the IP by default, but you can easily set it to use Name instead. Often you then want to set the suffix as well so the connection uses an FQDN. Note this can be customized per Floorplan so there is great flexibility here.
Availability Type
New in 7.7 is the ability to set per Computer how it should be available. You can edit a computer record in the Web UI or in KeyConfigure and modify this under the Categorization pane. This allows you to mark some computers for Physical use only, so despite being in a Floorplan that has Remote enabled, they will not show a Connect link. You can also prioritize machines by using Remote, or Both. When using the “connect to any computer” button, we’ll pick from those machines set to Remote only first, then fall back on the ones marked for either. You can even mark a computer to not be displayed at all.
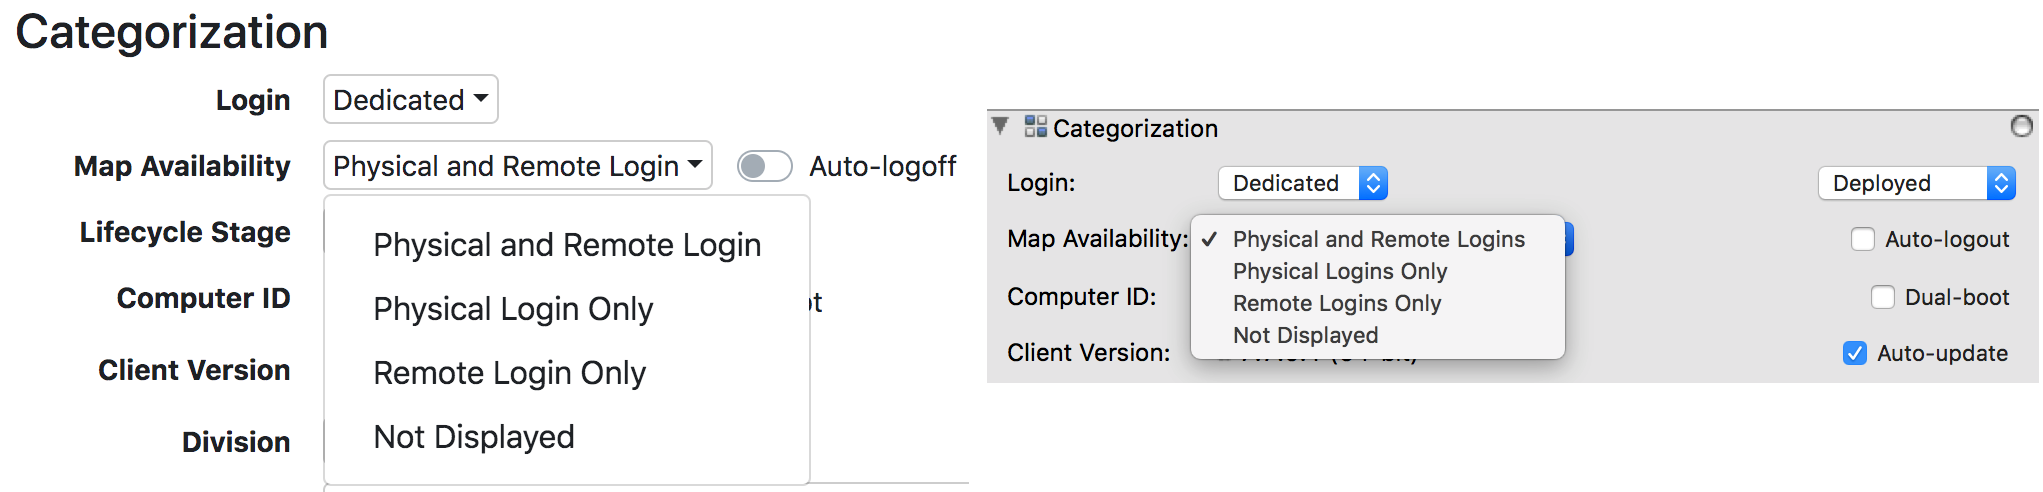
Note this does NOT affect physical logins. That is, a computer marked for Remote Only is not going to stop someone from logging in physically in the room. To manage that, we advise using Group Policy on Windows systems and limiting local vs remote login rights by AD group. The latter can be leveraged with schedules in Task Scheduler as well for more complex availability controls.
Auto Logoff
A common problem with remote connections is the user will simply close the connection rather than logging off on the remote machine. This leaves the computer in use on your maps and no one else can use it. While there are idle policies that can be set in GPO for RDP, we added a feature to help deal with this. By setting this feature on, after 3 minutes of a disconnected remote session the KeyAccess agent will trigger a logoff if the local OS session. This option can be seen right beside the availability option in the above screenshots. You can use an Admin Script in KeyConfigure to set this in bulk on Computers. Not familiar with our Admin Scripts? Check them out in KeyConfigure – File – Manage Scripts. The Move Computer script can be used to apply bulk changes of several attributes at once to selected computers. Very handy!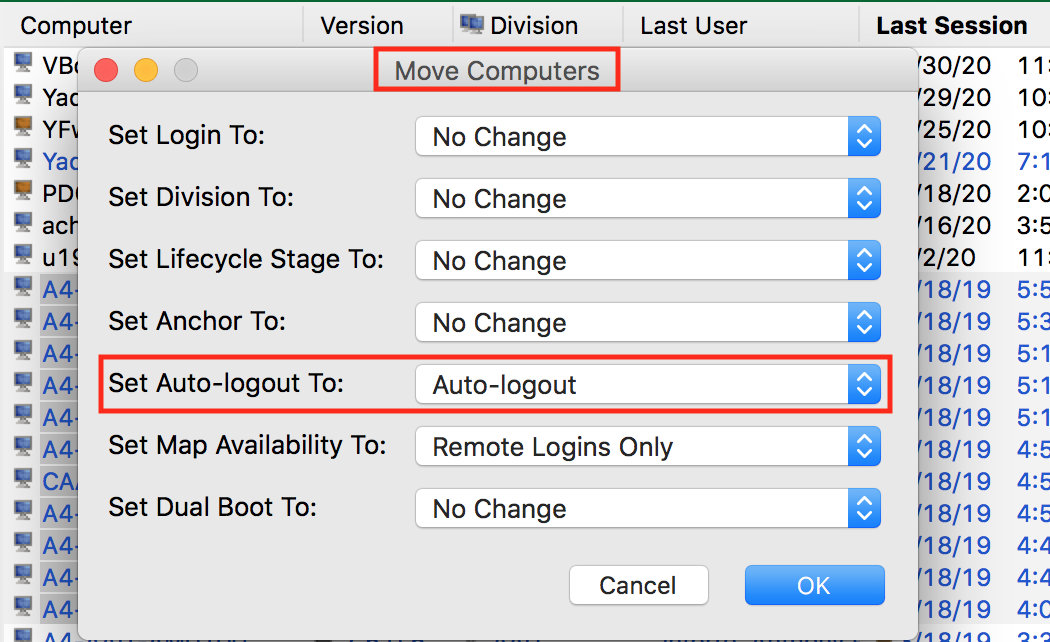
Reservations Please
The ability to set Reserved time periods for a division was added several versions ago. This allowed a location to be prominently displayed as reserved without being closed and therefore disabling the links. To enhance this, in 7.7 we changed the “For” field to check against AD groups. You can set that field so only members of the group entered will be allowed a connection when they click the link. You can then use the “Display As” field to set what the header will show since AD group name may not be clear to the public.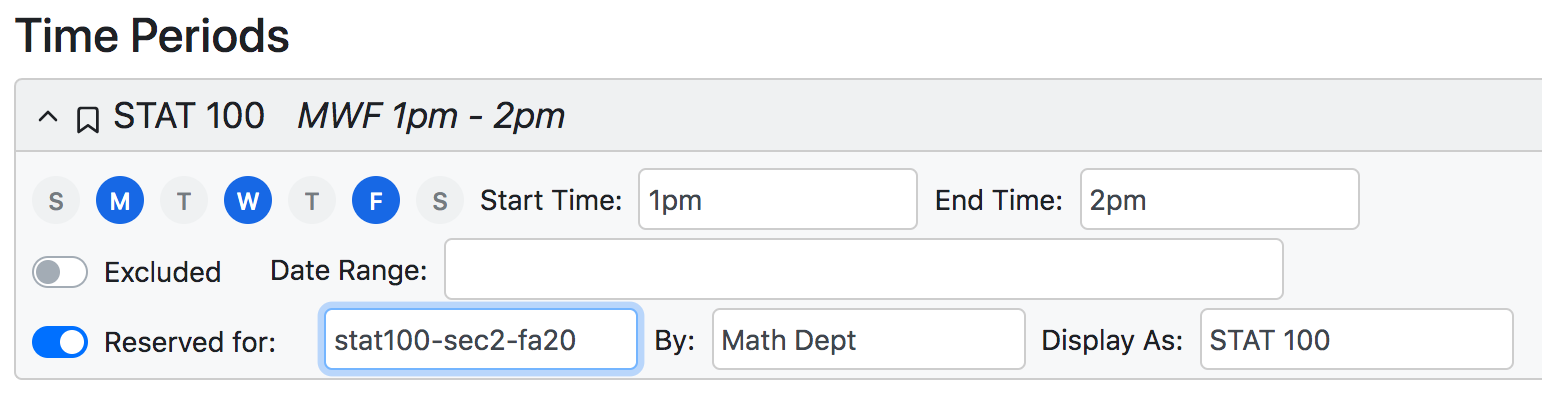
Templates
Previously if you wanted to customize what was in the rdp file download you modified the connect.rdp file in the override folder. That still works, but there are now even more options. Each connection type in the remote options has a distinct html file that defines the popup text for that connection as well as what action is taken. If the action is a file download, it contains the template code to create the file. You can therefore customize both the helper text and the file result in one location now. It also means there is more flexibility:
– You can still have an override file referenced in the html file. This means you can override an override, or not. Why?
– Because you can add options to the options. That is, by cloning the rdp file for example and giving it unique identifier information, it becomes a new option instead of overriding the default option. This means you could have different RDP settings per location all individually configured. It also means some could allow the override rdp file and some might not. The granularity (much like this blog post by now) is almost confusing!
– Never mind the file contents, this also means each lab could have a different popup message when connecting to machines.
– You can also customize the downloaded file name. Some customers prefer files use the computer name rather than all say Connect.rdp. You could use different names for each lab location as the default file name as an example.
Why edit the templates? The most common request is to add an RDP Gateway to the file. You may want to add a default drive mount or other default like printer redirection. One site had a lab that was not using domain authentication but rather local accounts and wanted the login to default to contain the computer name. Anything you can specify in an RDP connection can be put in the file just like saving a template from Remote Desktop Connection. Similarly the other file based protocols have options you might want to use to customize the experience.
Since this does involve modifying files and some potential complexity, we encourage you to talk through your needs with Support to ensure the best outcome.
Other Functionality
Can you Hold please?
Another quality of life feature added in 7.7 is the connection hold. When a user clicks on the Connect link, they get a temporary hold on that machine. It may still show Available while they are connecting, but it ensures there is not a collision a minute later. The hold is immediate and prevents another user from trying to connect to that “available” machine. The hold is also in place on disconnect. This ensures in the event of a network issue the user has a few minutes to reconnect without someone stealing the computer from them.
Tag you’re it!
The default way to create Map Sets is by Divisions. You can create multiple map sets and only create and publish the floorplans you want on each one. As Admin you see all of the divisions, but the public only sees what is published. So you can break locations out into departments, campuses, offices, etc as needed. But what if that’s not enough? Maybe you already had all your division based maps in place before COVID made life interesting and you don’t want to change those. Maybe your server is using AD mapping for Divisions and you don’t want to shuffle the AD or override it locally. Enter Tags.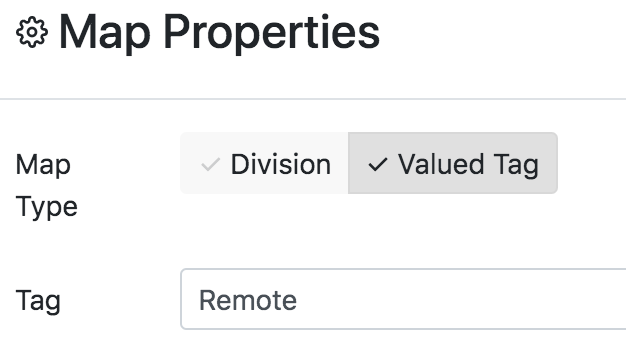
While a computer can only be in one Division, it can be in many Tags. Map Sets can be made based on Tags. End result? Say you take 50% of the computers in 4 divisions and tag them for Remote use. You then make a Map Set for that tag. Presto, all those computers from those other locations are in one big list in a few seconds. Second you say? Yep, once you know the process you can use an admin script to bulk tag the machines and with a few clicks have a list floorplan in place.
Software Availability
A closely related topic is that of customizing the Software list. Nothing to do with Remote connections per se, but given they may be looking for certain software it’s relevant. We get asked a lot about this, and it’s quite easy. Anything on the Software page, or in the popup when you click a Computer, is based on the Product Audits. If we found a Program, and that Program is in a Product, we’ll show it. Want to hide things like security software and utilities and non-public (on a faculty machine but not in labs) software? Simple. If you edit any Product in KeyConfigure or the Web, you’ll see under the Contact section is a checkbox for show on availability maps. If you turn it off, it will be hidden instantly. In 7.7 you can also manage this in the Manage page in the Web under Software via the one column of checkboxes. However, note that this targets Families and can take an audit cycle to affect the Editions. But, the quick list of visible items is very handy for reference.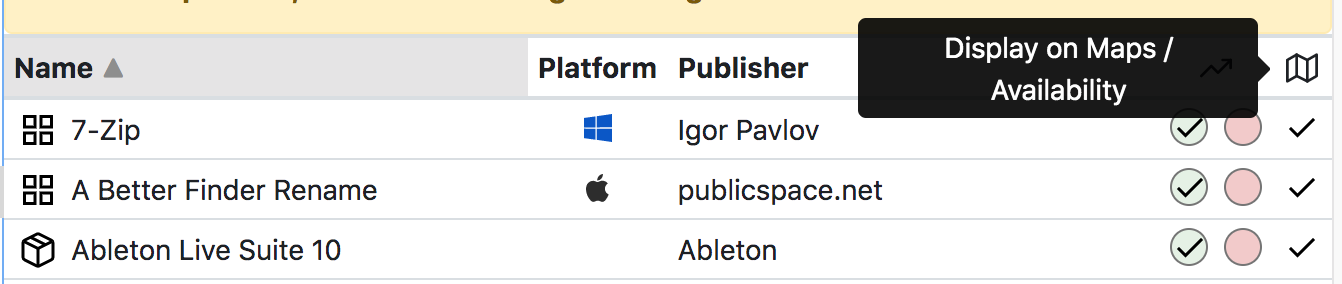
A common question is about adding icons to manually created Products. Sorry, not yet 😉
Also common is how to change things in suites, like Adobe apps. Some times this is making Photoshop show as Creative Cloud, some times it’s to show all the apps instead of the suite. In either case, find what you want to not show in the Products in KeyConfigure and move it to Ignored. In the next Audit, we’ll find a new Product to associate to the install and the list will update. Note that you have to consider what you want to show in the Web against what you have in Policies and Purchases. You could easily find these things at odds, and you’ll have to decide which function is more important. As always, we’re happy to discuss to help this choice.
In Person Only
An option was added recently to Policies that requires a local login. With that option enabled, the managed Product will not be permitted to launch if we detect a remote session. This can be important if a certain software license specifically says it can only be used physically and not remotely.
Putting it all together…
Remember at the beginning when I mentioned there is no best practice and every site is different? Hopefully now it’s clear why this is the case. All of these options can be combined in a rich assortment of ways. Ultimately the question is what do YOU want your environment to look like? What is the best experience for the users? What resources do you have to throw at the question? Sassafras Support is happy to discuss your needs and advise on a solution. Today’s landscape is all about creative problem solving, and we can clarify all these details to make sense in your setting. But here are a few thoughts from real customer situations:
I need different people to see different things!
Ok, how about…
- Use Map Sets to break out computers to different tabs named for Departments. Each tab shows the Divisions for that area. Visual demarkation only of course, but you could use the Reserved time periods to create permanent reservations too.
- If that’s not enough, you can set the Public option on a Map Set to off while the Division(s) under it are on. Then you can’t just browse to the lab, you need to know the special URL. This can be emailed out to the group in question.
- Still want more? Ok, no problem. Clone the Public Role to new roles named for the groups of students. Link those to AD groups. Set unknown logins to Determine Access on Demand. This means we don’t default unknown logins anymore, so make sure this fits the use case. It also means we don’t create accounts to clutter the Admin Access window. End result is that each person gets a specific role/group as needed. These roles/groups can be set in the ACLs of Divisions to have view access or not. It may be a lot of setup, but the user has a robust role based unique experience of the Web UI.
- Too complicated? Only need 2 special groups? Ok back it off a level. Clone the Community account, set a couple AD groups to use those clones in the Admin Access configuration, and set the ACLs for those accounts. Same idea as point 3, but not quite as involved.
All that clear as mud? Great! Contact Support and we’ll be happy to walk through all the details. The take away should be there are many options and we can probably do what you are looking for.
I want to totally customize what users see!
Ok, that’s going to depend on exactly what you want, but…
- For starters, you may want to look at the Embedding information above. While we have a robust Web UI, some sites would rather just use our elements in their own website.
- We have a REST API so you can pull information and really build your own UI. This may take all the Remote capability out of the picture however.
- How about setting up the Dashboard? There is a rich array of Widgets. They can include Maps. They can even include iframes of other internal and external content. Be careful with raw html disrupting the main page code, but you can get pretty fancy.
- Already using AD groups and logins? Each group/shared account/ or even individual account can have a unique Dashboard. Once again if you’re not afraid of the work, there are plenty of options.
- Side note, if you missed us adding the Info tab on Floorplans a few versions back, check it out! Using the markdown editor you can add any descriptive information, images, links, etc that help users understand the particulars of that location.
You’re still here?
Gold star for reading the whole thing! I warned you it was going to be a long ride. If you have any questions please feel free to contact Support and we’ll be happy to help make sense of all this! Hopefully this brought up some ideas if not answered some questions.
Until next time!
Subscribe
Subscribe:
Follow:


 See K2 First-hand:
Follow: