
Though availability maps have been around since the 7.2 version of KeyServer, we’ve found that many K2 administrators either still aren’t aware of them, or they just aren’t sure where to start when it comes to implementing them. Therefore, we’ve put together the video above to help you get going. If you’d prefer to read through the instructions, the same information in text form is written out below.
Computer and Software availability maps in KeyServer are easy to set up and implement, but because each lab must be set up one by one, the process of building out all your labs still may require a time investment. The solution is simple: break the process into manageable chunks, work through them one step at a time, oh, and just get started. Once you get the first map finished–in possibly less than an hour–the rest will come together much faster.
Prerequisites
Before we dig too deeply into set up and configuration, however, let’s talk for a minute about a few simple prerequisites.
- Ideally you’ll want to be fully up-to-date, because the newest version includes some useful enhancements and bug fixes. Heat maps, for example, weren’t added until 7.4. Availability maps were first introduced in the 7.2 build, so you’ll need to be there at a minimum.
- Secondly, you need to make sure KeyReporter is up and running on your KeyServer. Simply go to the Config Menu, click on “KeyReporter Settings,” and then check the KeyReporter Status area. If it’s not running, just click the Start button to get it going.
- Finally, you’ll want to make sure you’ve set up Computer Divisions in KeyConfigure, and that they are accurate and up to date. Availability maps are based on the divisions created here, so this is a critical step. Divisions can be set up through AD integration, Filters with Actions or “Rules,” or created manually by drag and drop. Be sure your divisions include all active machines, and that any old hardware has been set to “Retired” status or moved to the “Uncategorized” Division, so they don’t show up on your maps.
Set Up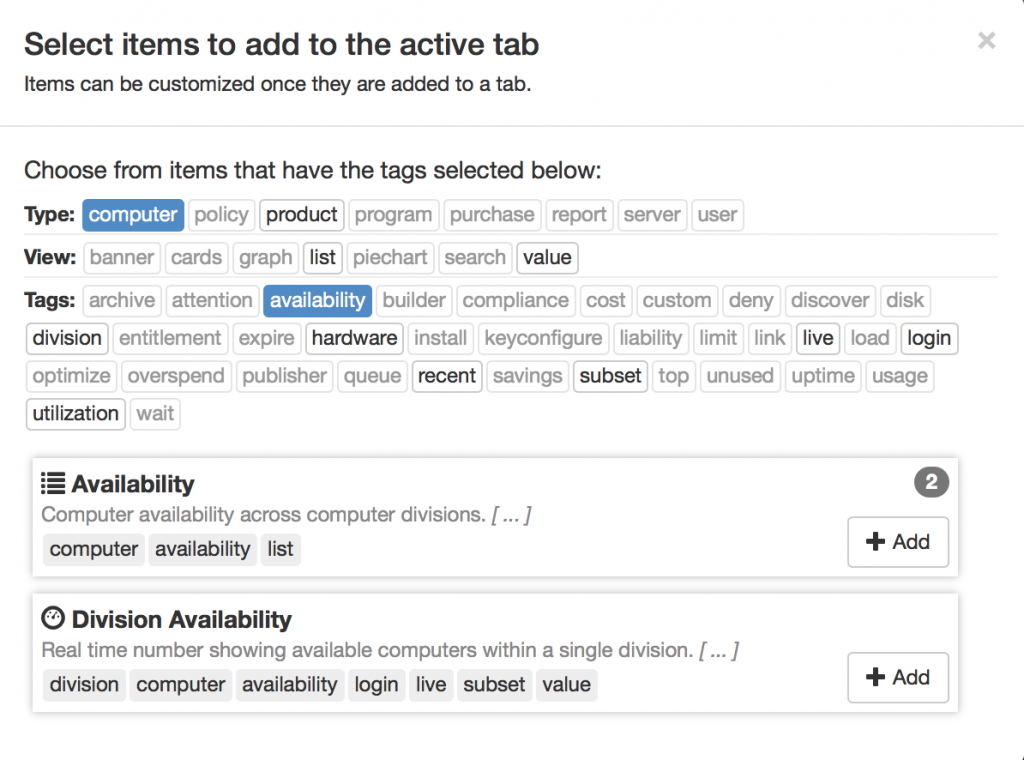
Assuming you’re up-to-date and your Divisions are in order, let’s walk through the steps of building out a map.
- Log into KeyReporter with Administrative privileges and add the Availability widget to the dashboard by clicking the + button, selecting Computer as the Type and Availability as the Tag, and then just click the + Add button to place the widget on your dashboard.
- With the widget added to your Dashboard, while logged in as an admin, you should see a list off all of your computer Divisions, whether or not a map has been set up for them. Guest users will only see Divisions that have maps. Click on the name of the Division you would like to start with to enter the default map page for the selected Division.
- Click the Edit button (Pencil icon). Do you already have a background/floor plan image to upload, or do you want to build your room using the built in drawing tools? If you have the image, make sure the resolution is no more than about 1024 pixels wide. KeyReporter does not have the ability to auto-resize background images just yet. If you have a background image, you can skip to step 5; If you are going to build your map with KeyReporter’s drawing tools, proceed to step 4.
- If you don’t have an image of your lab and you’d like to construct a background manually, click the “Add Box” button below the Division name, and use the Properties table that appears on the right to edit the color, outline, orientation, and other properties. Boxes can be used to represent desks or tables, and the shape can be changed using the bracket in the bottom right corner. The shape of the floorpan can also be changed this way. Repeat this for each desk, table, or other object in the room.
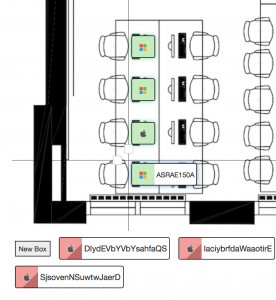
- If you have a CAD drawing in a PNG or GIF format, just drag it to the “drop GIF or PNG” box to add it as the new background. Be aware that the image will not automatically resize, so you’ll need to upload the image with the right resolution from the start.
- Once the room is set up the way you want it, simply drag the computer icons into place. The selector at the top allows you to change the size of the icon, so if you are designing a particularly large lab with a lot of computers, it might make sense to use the smaller icons.
- Shift-click to multi select, then align by clicking the button on either the horizontal or vertical alignment tool. With one or more computers selected and the shift key pressed, arrow keys nudge.
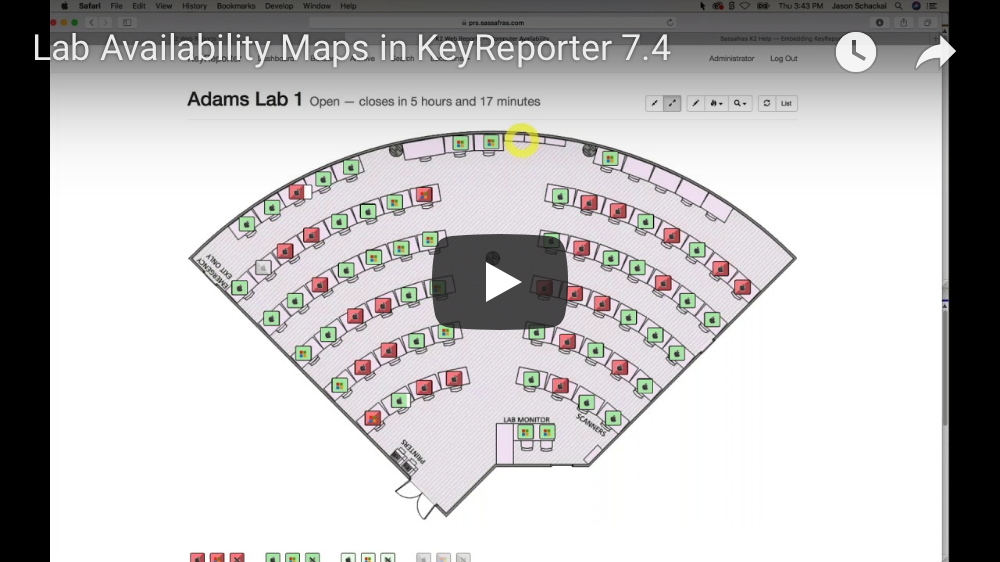
That’s all there is to it. Hours will be displayed on the map page when they have been set, but they cannot be managed directly from within KeyReporter. Instead, select the Time Sets menu item from the Windows menu in KeyConfigure, right-click and choose “New Time Set.” Name your new time set using the Division name of a lab. Then right-click in the Time Set Details window to create a New Time Period, and save. Since the name of the Time Set matches your lab, KeyReporter will automatically display the lab open and closed times at the top of its Availability Map.
Just like all of the other widgets and reports in KeyReporter, all of your lab maps can easily be embedded into external web pages accessible from anywhere, making it easy to display lab availability on Electronic Signage, Informational Kiosks, or on a dedicated page on the university’s website or intranet by using the code snippet and instructions found at this link: https://www.sassafras.com/hrl/7.4/kr_embed.html
The availability widget can also be limited to a single section, such as a specific building, department, or campus – which can be useful for a kiosk or sign. Availability Maps in KeyReporter are easy and quick to set up and use. If you get through the process of creating your first map today, you’ll demonstrate it to your colleagues in less than an hour. If you have any additional questions or need additional assistance, please contact us at support@sassafras.com.

Subscribe
Subscribe:
Follow:


 See K2 First-hand:
Follow: