Web UI Settings Page
The Settings page in the Web UI has settings for both the Web UI and overall server functionality (replicating many settings found in KeyConfigure). It also contains an Information page that lists important details of your server, including the license Serial and Seat count, server Version, Host, and Platform. This is useful information when working with support.
Note that there are Web Service Settings in KeyConfigure under the Config menu as well. These are the same as those in the Network section of this page. Printer settings and many other items are also found in KeyConfigure.
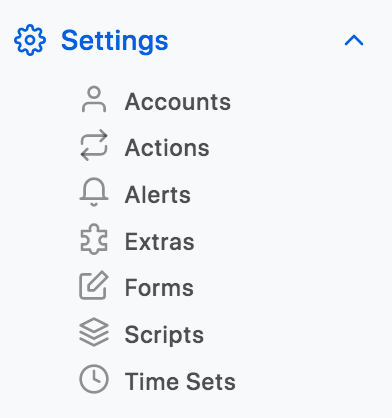
Main Items
These items are sub navigation options in the main navigation sidebar. These are shown when you click the ^ triangle next to Settings.
Accounts
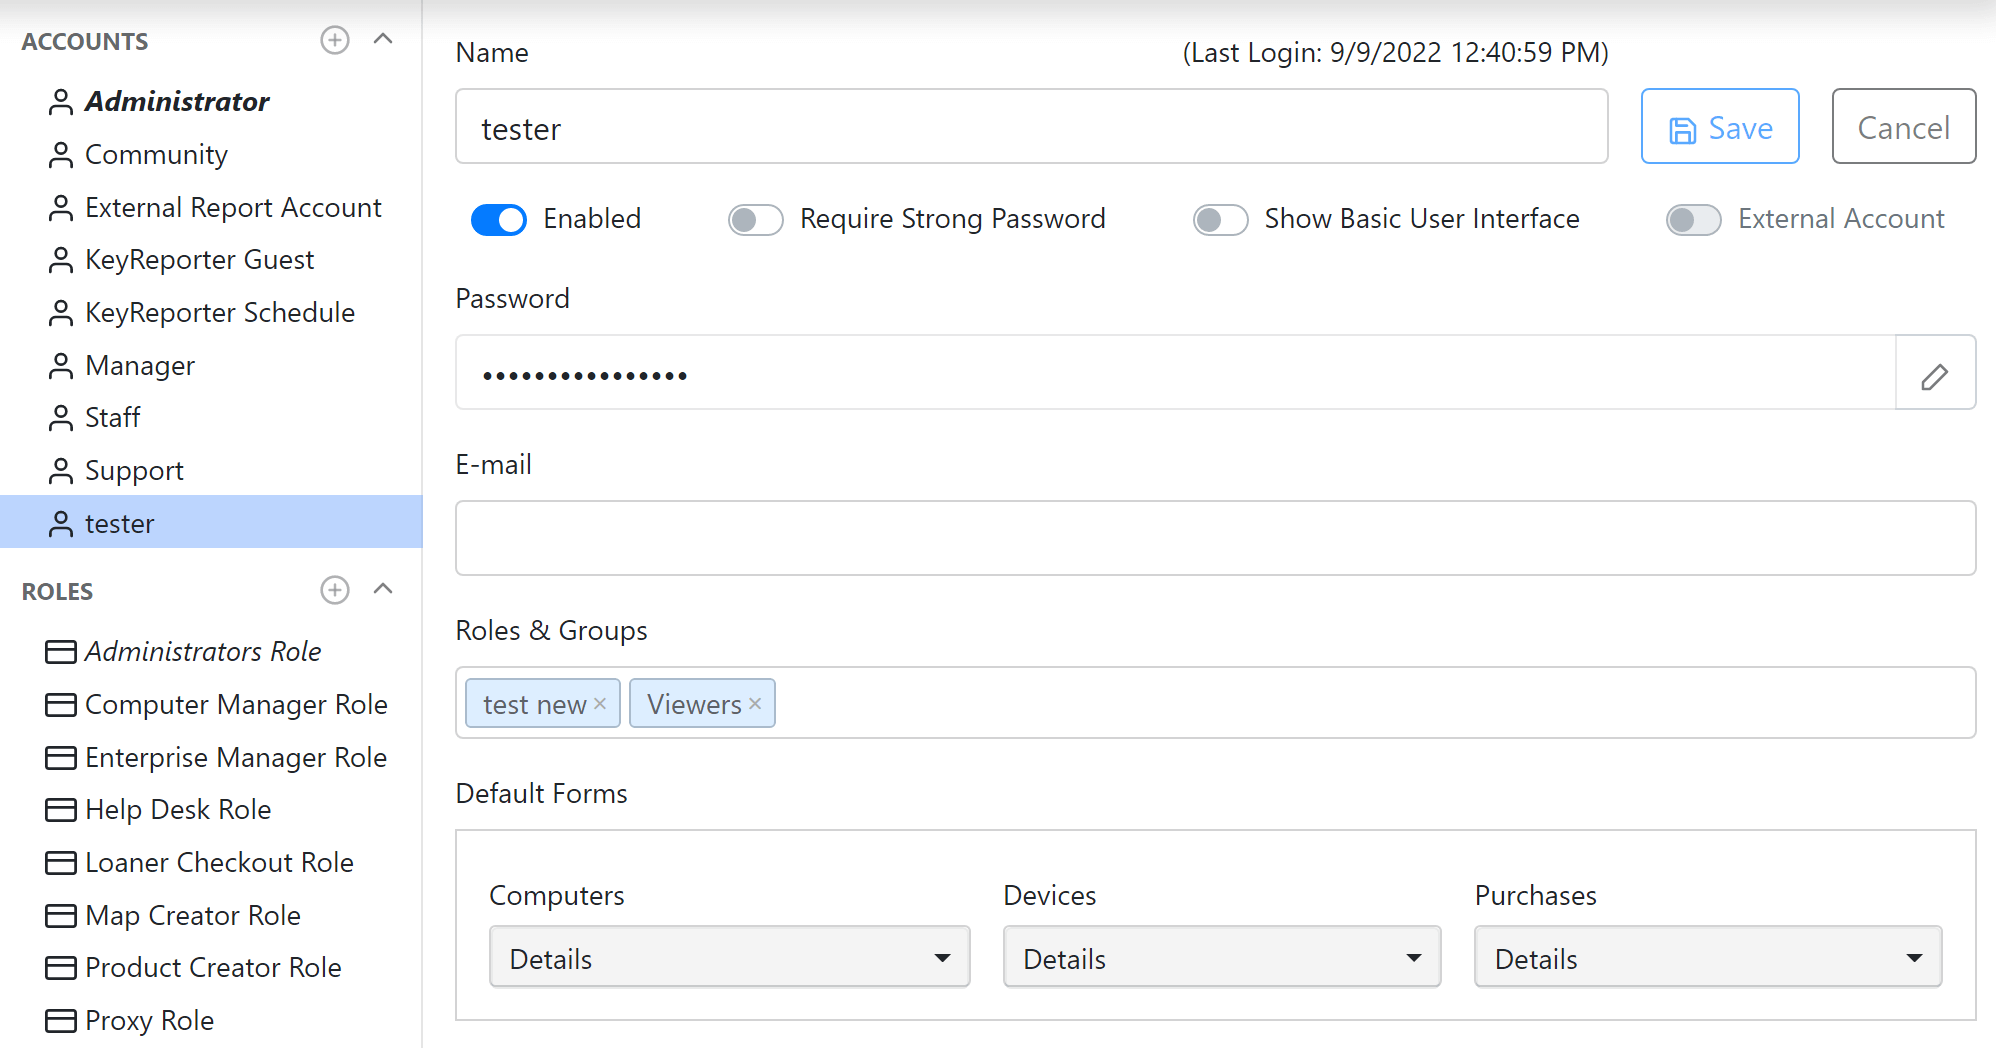
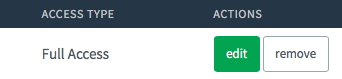
The equivalent of the Admin Access window in KeyConfigure, this page is used to manage privileged Accounts, Roles, and Groups. Note that the concept of Permissions is very deep and often best explored with a member of our Support team when working at the enterprise level.
- The left side sub navigation has three sub sections: Accounts, Roles, and Groups. Roles grant Privilege, Groups grant Access. In order to have Permission to a thing, you need both privilege and access. This complexity allows very granular federated rights.
- Roles and Groups are assigned to Accounts by drag and drop. They can also be automated by way of an External Authentication system and group membership therein.
- You can right click on an account/role/group to access a context menu to Delete items or Duplicate them.
- Making the divider between the sub navigation and main pane wide enough will show details like if an item is built-in or linked to an External Group.
Accounts
Selecting an Account will show the details for that account.
- The Name of the account is what is used to log in.
- If an account is set to External then the Password is disabled and not relevant.
- The email address is optional and for reference only.
- Default Section is used in complex access rights settings to assume where a resource is created if the account has access to multiple Groups.
- Default Forms can be assigned to set the view of various record types to a custom alternate from the normal Details view.
The Privileges section shows what the result of the assigned Roles is. These are additive. They can not be edited at the account level.
Roles
Roles can be linked to External Groups in a directory system. This allows for automatic granting of a Role to an external group member at login. The details of this can be slightly more complicated than that statement, and you're encouraged to talk with Support as needed to set this up.
The Privileges are the core of the permissions management in the platform, with Access rights being a secondary item when granularity is needed. Each sub section of this list has many items related to that data type or grouping of concepts. Note you can not modify any built-in Role, but you can Duplicate it as a starting point for customizations. Several items can be unclear as to their impact and importance when you are not familiar with the nuances of the platform. Again we encourage you to test any role and consult with Support as needed. A few such items are listed here:
- Under Settings: View Division Sepearator, View Default Purchase Currency, View System User Names, View Computer ID Settings. These all tend to be fundamental in some way, even if the users is only doing things like viewing purchase records (and being able to see the currency). They are not strictly required but lacking them can cause odd experiences.
- KeyReporter Privileges control the Web UI experience specifically, regardless of other settings. For example, if you lack View Computer List Page, then it doesn't matter that you have full Computer Privileges, you still can't see the computer page at all.
- Similarly, everything in the Web uses our API. So while not immediately obvious, Inspect and Modify objects via REST API are needed for red and write ability of any kind respectively.
- Forms and Scripts have individual rights to Use them vs View the list pages of them.
Groups
There are only two build in Groups: Editors and Viewers. These grant view and/or edit access accordingly. Using this simplifies the Permissions structure to using the Role as the final say in what an account can see and do. Granular Access is only needed if you want to limit privilege to sub sets of objects like Computers or Purchases. When you create Sections, a Group is automatically created to manage the access rights on that Section.
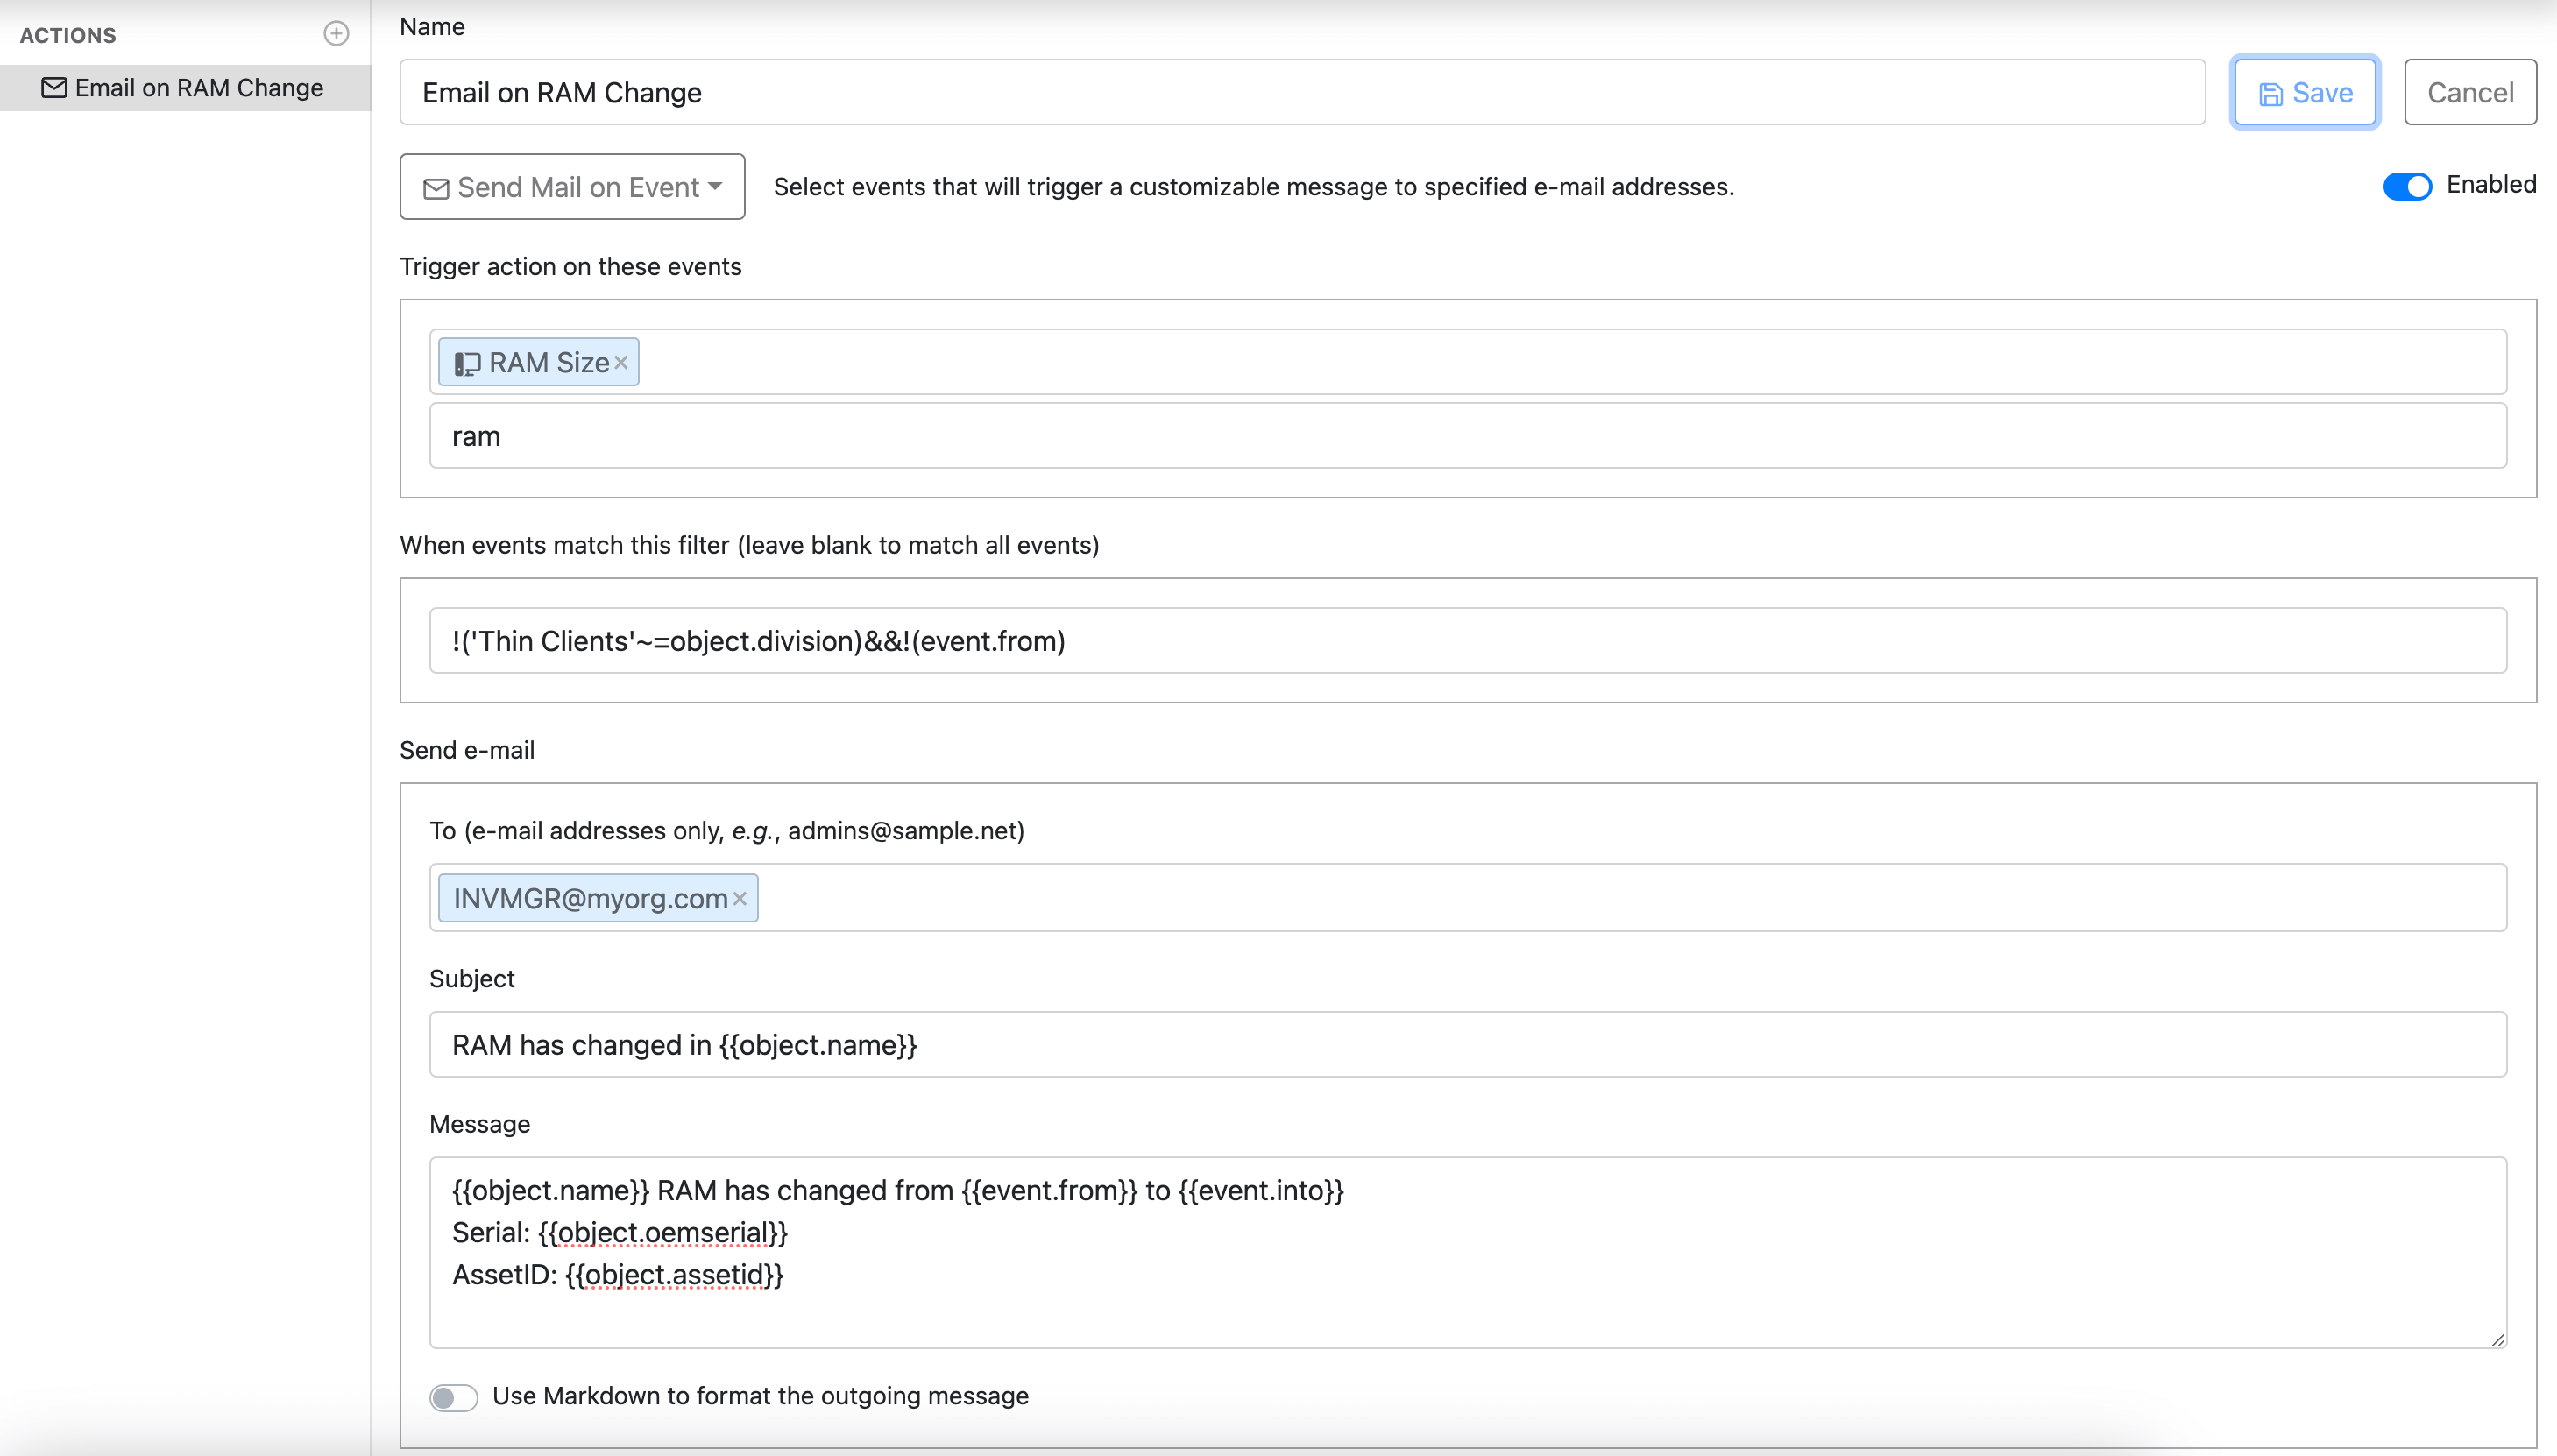
Actions
Actions allow you to build various kinds of automations. These can be very powerful, and therefore possibly dangerous if you were to accidentally create an infinite loop of conditions between two actions, or flood someone's email with system changes. Be sure to test your Actions and consider their conditions carefully.
There are 3 basic Types of Actions, each of which will offer different conditions for creating them.
- Send Mail on Event - As indicated, this will send an email when something occurs. For example, if the amount of RAM changes in any computer, send an alert, provided it is not in a divison that contains "Thin Clients" and is not getting RAM data for the first time. Macros can be used to populate data in the email subject and message.
- now (all action types)
- connection (Mail, Webhook)
- mail (Mail)
- event (all action types)
- object (all action types, when event has a subjectid/subjecttype)
- Call a Webhook - Use this to make a call to an external system to make a change based on an event in the KeyServer. For example (purely hypothetical), when a computer is moved to Dormant, call on another web based system to remove the computer from your DNS system.
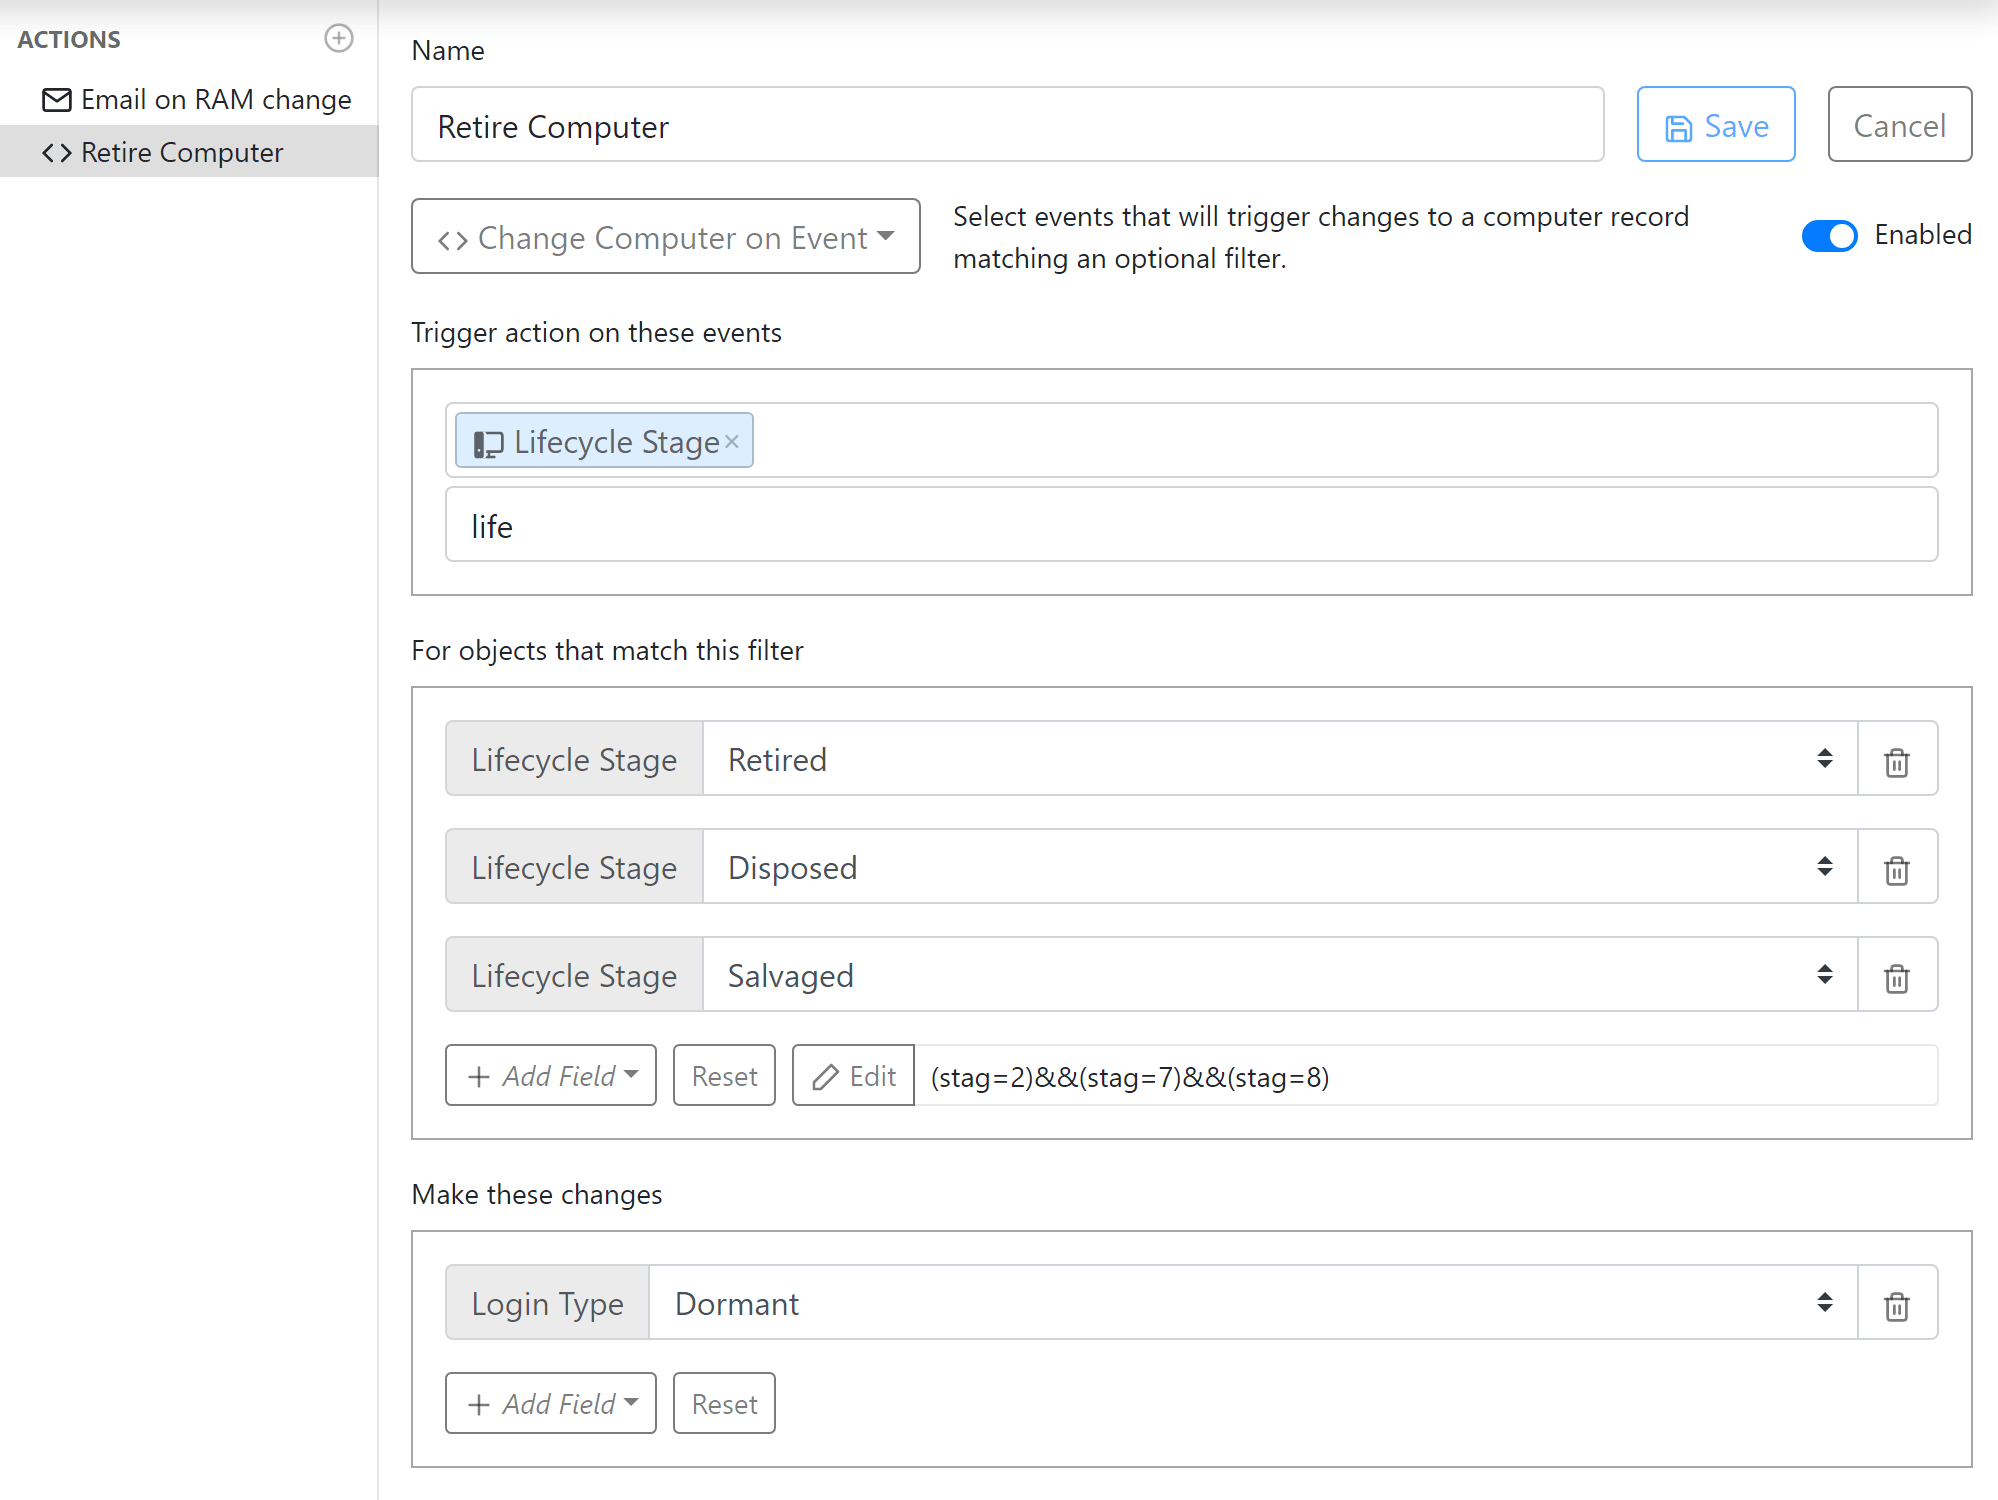
- Change Computer/Device on Event - Based on one property change, make another property change. For example if a computer is moved to the Disposed Life Stage, also move it to a Dormant Login status.
- Change actions have a visual filter builder that is the same as what you see when building a Filter on the Computers or Devices pages. This allows for each field selection, logical operator choice, and variable editing.
- Email actions on the other hand are special. It is a purely manual method that goes back to making Filters in KeyConfigure. However, instead of using the field names from the Tables documentation, use the Macros as shown below (do NOT include the braces). Note you can also use a macro by itself to test for "truth" of that condition. For example, (event.from) tests to see if there is a from value on the event, so you could filter out all events where it's the initial population of the field by the client and only trigger on change.
Click here for available Macros in Actions.
Actions can customize their results using macros that change depending on the details of the trigger event. Macros are enclosed in double braces and can be placed within most fields of the action. For example, to embed the current date, use {{now.date}}
There are five macro groups. The specific macros that are available depend on the type of action, as indicated below.
Now Group
Return the current date information in a given format.
now.datetime (2022-09-25 20:01:52)
now.date (2022-09-25)
now.time (20:01:52)
now.iso (2022-09-25T20:01:52-0400)
now.rfc (Sun, 25 Sep 2022 20:01:52 -0400)
now.day (Sunday)
now.month (September)
now.unix (1664150512)
Connection Group
connection.host
connection.server
connection.version
connection.admin
connection.section
connection.weburl
Mail Group
mail.from
mail.recipients
mail.date
mail.uuid
Event Group
Information related to the event that is triggering the action.
Computer / Device History (event.class = trail)
event.class
event.instance
event.when
event.subjecttype
event.subjectid
event.subjectname
event.hexid
event.txtid
event.what
event.from
event.into
Admin Journal (event.class = journal)
event.class
event.instance
event.latest
event.when
event.what
event.code
event.subjecttype
event.subjectid
event.subjectname
event.hexid
event.txtid
event.topicid
event.count
event.admin
event.comment
event.notes
event.level
event.committed
event.repealed
event.multiple
event.failure
event.agentless
event.resolvable
event.dateonly
event.deadline
event.sectionid
event.resolved.when
event.resolved.result
event.resolved.admin
Usage Log (event.class = usage)
event.class
event.instance
event.when
event.what
event.reason
event.duration
event.othertime
event.foreground
event.count
event.gmtoffset
event.flags
event.closed
event.tunnel
event.authed
event.remote
event.mobile
event.address
event.expansion
event.user
event.client
event.program
event.product
event.family
event.policy
event.computer
event.division
Signals (event.class = signal)
Used when triggering an action from a Signal in a Form.
event.class
event.instance
event.when
event.what
event.code
event.label
event.subjecttype
event.subjectid
event.subjectname
event.hexid
event.txtid
event.admin
event.description (Signal Message in Form)
Object Group
object.fieldname
(full object per subjecttype/subjectid of event)
For a list of fields see the Tables Documentation. Note the special case of object.division which will operation the division Name rather than the ID. Note you must use the full field name that appears after 'computer' for example, not a short name from the database. That is, to get the last session time for example you'd use object.lastlogin.
As of 8.0.0.5 you can also reference linked tables. This takes the example syntax of {{object.owner:user.email}} (i.e. object.fieldname:linkedtable.fieldname) which in this case would return the email address of the User that is in the Owner field of the Computer record that is the Object of the triggered Action.
Examples
An example of using these might be an email for alerting you when a Division is deleted from the system:
{{event.subjecttype}} {{event.subjectname}} deleted by {{event.admin}} at {{event.when}}
This would yield: "division a-test.layer2 deleted by Yadin at 2022-10-11 12:44:23" for example.
Triggers
The Trigger is what kicks off the Action. Events can be the change of a computer property, or a certain type of Journal entry being created. As of 8.0.0.4 these can also be Signals as set in Forms. A Signal uses the syntax sgnl.form.fill.signalname where the signal name is optional and set in the Form Properties. If you do not specify the signalname then the Action will triger on ANY form save event where Signal on Save is enabled.
Filters
You can create filter criteria on Actions. These differ based on the type of action:
Alerts
Use this screen to configure the Alert actions for various system events. For more details see Alerts in KeyConfigure.
Extras
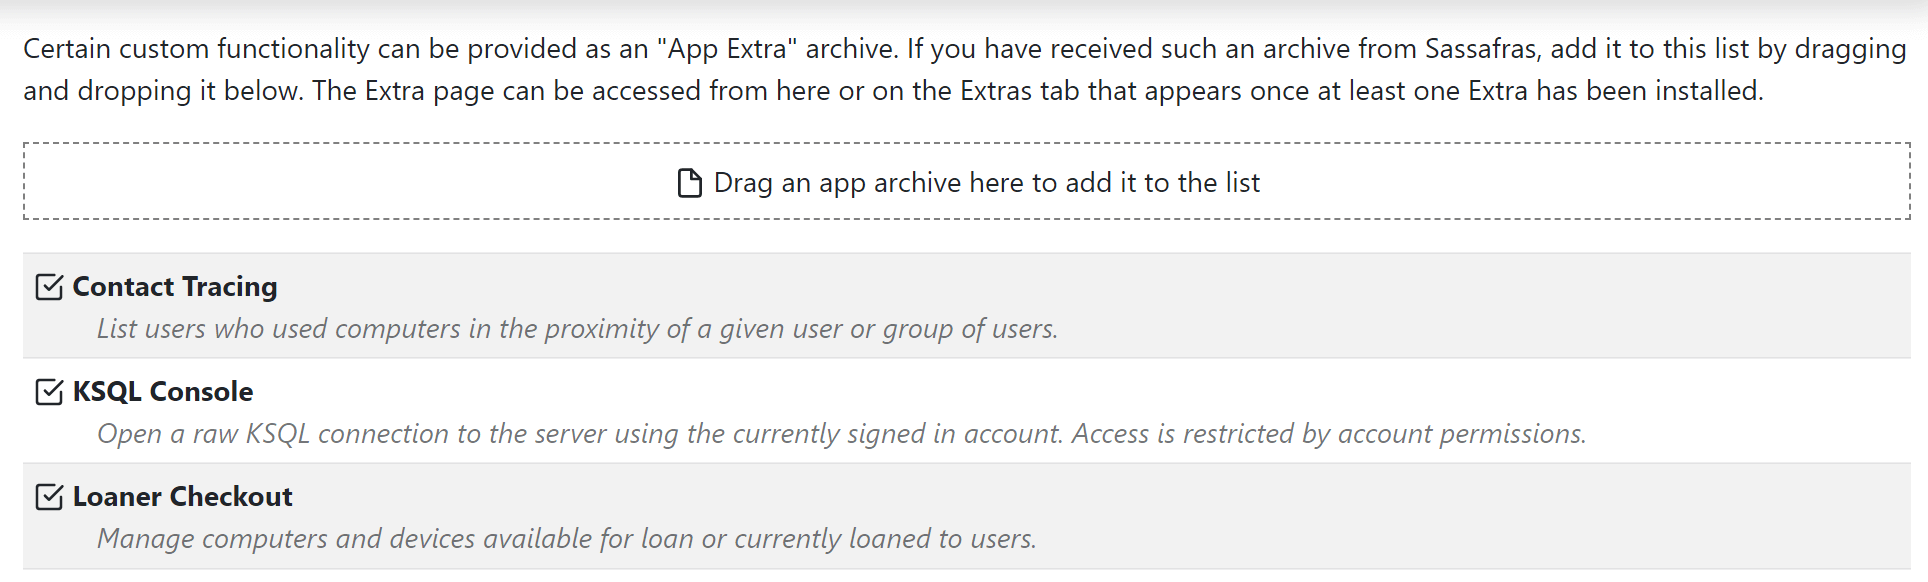
This is used for activating extra plugins supplied with the platform, as well as adding custom modules developed by Sassafras. Simply check the box of an Extra to enable it, or drag in the custom bundle supplied by Sassafras. Reload your browser to see the Extra main navigation item, which has a dashboard style layout.
Forms
Forms allow you to customize the detail view of objects. This includes Computers, Devices, and Purchases. You can then assign a Form to an Account as the default view. For example, you can have a tech or workstudy that has a more simple view of asset fields rather than the full list of all panes and attributes you normally see. By stripping out fields they are not concerned with, and putting all items that are important from different panes into a single view, it can make rapid update of asset records during physical inventory much smoother. It also allows you to add custom fields that do not appear in asset records at all, be they informational text or external reference links.
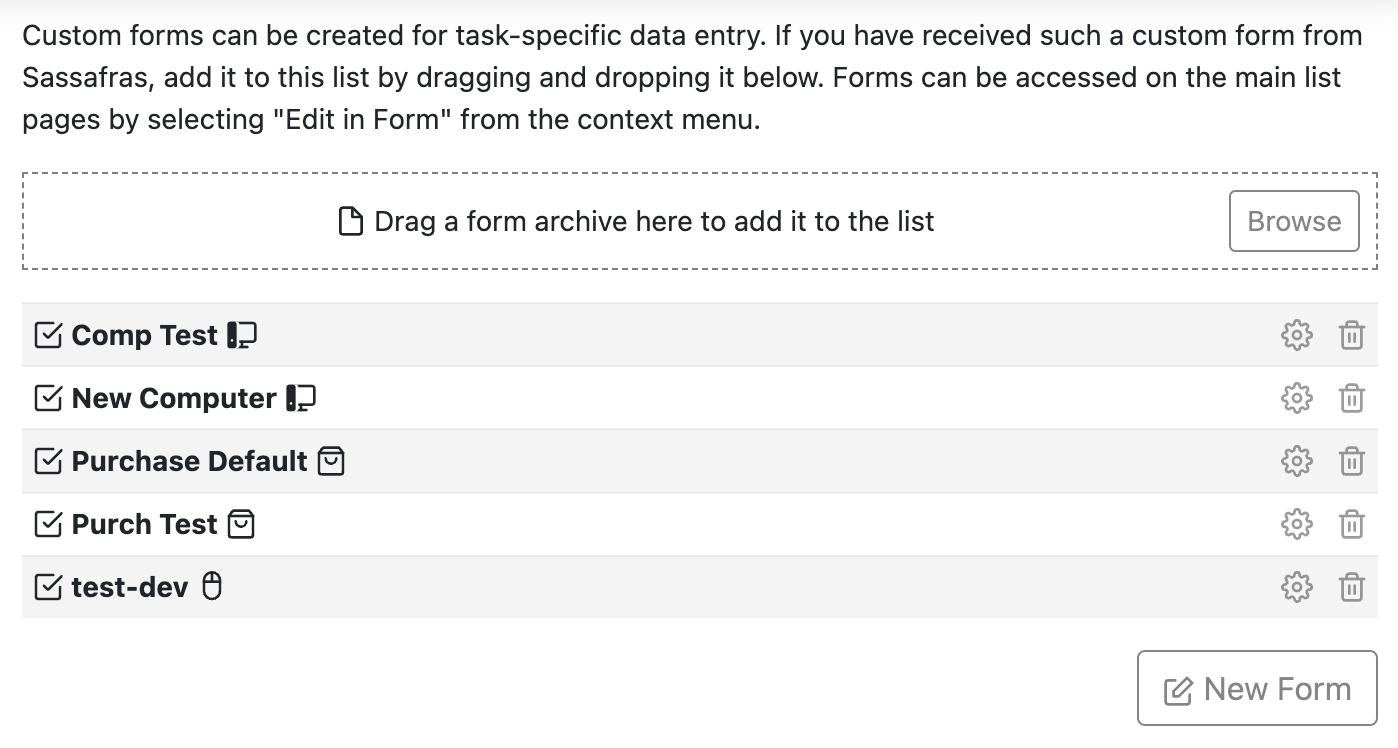
Forms List
The main page when you click Forms shows a list of all forms in the system. Each row has the following:
Form Properties
Form Editor
When you click a form or make a New Form, you are taken to the editor. The top left tab has the form Name and gear to configure select Properties. There is always at least one Tab in a form. You can configure the name of the tab but this is not important unless you have multiple tabs (one tab does not show). Each tab can contain whatever elements desired. Elements can be dragged from the right hand list and dropped into the tab space as desired.
There are 3 sections of elements that are line separated. The 3rd section are the fields for the table Type set in the form Properties. The first two sections are formatting elements you can add to create more robust layouts. Every element you add to the form has a gear to configure its properties, and an x to delete the element. You can drag and drop elements on the form to rearrange them. The Properties of these formatting elements differ by element type, and are different from the Table element properties.
You can change the Label of a table element which effectively allows you to rename the field on the form. For example, you could change Cost Center to Budget Number. This does not change the actual field name in the platform, it only renames it on this one form. You can also mark fields as Required if you insist them have a value when the record is edited, or Read-only if you don't want the field to be modified via the form.
Special Elements
There are certain elements in certain form types that require clarification or have very specific use cases. Contact Support if you have questions, but here are some examples and details for novel use cases.
When using a User form for the Loaner Checkout Extra, you may want to include a few special elements. The Signature field for example will take the input from the checkout extra and include it in the PDF of the form that is emailed to the user. Inherently a User form only includes User elements, but you'll likely want to include Computer and Device information on the checkout form. You can use the List element for this. When you configure this element, set the Field to hardware (only usable field thus far), and the Descriptions to Equipment: [{{icon}}] {{name}}. This will display an Equipment list that iterates all items in the checkout using their icon and name. If you turn off the Show Header option then "Equipment:" will not show. The [ ] designate an icon, so you could use [computer] to display a computer icon, but using the macro will use the icon type appropriate for the asset (computer or device). You could also decide to include {{serial}} for example.
Models
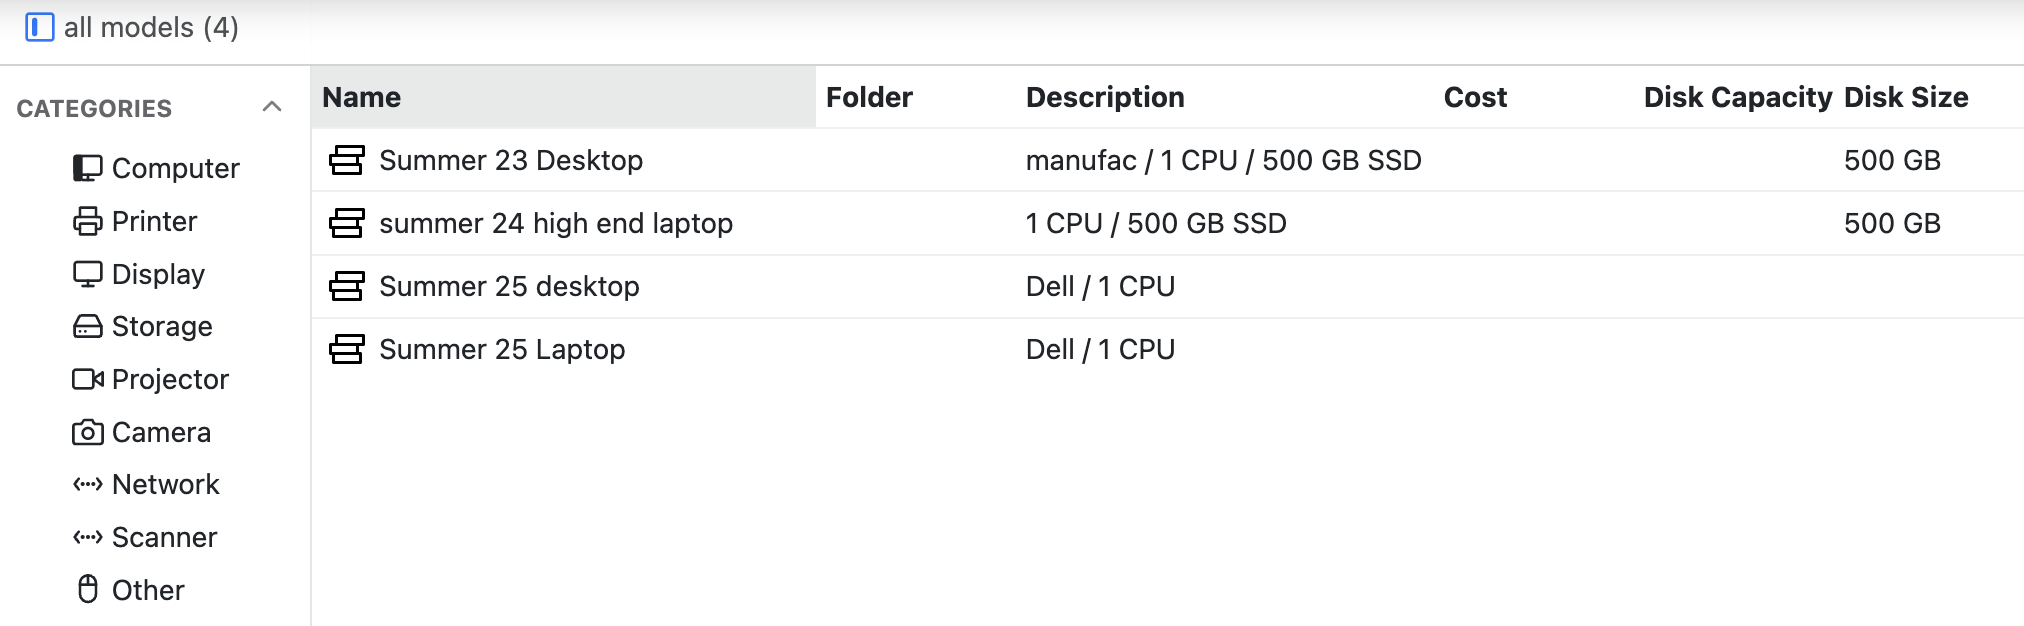
This page is for the definition of Hardware Replacement models. These can be defined for Computers or Devices. The layout of this page and the record details therein are very much like the Computers and Devices pages. Overall the intended use is to create preset configurations to link to hardware records as reference of their baseline or Replacement models. This can then be leveraged in the Hardware Replacement Extra.
Each Model will be in a Category for easy filtering, just like the Devices page. You can create Folders to organize models in any way you like (e.g. years or departments). And like other list pages, you can leverage powerful Filters to narrow your view of items. The Ribbon also has the typical tools to Add a new record, and choose your display Columns and Grouping criteria.
The Details you can define in a Model are pretty straight forward. Specifications will be useful in the Hardware Replacement Extra when reviewing the current and planned replacement stats of a computer. The Purchase pane of these records will also play a significant part in the use of the Extra, particularly the Cost.
Note that Computers and Devices have fields in their Purchase pane to link to both a base model as well as a replacement model. This sets up the relationships that are used in the replacement Extra.
Scripts
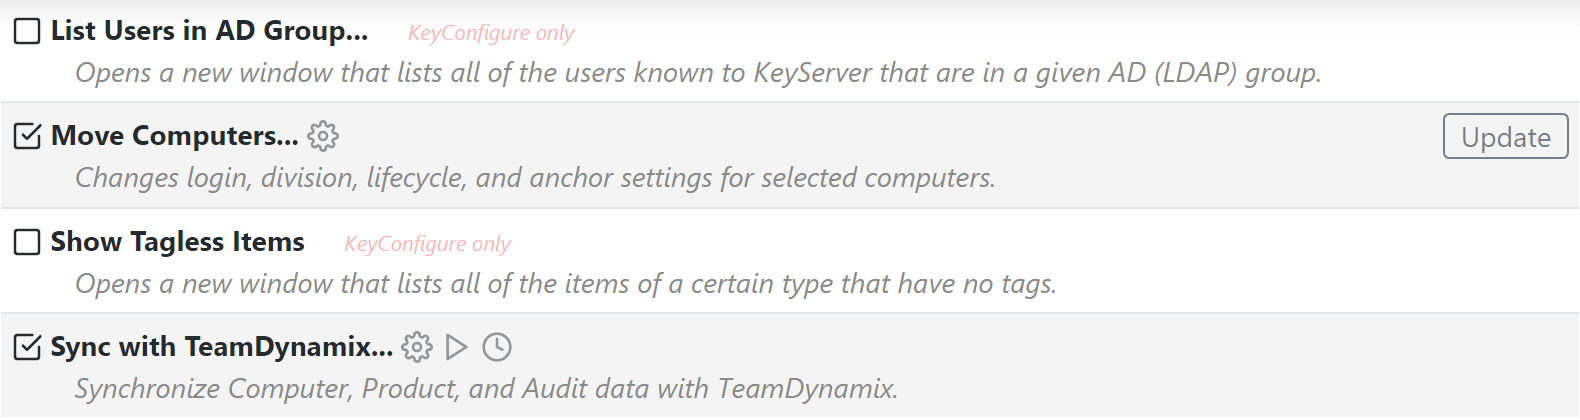
On this page you can enable various Admin Scripts for use in both the Web UI and KeyConfigure. If you are provided a script bundle by Sassafras Software you can drop it in the area at the top of the page to load it on the server. Otherwise you can simply check the box ☑ for any script to enable it. If there is a newer version of the script available there will be an Update button on the right side of the screen for that script. Some scripts only work in KeyConfigure and are marked as such. Once a script is loaded there will be one or more icons you can click to configure ⚙, run ▷, or schedule 🕓 it.
Time Sets
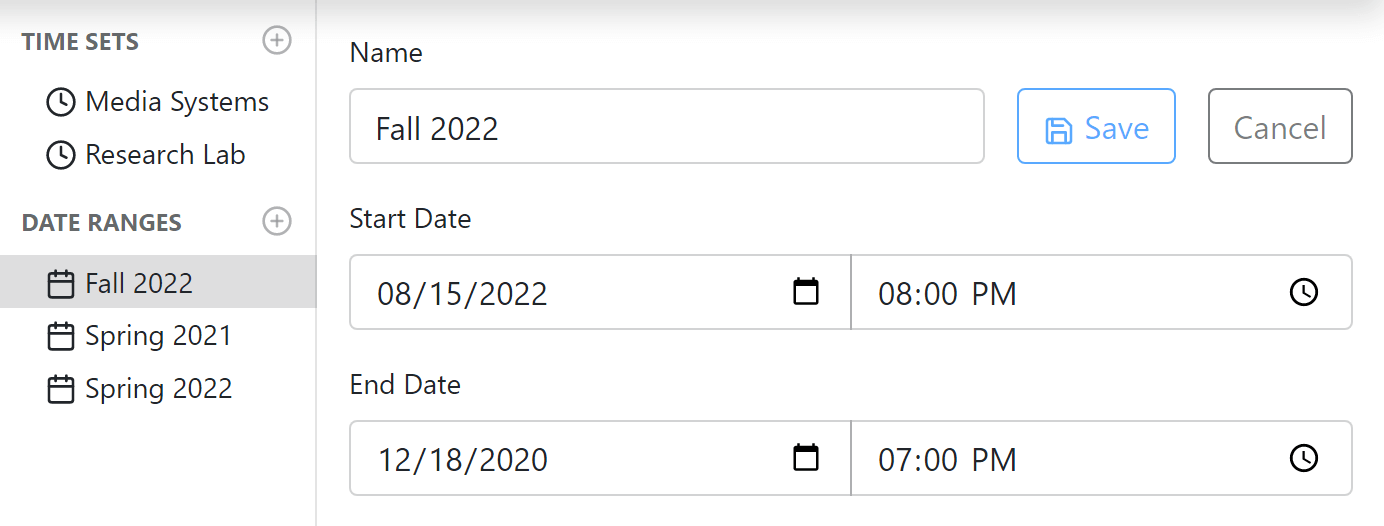
While you can easily create Time Sets by way of setting Open Hours in a Map Floorplan, sometimes you want to manually create time sets for more advanced purposes. You can also create custom Date Ranges for easy preset use in Reports. For more details see Time Sets in KeyConfigure.
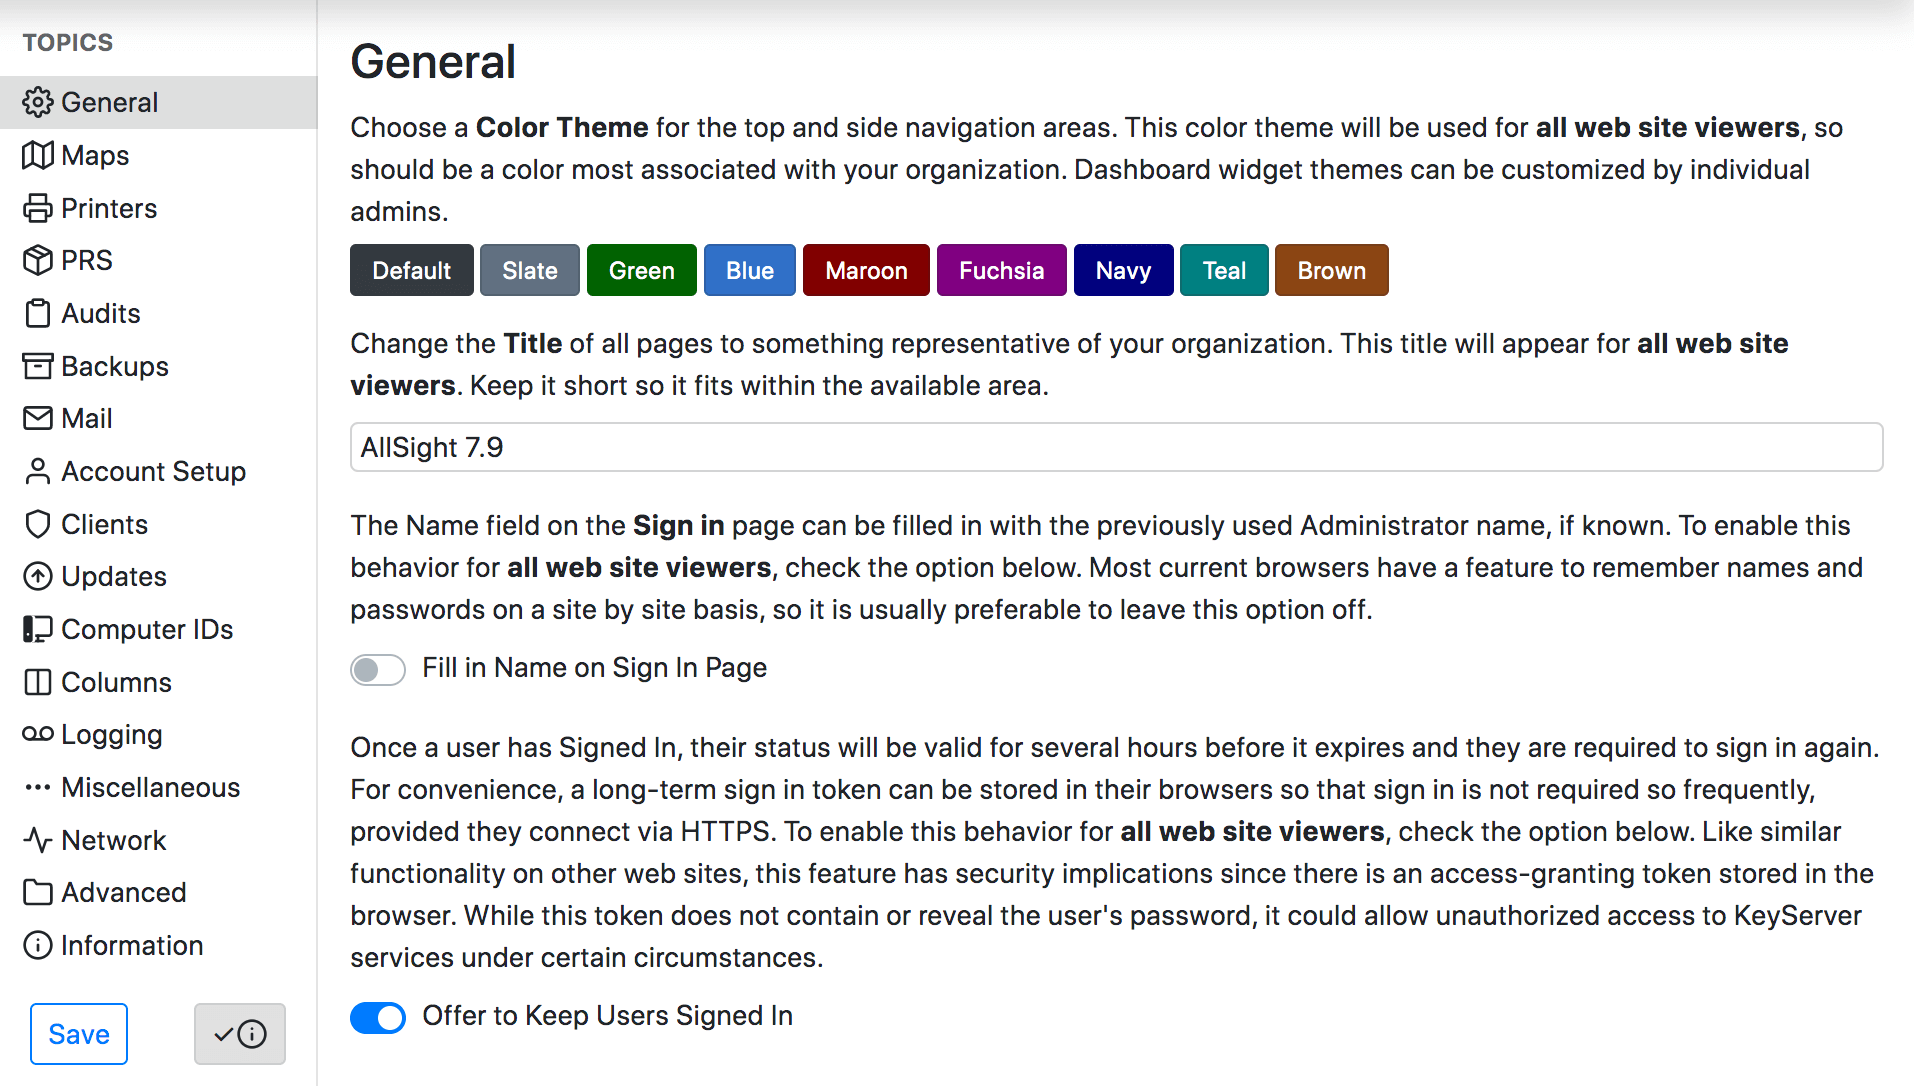
Topics
These items are listed in the sub navigation pane of the main Settings window, which is displayed when you click on Settings.
The ✓ ⓘ button at the bottom (next to Save) is used to toggle the verbose information for the various settings on many sub pages and is on by default. The screenshots below are with this information toggled off for brevity.
Remember to click Save when making changes to any settings or they will not be applied in most cases.
General
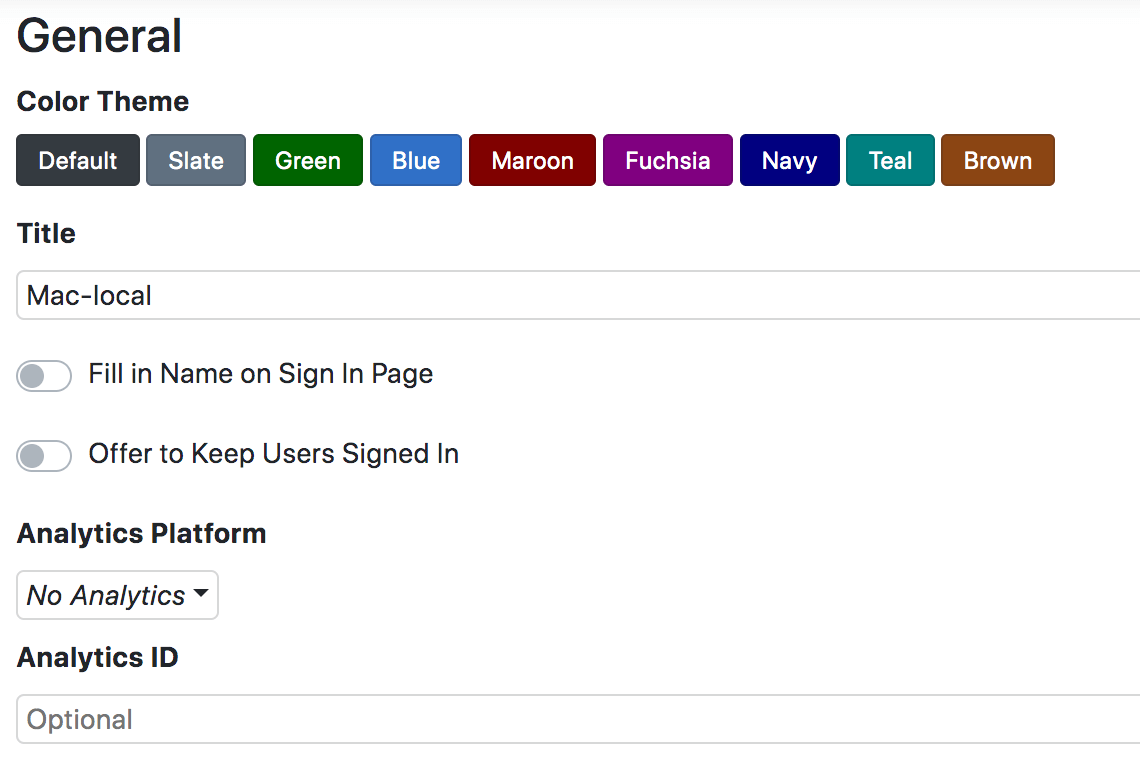
Here you can set the Color Theme for the Web UI from a selection of choices, which changes the main header bar. Colors of individual Widgets on the Dashboard can be configured per widget but will use the chosen theme by default. If you wish to customize the theme outside of the preset choices contact Sassafras Software Support.
You can also rename the Web UI Title and its browser tabs to anything you like for site branding. This name appears in the upper left by the Sassafras Software logo. Remember to click Save to the left to apply your name choice. Browser caching can create refresh issues, so keep that in mind if you're not seeing your change apply as expected.
There are also two options for controlling the login window behavior and retention of login sessions.
Maps
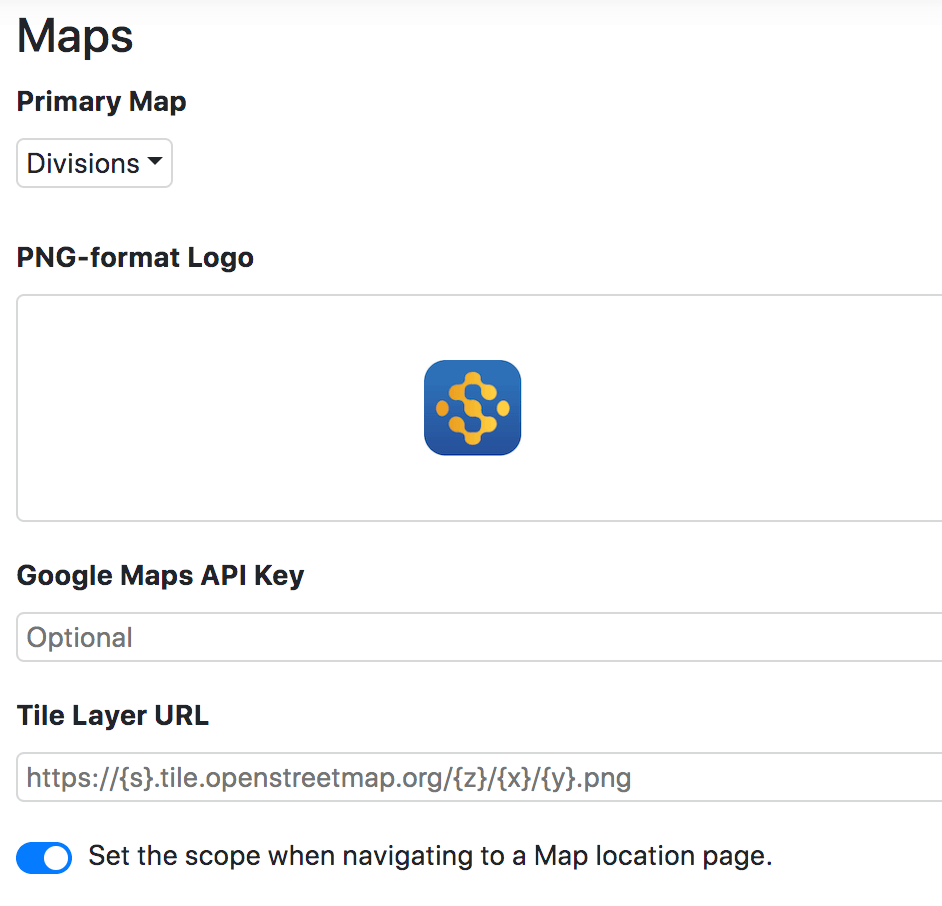
The first option on this pane is for setting the Primary Map for the Maps section as well as the functions mentioned in the setting option. This allows you to override the Default Map Tab.
You can drag and drop a PNG format Logo for use on your Map Floorplans. This will appear in the Models library when editing a Floorplan.
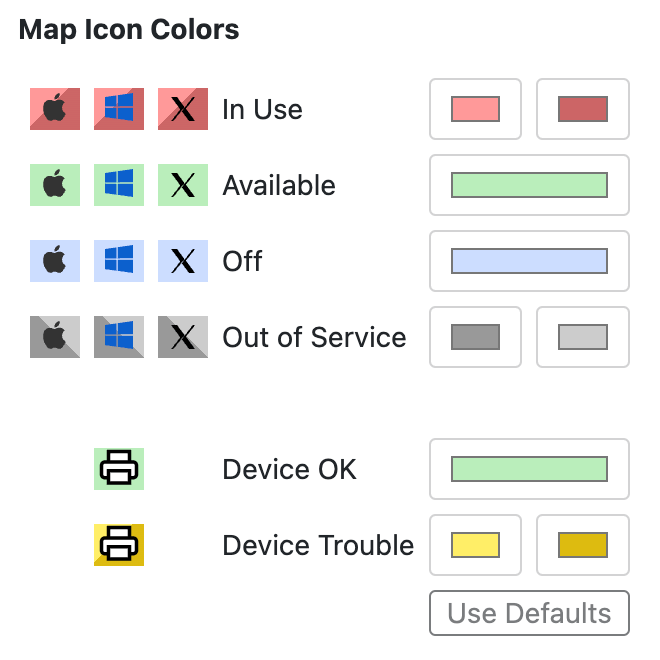
For accessibility needs, you can customize the icon colors for the various availability statuses shown on maps.
By default, we use Open Street Maps for the geographic display on Map Tabs, but you can use Google Maps if you like. Simply obtain a Google Maps API Key (costs may apply) and insert it in this field. Alternately, if you choose to use GIS software to create a custom Tile Layer for Open Street Maps, you can point to your tile server to customize your Maps display.
You can choose to Set the scope when navigating to a Map location page. This will auto set the Scope in the web UI to the last Floorplan you visited so it follows you to other pages. For some this is convenient, others find it troublesome, so it is an option.
You can also choose to Display pop ups when hovering over Map locations. This toggles if you need to click on a marker on the street Map to select the location and show details, or if that automatically pops up on mouse over. This can be more or less convenient depending on the density of your map locations.
Printers
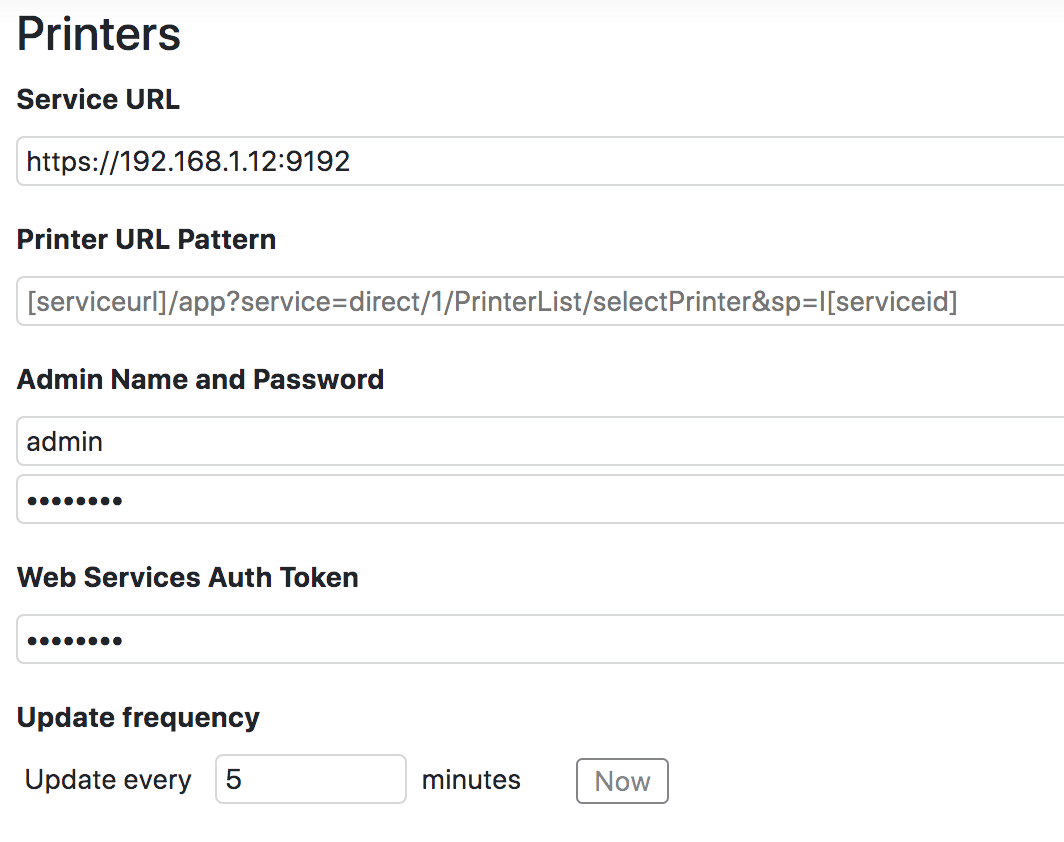
If you use PaperCut in your environment, you can add configuration to pull devices (Printers and virtual Queues) from that service into KeyServer. The fields are well commented, and this is also configurable in KeyConfigure in General Settings. Note that currently only a single PaperCut server is supported, but you may use IPP in your Printer Details to query individual printers.
 Compatibility Notice: - PaperCut version 18.3 and higher are fully supported with the settings documented here. Prior to 18.3 we are unable to automatically update the printer status as a key identifier is missing from the printer export. If you manually populate this value in each printer record, then status can be updated. We do not support any version prior to 17 as the needed API does not exist.
Click here for instructions for manually setting IDs to fetch status updates.
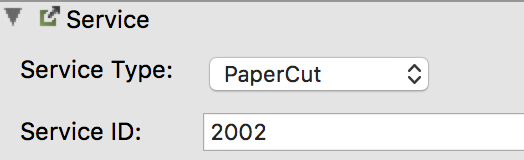
In order for KeyServer to update the Status of a Printer we need the Service ID of that device. Prior to PaperCut 18.3 it is not possible to retrieve that programmatically, so it would need to be set individually per device. For each printer imported from PaperCut, you will need to do the following:


Click here for details on required PaperCut permissions.
The account used for pulling printers from PaperCut needs to have certain permissions, but does not need to be a full admin. Configure the account you wish to use in PaperCut under Options -> Admin Rights -> Edit the account in question.


Ensure the account has these permissions:
![]() Access Dashboard
Access Dashboard
![]() Access printers section
Access printers section
![]() Access devices and site sections
Access devices and site sections
![]() Access reports section
Access reports section
![]() Access Central Reports
Access Central Reports
Click here to see instructions on how to find the token.
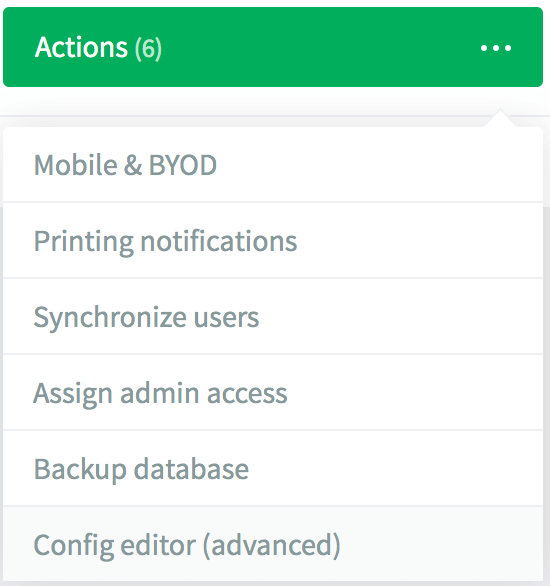
Log in to your PaperCut server and click on Options
Click in the upper right on the Actions button and choose Config Editor (advanced) from the drop down menu
In the search field enter auth.webservices.auth-token and click the green arrow.

If there is no Value for the auth-token, type one in (make sure it's secure) and click Update. Copy the Value for the token into the configuration field in KeyServer and Save the settings.

Note that you can only set the update frequency in General Settings in KeyConfigure. By default status will be updated every 5 minutes.
Click here for notes on PaperCut Security
There are a couple security items worth noting so they are not overlooked. These are the Allowed admin IP addresses and the auth.webservices.allowed-addresses options.
- Under an admin login, go to Options -> Advanced and scroll down to the Security section. In the field for Allowed admin IP addresses ensure you have the IP address of the KeyServer in addition to whatever other IPs may be needed in your environment normally.

- Under Options -> Actions -> Config Editor search for webservices.
In the auth.webservices.allowed-addresses field ensure the IP of the Keyserver is added if it's not set to the default unrestricted (*) value.

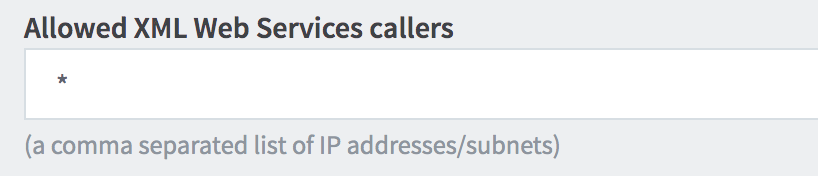
You can also see this under Options -> Advanced -> Security in the Allowed XML Web Services field:
PRS
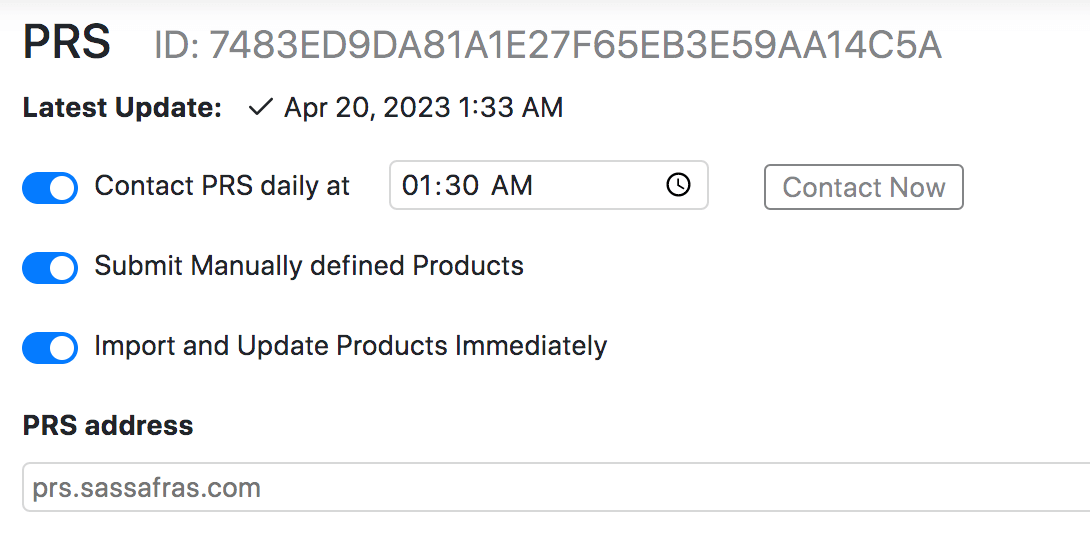
These settings are for managing the communication with the Sassafras Software Product Recognition Service. You can control the time of day these checks occur, perform an immediate contact (handy when trying to get new inventory recognized ASAP, and customize other settings.
See also PRS Settings
Audits
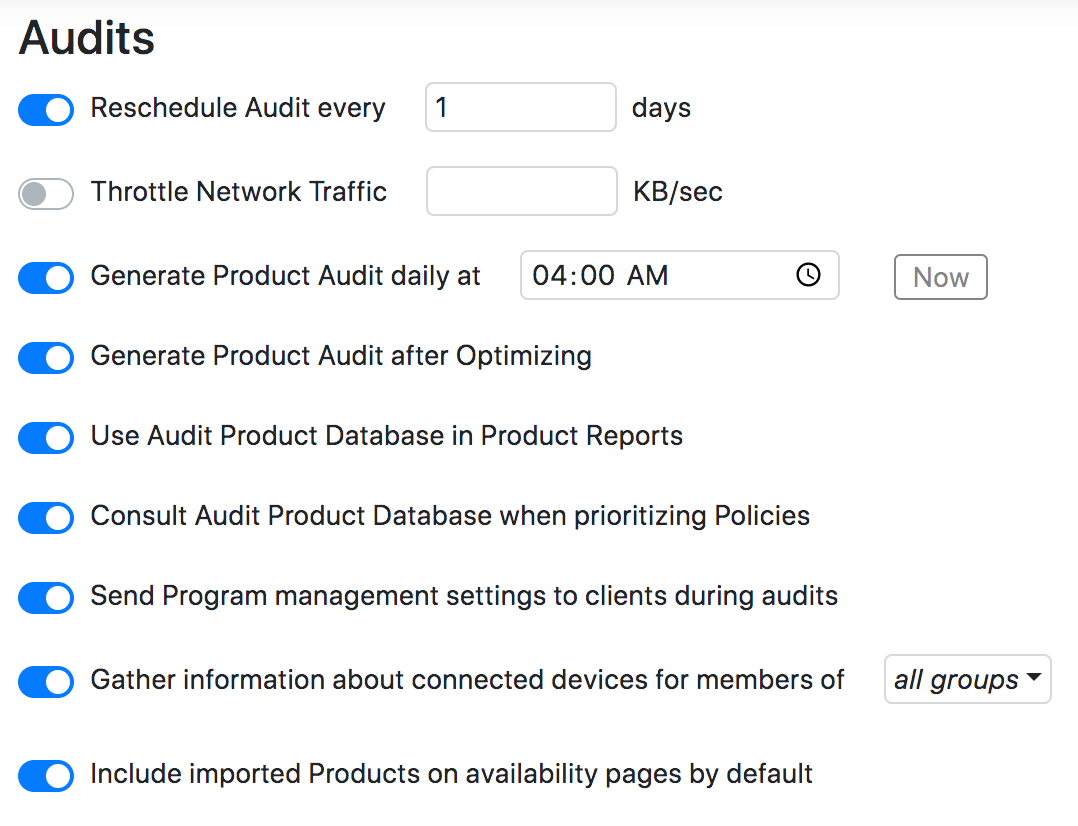
This section allows customization of client and product audits. Client audit frequency is defaulted to 2 weeks, but many sites upon consideration of traffic impact set this to daily for expedient updates of client inventory changes. Once a PRS check (see above) completes relative to a client audit, a Product audit normalizes install counts into our standard definitions and families. You can use the Now button to do this on demand, which can be useful when you're creating a new master system image for deployment for example.
See also Audit Settings
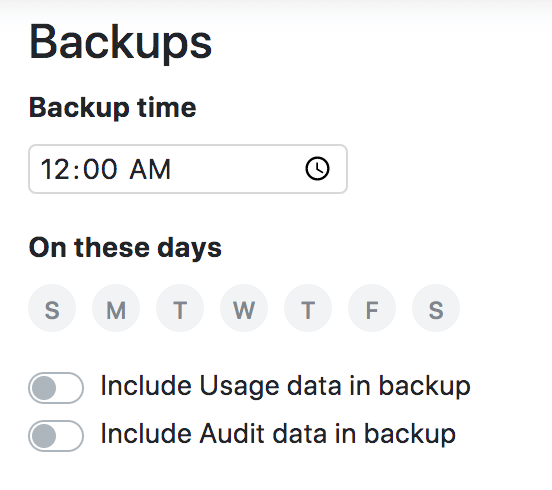
Backups
While infrequently used in an age when server infrastructure is virtual and means you have full VSS level backups, we still provide a traditional file level backup of all local database files. See also Backups. Note that this is disabled entirely for Cloud customers.
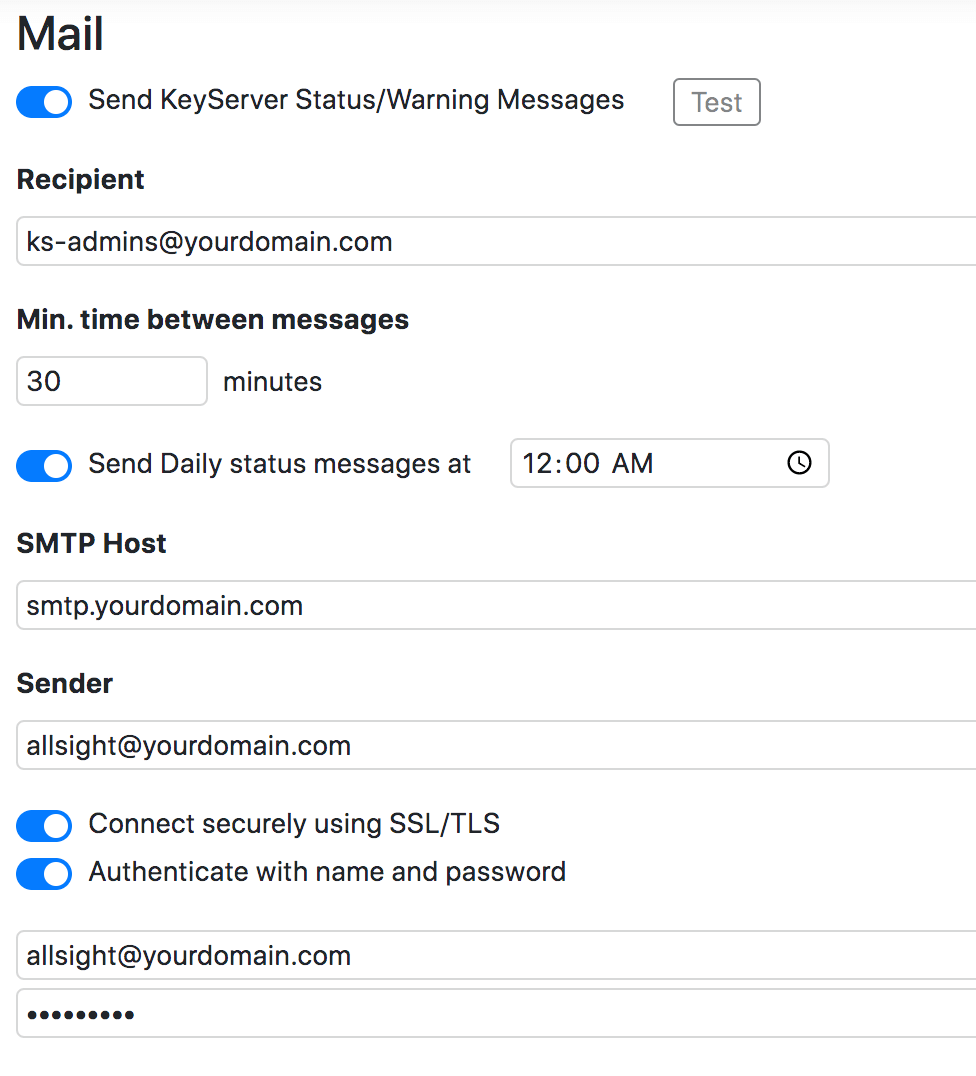
An important part of server service administration is alerting, and in order for scheduled report emails to be sent we need mail settings. Use this section to define when and to whom system alerts and dail status emails are sent, and how email should be relayed.
See also E-Mail Settings
Alarms
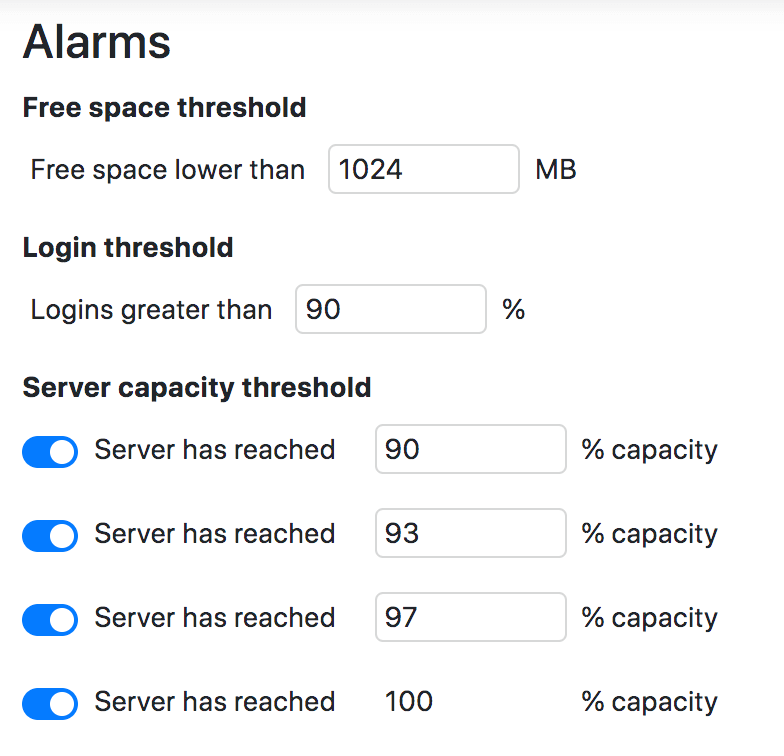
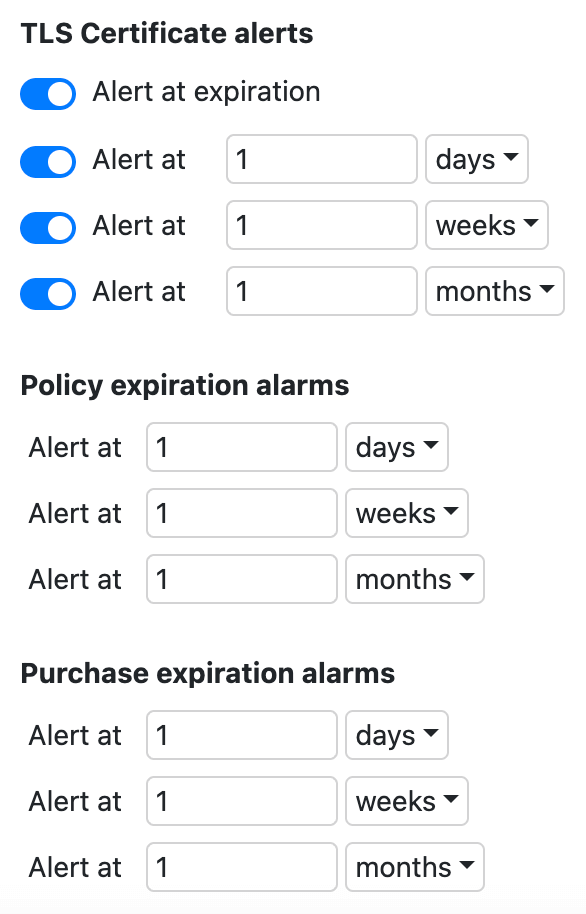
Manage the global server alert settings for various thresholds. These will trigger emails to the admin email set in the above mail settings.
The Free Space threshold is exactly that, the free disk space left on the host server.
The Login threshold is usually only a concern in a setting where most computers are constantly in use and may allow for multi user login. Each session consumes a seat, and the total sessions, just like your total Dedicated and Leased Computers, can not exceed your license count or denials will occur.
Sever Capacity alarm levels are for the number of allocated Computer seats relative to your license capacity. Once triggered these will disable and will need to be re-enabled once the seat count has been lowered.
You can set TLS Certificate Alerts to be notified when the SSL cert in use by our web service is going to expire.
Both Purchases and Policies can include an Expiration Date. These are the global settings for those default timers. Purchases can be individually modified in their Details.
See also Alerts.
Account Setup
This section allows configuration of authentication against a directory system or other service for KeyConfigure and Web UI logins. You can choose from a wide selection of Authentication Modules depending on the server platform you are running on. For example, Active Directory is only available when running the server on Windows. Each module has unique settings, but some options are global.
You can decide if Guest browsing should be enabled or if authentication is required to access the Web UI. The External Groups section allows quick and simple mapping of various directory system groups to various default roles. Options include:
- Manager Account - Full administrator rights
- Support Account - Lower permissions appropriate for middle tier IT staff
- Staff Account - Limited permissions appropriate for technical employees outside of IT
- Community Account - Guest level access
- Create Accounts as Needed - This will make accounts in the server and grant them any roles based on external group reference (see Accounts above for more on that aspect). Otherwise they can be manually assigned roles in KeyConfigure after they get created on first login attempt (which will be denied).
- Determine Access on Demand - This will resolve any group membership against roles configured in KeyConfigure and grant access without making a local account in the server.
- Disallow Login - Do not allow the account to log in
You can then choose how to handle Unknown External Logins. This means any account for which there is no simple preset mapping in these options, and no manually created account in Admin Access. Generally you would either Disallow these attempts, or map them to Community so it's the same as if they were a Guest. You can however set this to Create as needed or Determine on demand and use specific Roles pointed to designated external groups to create more complex login assignments.
See also Admin Authentication and Auth Modules
Clients
The main use of client authentication is to enable automatic allocation of computers into Divisions based on directory organization (e.g. replicate OU mapping in AD). Note we do not replicate the entire AD, individual changes are made when a client contacts the server as relates to the division that computer is in. While it can be used to force authentication to the server to get a client session, that is exceedingly rare.
See also Client Authentication
Updates
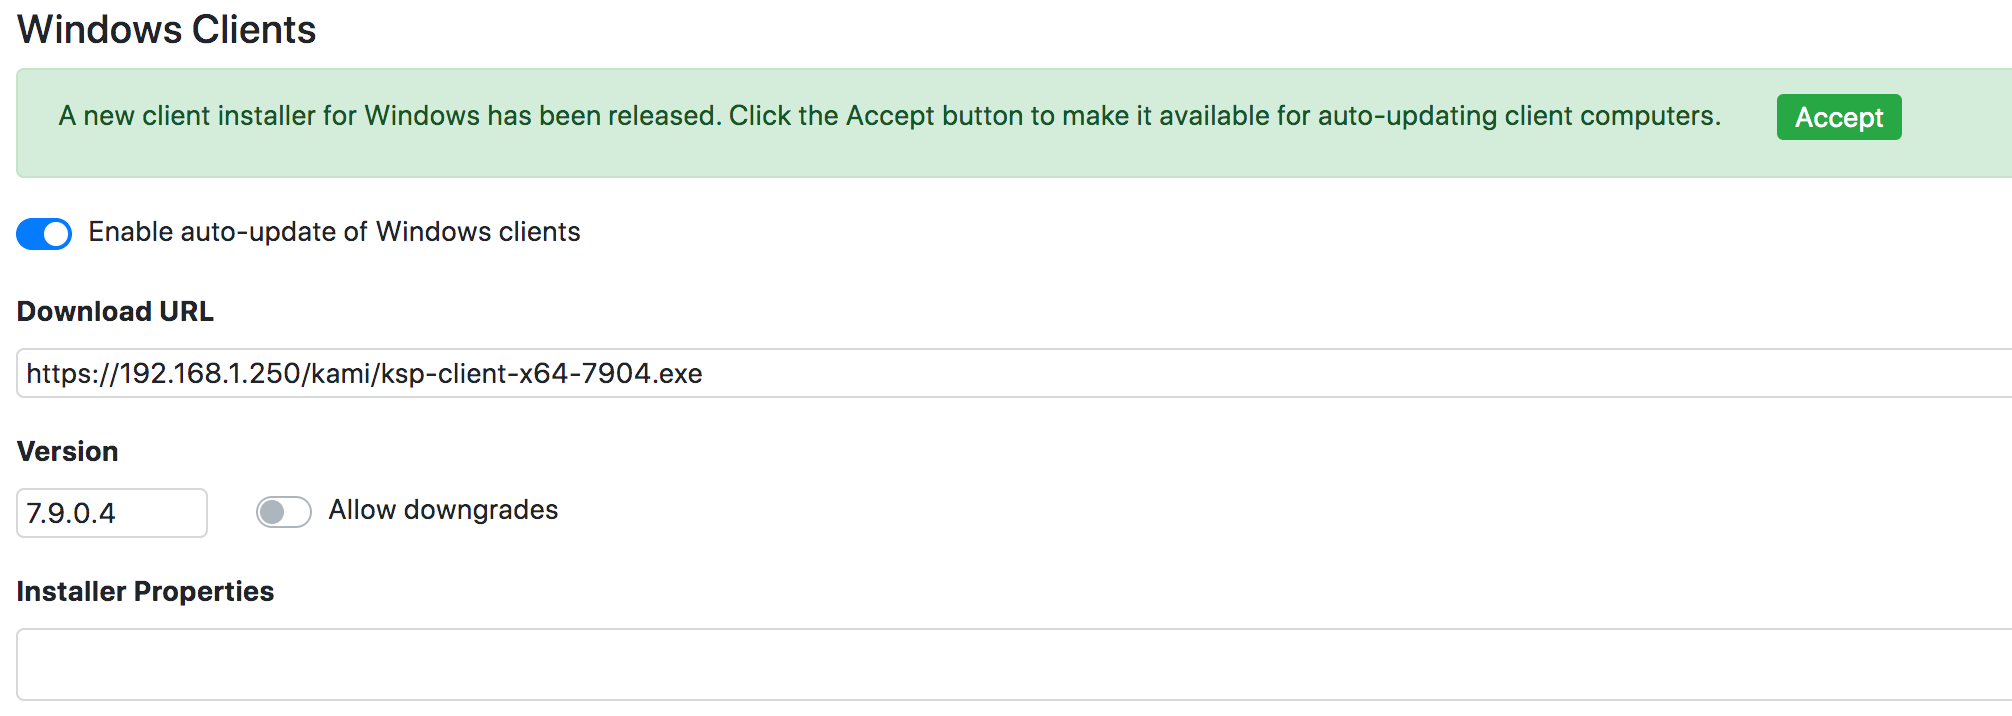
This page allows you to very easily fetch the latest client installers from Sassafras Software and enable them for client self updates. It will show a green dot in the navigation when updates are available, and you can click Apply to fetch them and activate the update settings.
Ensure you click Save in the main settings list to actually save the configuration changes.
See also Client Self Updates
Computer IDs
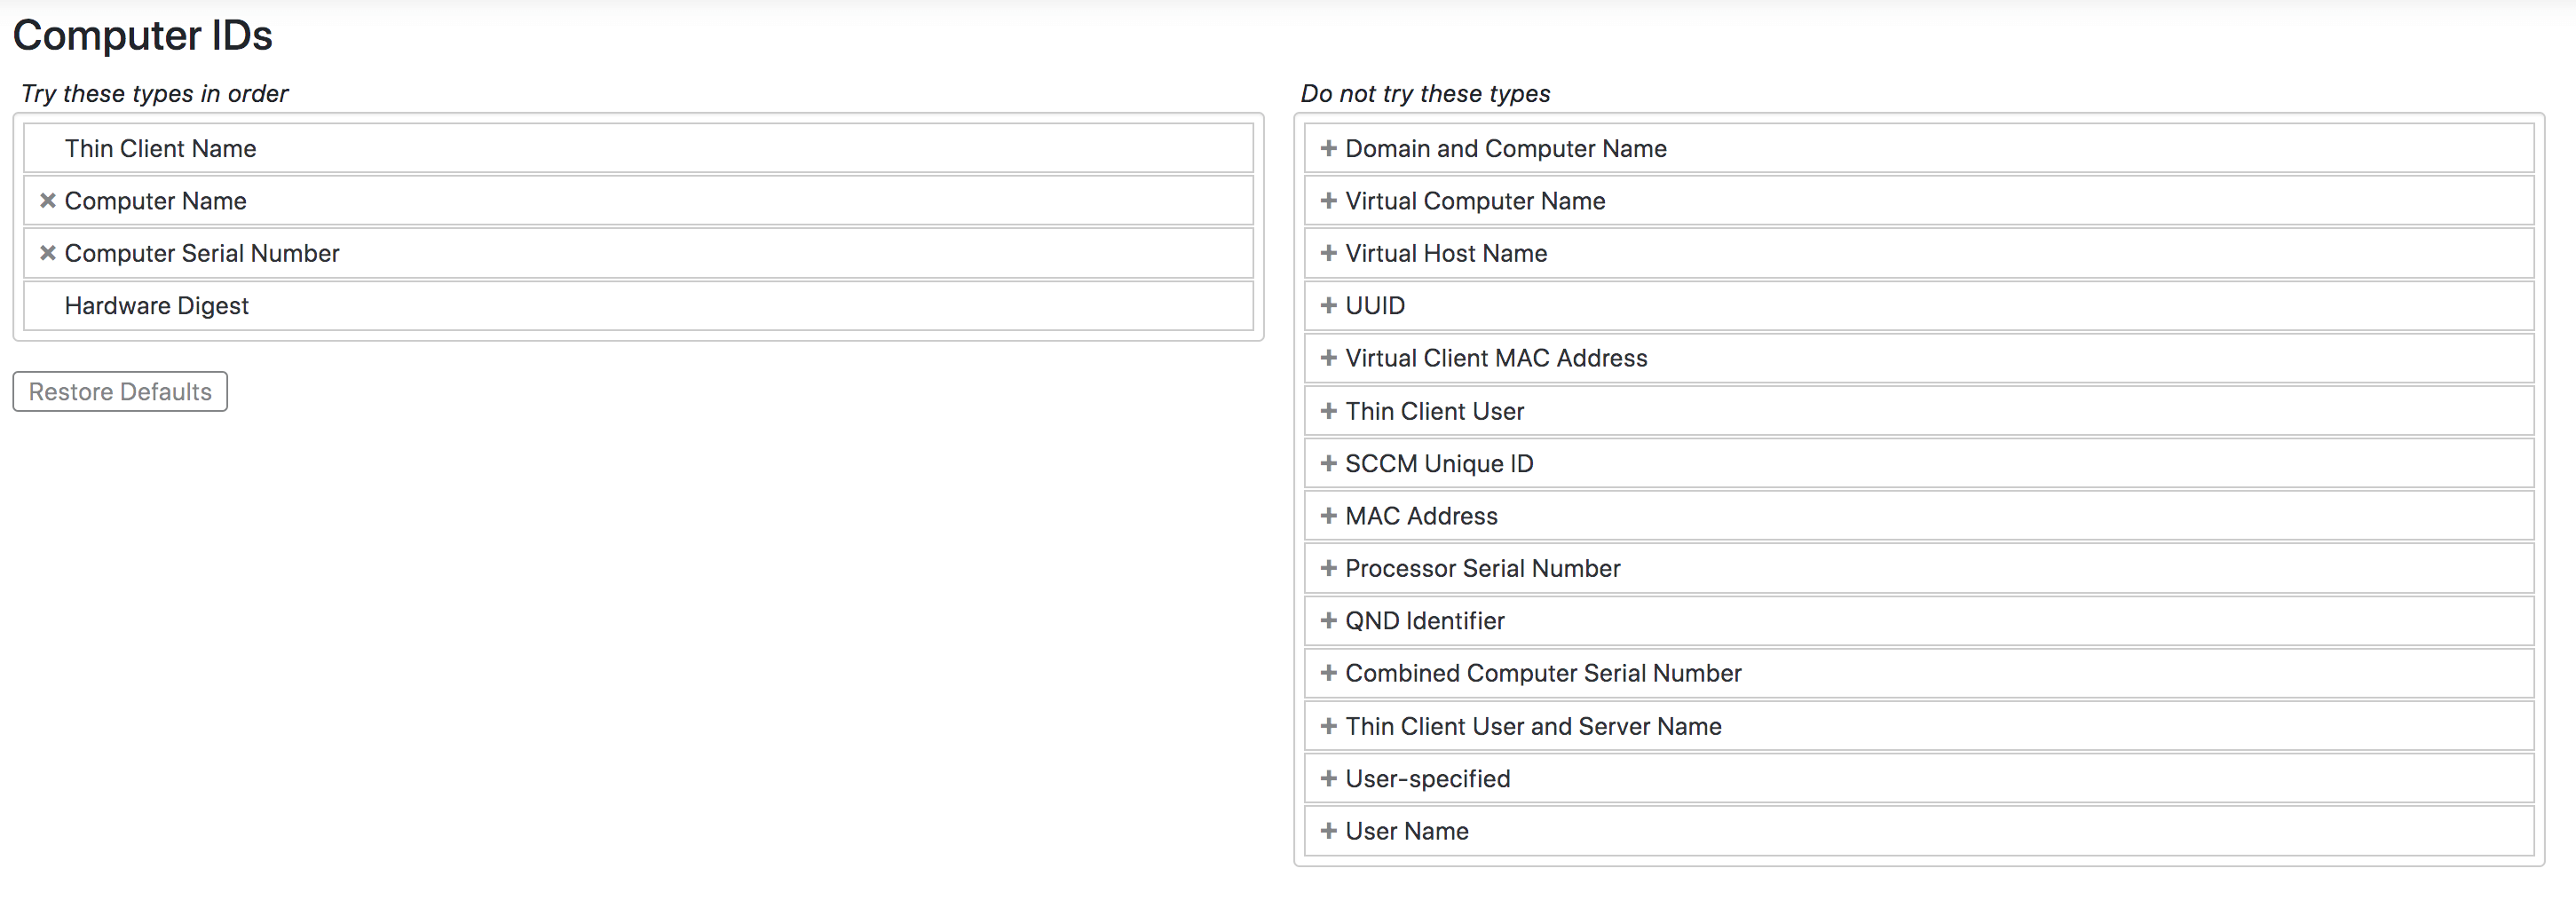
Determining how to identify computers is a critical part of initial setup. In recent time Computer Name is the most popular choice as it allows for easily swapping out systems in lab spaces. If names are the same, new computer replace old computer in place in the software. However, you lose the ability to have full lifecycle tracking that way. Serial number can be a good alternative for unique tracking, but some times obscure hardware does not provide the serial very well. MAC address was the old standard, but in recent years external network interfaces has made this problematic as that identifier is now unreliable to be present. The decision of what you use should be well considered before initial client deployment. Note there are further considerations if you have "thin client" services. Changing these on an established server can have notable considerations and you are encouraged to proceed with caution and consult with Sassafras Software Support for assistance.
See also Computer ID Types
Columns
On this page you can set default values for various fields used in the Details of Computers, Devices, and Purchases. See Custom Columns and Custom Values pages for full details on defining custom fields, device types, and lifecycle stages.
Logging

In the event of troubleshooting, this section is used to elevate logging levels to assist with diagnostics. The logs are written to the diagnostic.log file in the KeyServer Data Folder on the server. Note that no granular item can record at a higher level than the general setting.
See also Log File Management
Idle Usage
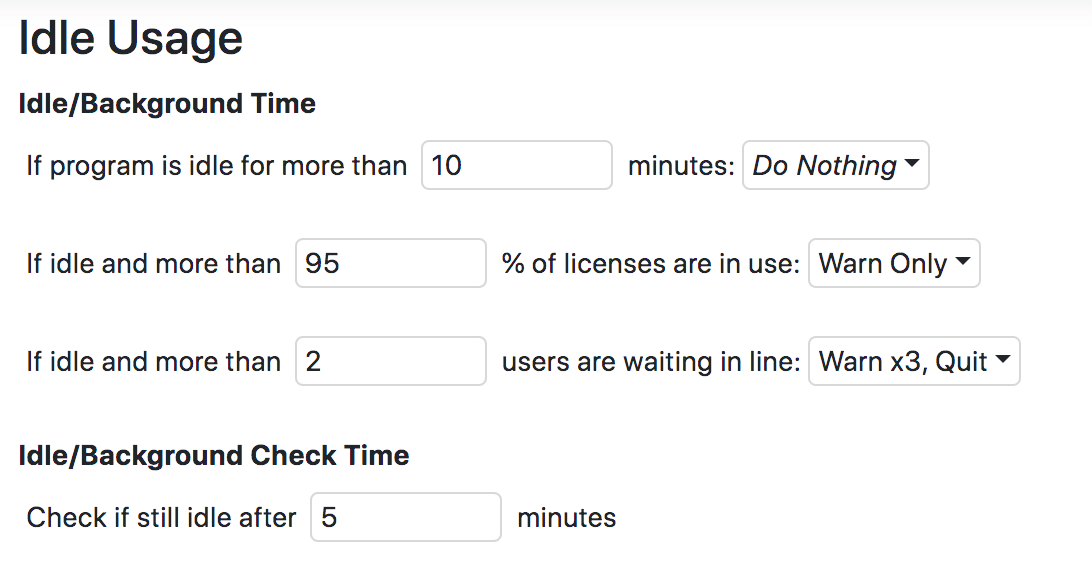
Configure the various global settings for Policy Idle Times.
Miscellaneous
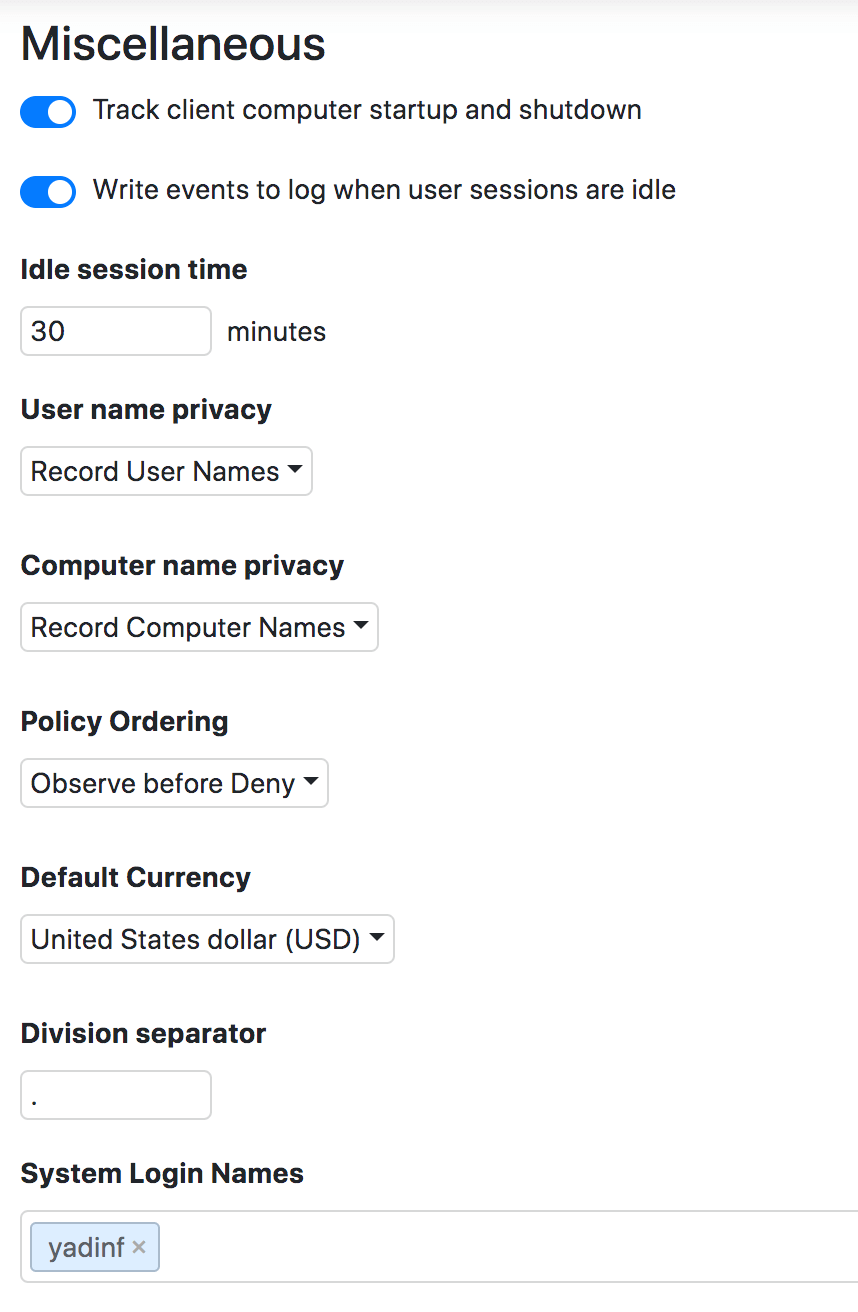
See also the Privacy, Idle, and Misc sections of General Settings
Network
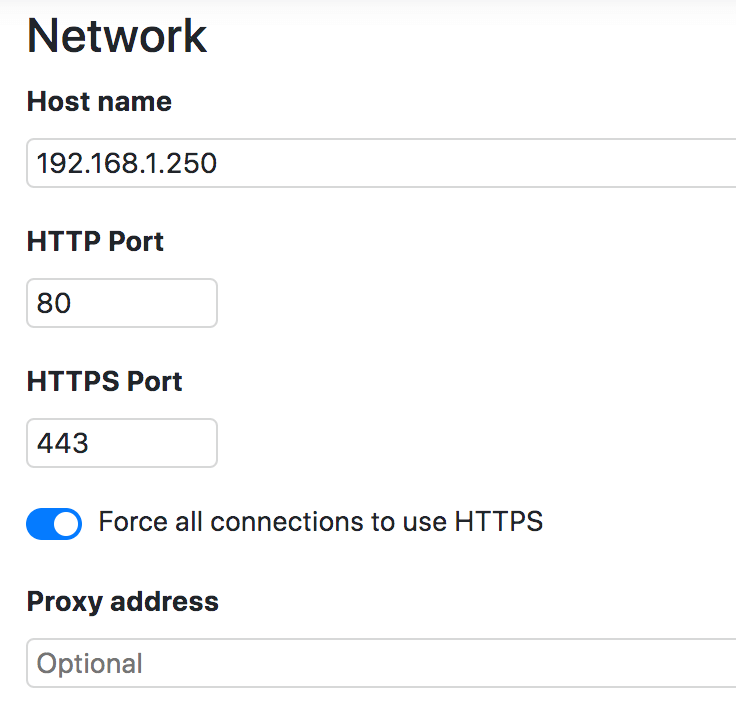
This section allows you to customize the various settings for the Sassafras Server Web UI Service (internally known as KeyReporter). Many of these are advance settings and should not be modified unless you are a network admin who understands the implications.
The Hostname setting is the single most important item here, and should always be set to the DNS name you want to use for the web interface. You will need to ensure this is cleanly configured in DNS against the host server, and you obtain an SSL certificate for the host using this same name.
We recommend using the default Ports for HTTP and HTTPS so it is easy to get to the web service. This means no other web server should be running on the same host.
Best practices state Force HTTPS should be enabled. Note some settings are not accessible on an unsecured connection.
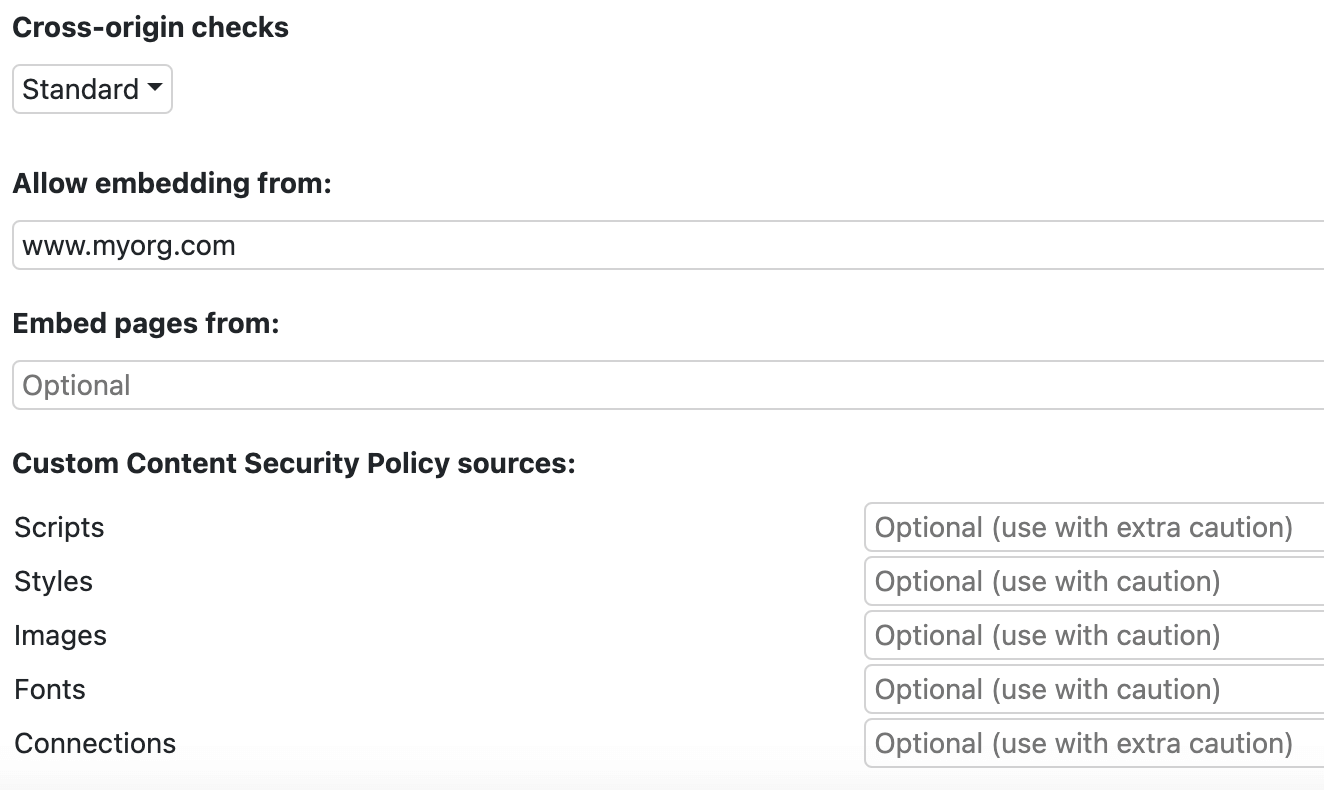
If you plan to Embed elements of our service in another web page, or vice versa, you will need to set the proper DNS names in the relevant embed fields to support that. These are space delimited.
See also Web Service Settings
Advanced
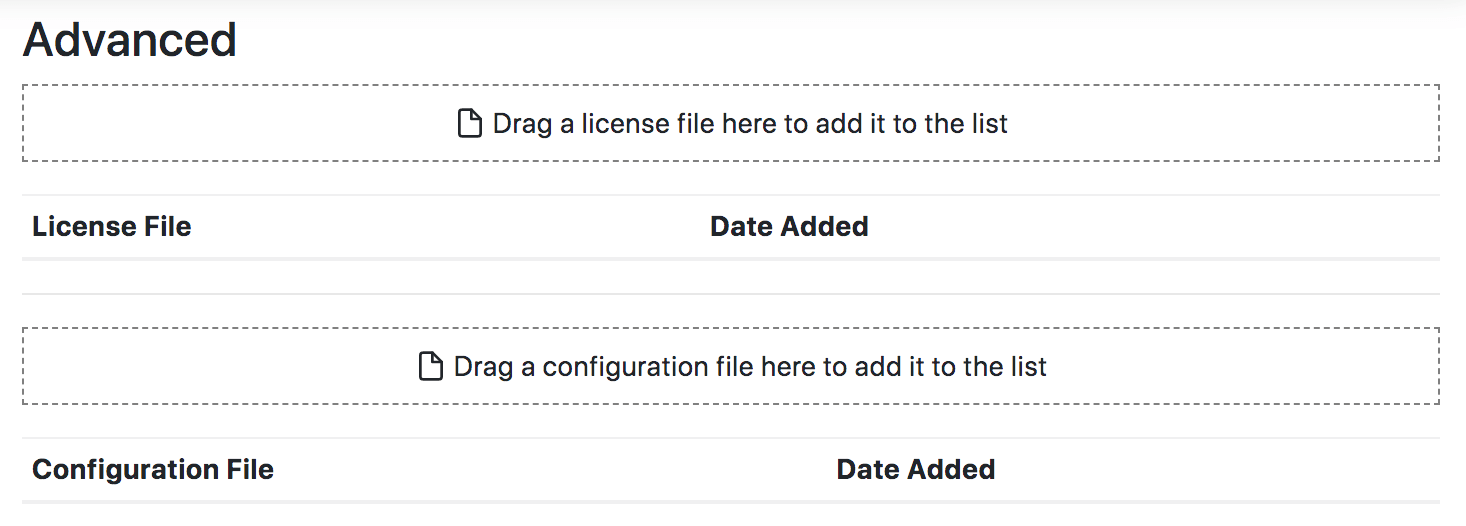
Allows for adding custom software license files (vendor provided) and configuration files (Sassafras provided) to the server. Traditionally RDP access to the host server was needed for these additions.
Information
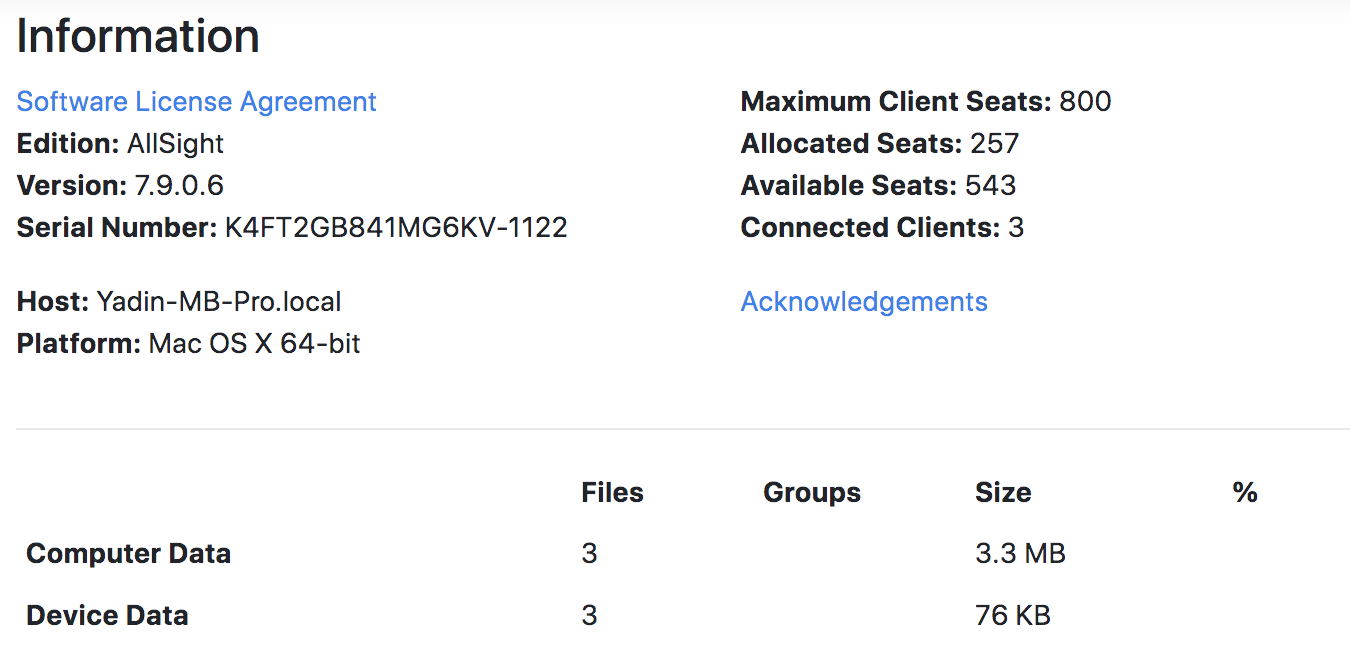
See various information about your server including version, license data, and server platform. Also shows a detailed list of file/folder sizes in the server data folder.
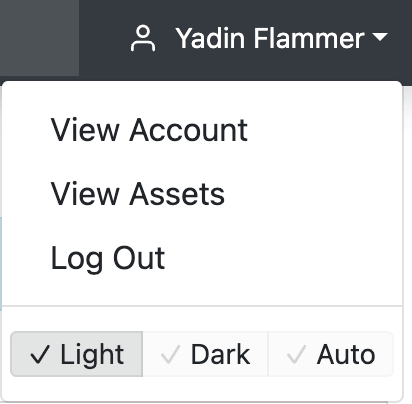
Account Settings
 >
>
If you click your user name in the upper right of the Header Bar, you will find a couple account options. There is also the Log Out button and a choice for view mode (light/dark).
View Account
The options presented on this page will depend on the privileges of your Role.
You can change your Email address, which will find an associated Gravatar icon for the Account menu. This is purely cosmetic.
If you are logged in by https, you will be able to change your Password, assuming this is an internal account with sufficient rights (passwords from external authentication sources like AD can not be changed through our software).
You can choose the default Form views used for each of the major list pages (Computers, Devices, Purchases). See Forms above for more details.
Notes can be used to store anything you like. If you are using a shared account you will see the relevante note on that account (e.g. Manager).
Show Basic User Interface will cause the Side Bar to not show expanding menu items, such as various Dashboards when that header item is chosen and the report builder items. Note that having full admin rights overrides this having an effect.
The Get Access Token button is used for external authentication methods that can use a token instead of username/password pairs. This can be useful for service account access like API calls.
The Login QR Code is for use with our Mobile App. If you don't see this button you may lack proper permissions or your server needs to be updated.
As of 8.0.0.6 you will see the left side navigation items have checkboxes next to them when on the View Account page. This allows custom toggling of those navigation items for your account. Note that Policies and Users are disabled by default. If you don't see those options you are not on a recent enough version.
View Assets
Added early in 8.0 releases this page is similar to the User Assets Extra but targeted to the personal account. It will show all assets associated to the user and the reason for the association. This allows general users to see the IT inventory they are allocated and responsible for.