Time Sets
Time Sets Window
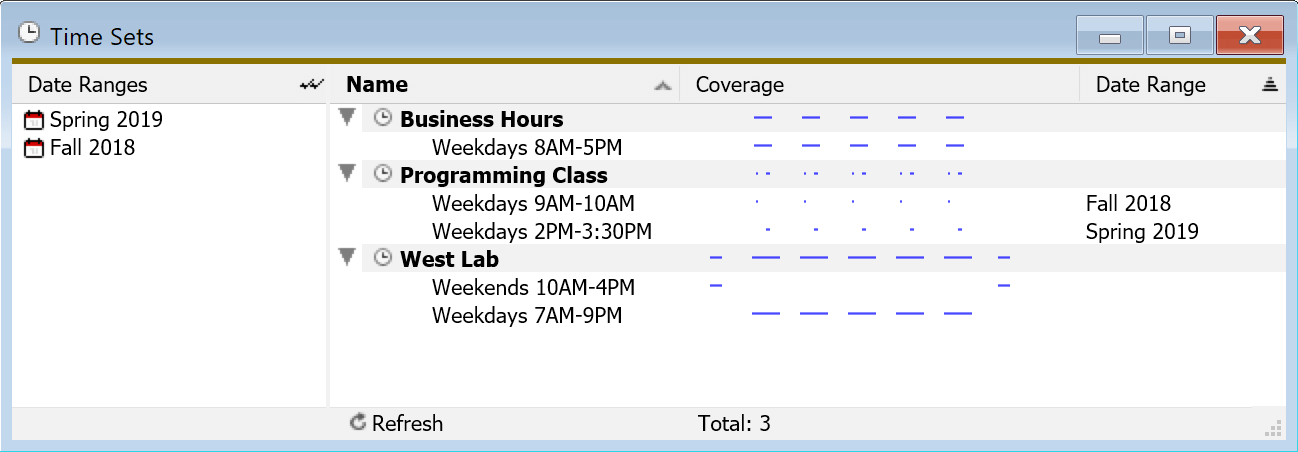
The Time Sets window shows time sets, which can contain time periods and date ranges for usage reports and lab availability. Initially the window will be empty, but by right-clicking in the main space, you can select "New Time Set" to create a new set. Once you have defined your own Time Sets, they can be used in reports. For example, you could make a "Working Hours" Time Set, and could then run a Usage (PLCY x comp) report that only included usage during those hours of the week. For more on how they can be used in reports, see the Reports document. You can also right click in the Date Ranges pane of this window to define a date range. Date Ranges can be associated with Time Periods as detailed below. Note you many need to click Refresh at the bottom of these windows when making new sets, ranges, or periods for them to show up.
Once you have created a Time Set, you must add one or more Time Periods in the Time Set Details window in order for it to be useful. Double click a Time Set (name in bold) to open the Time Set Details window to define these. Once made, you can see the coverage column shows a graphic representation of the hours on days those periods cover. By showing the Date Range column, you'll also see any applicable ranges applied to the periods.
Time Set Details Window
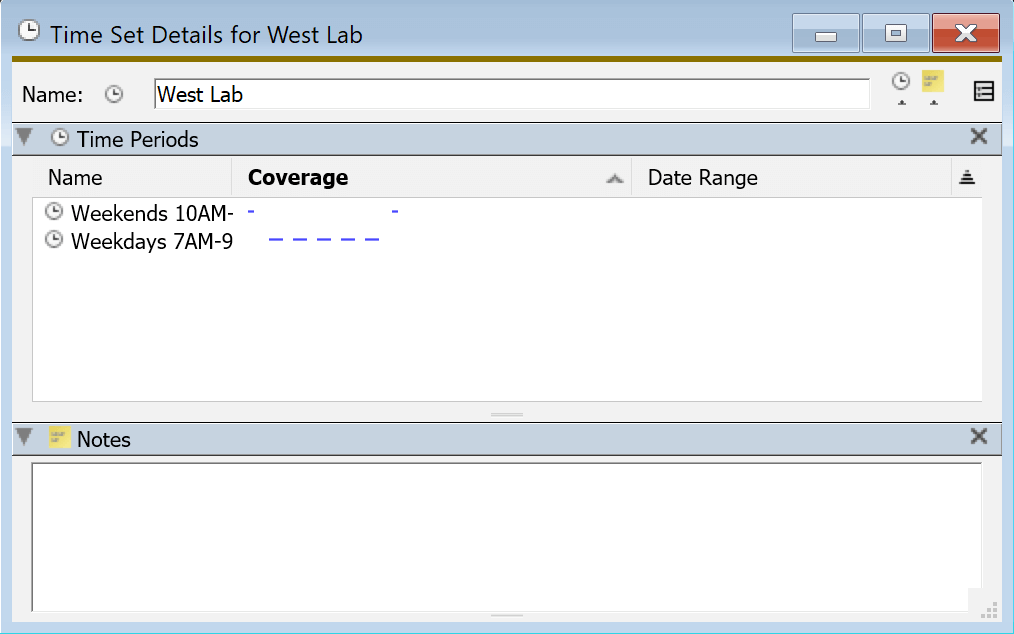
The Time Set Details Window shows the name of the Time Set, and has two panes - Time Periods and Notes.
A Time Set is defined by an OR of the Time Periods associated with it. To add a Time Period to a Time Set, right click in the list of Time Periods, and select "New Time Period". This will bring up a window where you can define a Time Period.
Note that you can also make a Time Set that corresponds to a Division. In this case, if you create an Availability Map for that Division, the Time Set will be used to determine when that lab is open. It is generally easier to manage Schedules for Maps in the Web UI. If the name of the time set does not exactly match the full name of the division, it will not be used for the schedule.
The Notes pane contains a single item, which is a free-form text field. You can use it for any information you want.
Time Period Window
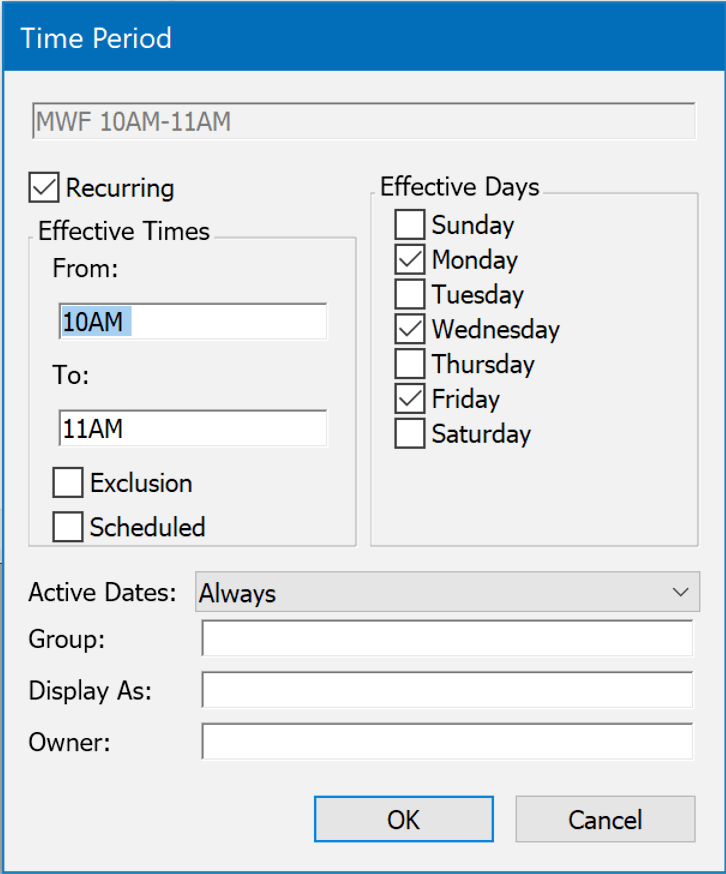
Each Time Period is a range of hours and a list of days. There is also a checkbox labeled Recurring that determines whether a Time Period is the same regardless of the week, or whether it only applies to certain days. Usually, a Recurring Time Period will be the most useful, since reports can already be given a specific date range, and you can also define custom Date Ranges both for reporting and to specify over what dates a recurring Time Period occurs. Note you must define Date Ranges before they show in the Active Dates drop down.
Exclusion essentially “turns off” the Time Set within the specified Date Range. So to make it useful you would combine it with another Time Period within the same Time Set. For example, the Time Set could have a Recurring Time Period for weekdays from 8AM to 9PM, plus a non-Recurring Exclusion for a certain week. Then the Time Period would define weekly hours except for a week with no hours (e.g. spring break). You can however simply have an excluded period that is the closed hours of the location, and it's otherwise open.
Scheduled/Reserved indicates a special state that applies to Maps in the Web UI. This shows the reservation information but does not gray out the lab, and does not hide the connection links as Excluded does. The Group field will tie this reservation to an external group if you have authentication enabled. This results in the Remote links only being displayed for the set Group. Display As dictates what is shown in the map header during the reservation period. Owner is an arbitrary field for admin reference if needed.
Date Range Window
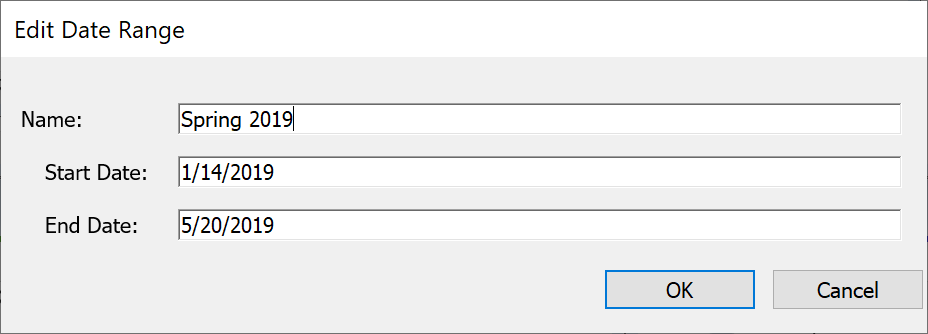
The Date Range Window very simply gives a name and range of dates. Just type in the date string for your start and end dates and you'll be able to use this date range not only for attaching to Time Periods, but also as a preset that is available in any Report.
Working with Time Sets
There are a few useful notes when working with time sets in KeyConfigure in the main Time Sets window.
You can right click on a Time Set to Duplicate it. This creates a clone of the entire time set which you can then rename to match another Division name to link it. This can be handy when working with multiple locations that have similar complex time periods.
You can also Duplicate just a Time Period which will make a copy of it under the Time Set that it's in.
You can drag and drop a Time Period from one Time Set to another to clone it to that time set. This can be handy for quickly applying something to multiple sets, like a fall break period.
Using the Web UI
You can also manage Time Sets to a large extent in the Web UI, although the interface is a bit different and does not have some of the copy/clone features mentioned above. However, whereas in KeyConfigure you must name a Time Set precisely to link it to a Division so it shows on a Map, the Web makes this very simple. Instead of making the Time Set from that window, you go to the floorplan itself and edit the Open Hours, which then creates the proper Time Set for you.
Importing
It is possible to bulk create time sets using a CSV file. This requires the Import Time Sets Admin Script. Unlike other imports (like computers and purchases) this has no mapping wizard so a template must be followed. Here is an example with the required headers:
Name,Excluded,Reserved,Days,Start,Stop,Duration,Group,Department,Owner,Daterange
Lab A,0,1,mo tu we th fr,18:00,21:00,3:00,Testing,Test,,
Lab A,0,0,mo tu we th fr,0:00,24:00,24:00,,,,
Lab A,0,0,su sa,0:00,24:00,24:00,,,,

Lab B,0,1,mo tu we th fr,18:00,21:00,3:00,Testing,Test,,
Lab B,0,0,mo tu we th fr,0:00,24:00,24:00,,,,
Lab B,0,0,su sa,0:00,24:00,24:00,,,,

Lab C,0,1,mo tu we th fr,18:00,21:00,3:00,Testing,Test,,

Private,1,0,,2021-01-02,2021-01-16,,,,,
Private,0,0,mo tu we th fr,0:00,24:00,24:00,,,,
Private,0,0,su sa,0:00,24:00,24:00,,,,
Remember that the name of the Division must match exactly, and that the name must be the full string when using nested divisions. That is, if Lab A is under Building A which is under Campus A, the full division name is Campus A.Building A.Lab A, not just Lab A. If the name of the time set does not precisely match the name of a division, it will not be used by the division. You can right click a division and choose Edit Division to view its full name.
Note that for one off events (not recurring) there are two requirements for the row syntax. Ensure that the Days column is empty (otherwise dates are ignored and it will be recurring), and the Start and Stop fields use two digit syntax. That is, date and time values need to be 01/20/2022 07:00 not 1/20/22 7:00. Incorrect syntax may cause the row to not be imported. Be aware that programs like Excel may save the date/time syntax in ways different from what you see in the spreadsheet. Check the raw csv contents if you experience issues.