Computers Window
The computer window displays selected records from the computers table. The computer table contains a record for every computer that has used the KeyAccess client software to connect to the KeyServer, including records representing both physical and virtual computers. In addition to the obvious fields necessary to identify distinct computers, numerous hardware attributes are available for display in the Computers window using the customizable columns feature. Double clicking any computer record opens its Details window.
See also our Tutorial Video on this topic.
The Computers window is included in the "Standard View" from the KeyConfigure Windows menu. It directly supports various reports that summarize computer deployment information including hardware capabilities, internet location, last login, etc. Links to the Computers table from the software Audit and management Policy tables support management of license compliance for specific computers, Divisions, Sections, and Groups.
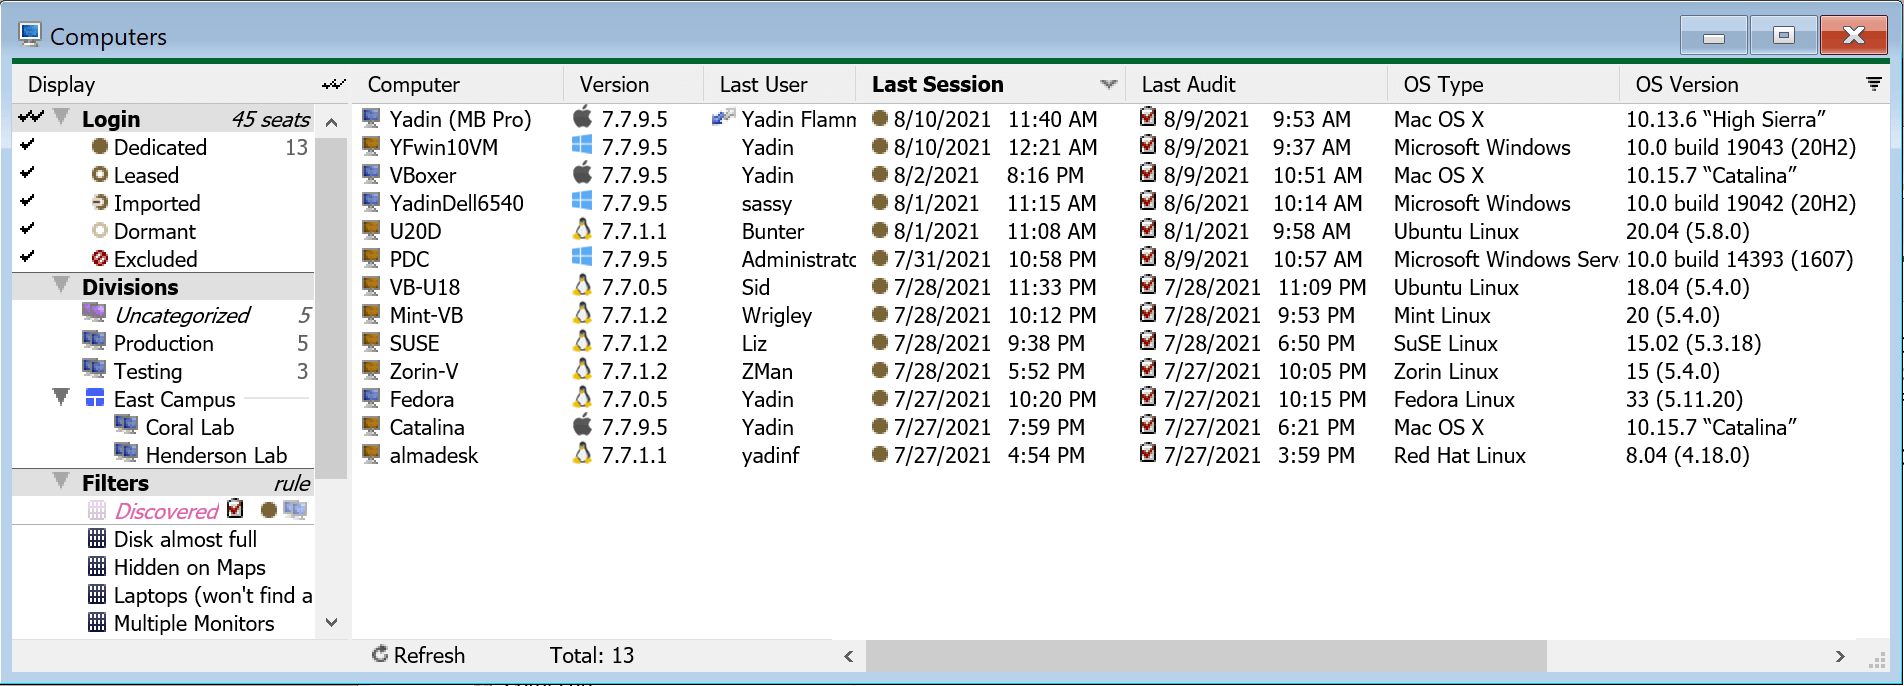
Left Side — Display column
The Display column on the left of the Computers window is used to restrict the computer list on the right to a selected subset. By enabling check marks for Dedicated and Leased only, you can restrict the display to just the records that require a KeyServer ‘seat’ – the number of such records cannot exceed the number of ‘seats’ enabled by your KeyServer license.
The Display column is divided into four panels. Each one classifies the computer records on the right according to various attributes. Multiple check marks within the same panel increase the selection set — the conditions are OR'd together. Check marks in separate panels decrease the selection set — the conditions are AND'd together. Clicking on the double-check icon that appears between the Display column (left) and the Computer list column (right) will toggle between the current selection and all selected.
Login panel: the five states listed in the login pane classify computers according to which KeyServer services are available or in use. Read Sassafras Software Licensing for information on how the login types affect licensing of the Sassafras KeyServer Platform.
- Dedicated computers when logging in to KeyServer have access to all services. Whenever a node locked license is assigned to a computer, its login type automatically becomes Dedicated.
- Leased computers have access to all KeyServer services except the assignment of a node locked license. When KeyServer services are not actually accessed by a Leased client for some period of time (e.g., no activity is reported such as usage logging, software audit, license grant, license return, etc.), then the Login lease will expire and the computer will be automatically reclassified as Dormant.
- Imported computers are new in 7.8 and are exclusively created by our integration scripts for JAMF and InTune. This allows you to have iOS and Android devices inventoried in the Sassafras Server with your other Computers and Devices. These records appear in Audit and Usage reports, but do not use a license seat. Because there is no active agent involved, they will not show connected sessions.
- Dormant computers do not count against the KeyServer client limit. Dormant computers will not appear in Audit reports but historical software usage information will still be available to usage reports. If a Dormant computer makes a connection to KeyServer in order to report usage activity, to upload audit info, or to use managed software, its login type will automatically change back to Leased or Dedicated. Dormant computers will show in Italics in the main pane of the Computers window.
- Excluded computers do not count against the KeyServer client limit. These computers cannot receive any services and no new information will be recorded by KeyServer. Like Dormant computer, Excluded computers will not appear in Audit reports but they may appear in usage reports if there is relevant historical usage data. Computer name and profile information, however, will remain available for reference from various other reports. Unkeyed programs, even those configured to use a Manage Policy, will not be Managed on these computers – they will run but without any interaction with the KeyServer so usage will not be reported. Note: keyed programs (legacy) are dependent on an interaction with KeyServer, so these simply will not run on excluded clients just as they will not run on computers that do not have the KeyAccess client software installed.
Divisions panel: by default, there is a single Uncategorized division which includes all computer records. To create your own Divisions, use right click in the white area to bring up the context menu item, “New Division....” . Computers can be organized into the various Divisions either explicitly (by dragging selected records) or implicitly based on rules (explained below). In the table view of computer records on the right, the “Division” column will display the division membership for each computer (except for Uncategorized computers, which are listed with a blank value). In order to assign management responsibility for various subsets of these divisions, a subset can be aggregated into a Section and assigned to a limited admin account as explained in the Sections document.
If a Division contains automatically allocated computers only (by Rule or client authentication) its icon will be pink. If it contains any anchored systems (or no computers) it will be blue.
Filters panel: there is always at least one filter named Discovered. In addition, there are a number of other sample filters that are configured by default. You can also use the “New Filter....” menu item under a right click in the white area to create a new Filter, defining your own search criteria. Clicking to the left of a filter will select it. Only one filter can be selected at once.
Tags panel: Tags are arbitrary strings that are assigned to computers, policies, products, and users. This panel lists all Computer Tags, and will initially be empty until you have added some tags. For more, read the Tags documentation.
Rules — Filters with Actions
The default item in the Filters panel labeled Discovered is actually a Rule – it includes actions that, by default, set newly discovered computers to Login as Dedicated clients with Auditing enabled. To add or change an action defined in a rule, double click to see the filter details and click the 'triangle button' to disclose its configuration details. You can change the default Login type and Audit behavior specified in the Discovered rule, but the division assignment, Uncategorized, cannot be changed.
Filters with an action, i.e. Rules, are distinguished with a pink cross-hatch icon and always appear above Filters which have no action. They appear with small icons to the right of the name as an indication of which actions are active. The Discovered rule is the final rule, appearing just above the line separating Rules from plain Filters (if any).
A hierarchy of Rules descending down to the final Rule, Discovered, can be configured so that newly discovered computers are automatically categorized into an appropriate Division and the desired Audit behavior is specified. Computer records are matched against the Rules starting from the top — as soon as a rule matches, that rule's action(s) are applied, and no further rules are checked for that Computer. If the matching rule does not specify both Division and Audit behavior, the unspecified attribute will be set according to the Discovered rule (acting as the default).
OU Mapping
If you are using Active Directory for Client Authentication, it is also possible to populate Divisions based on each Computer's OU (similar functionality exists for LDAP and Kerberos authentication). This functionality is configured in the Active Directory authentication dialog. Using this means when a computer creates a session with the server, it will be put into a Division that matches the OU, based upon the options set in the Client Authentication module. Note that you can opt to let rules override mapping so you can augment your OU structure with custom Rules per the above section.
Anchored computers
Rules are evaluated every time a client computer establishes a session with the KeyServer. If a given computer should not be moved to a different division by any rules it can be Anchored, either by manually dragging it into the desired division, by right-clicking on it to "Anchor in Division", or by checking the Anchored option in computer details. An Anchored computer will no longer be moved from its division by any Rules or by OU Mapping. Its Division will remain fixed unless subsequently changed by an administrator. Other automatic settings made by rules will still apply. The Login and Audit settings for an Anchored computer can still change automatically by a Rule.
Computer that are Anchored are indicated in the computer list by an anchor icon in the Division column. When a computer is first discovered, it is not Anchored, and will not show this icon. In order to bring an Anchored computer back under the influence of rules, drag it onto the Discovered rule (filter), or open the Computer Details window and un-check the "Anchored" checkbox. You will see the anchor icon go away, indicating that it is once again un-Anchored. Whenever rules are changed and reapplied, they will affect all such un-Anchored computers, in order to easily recategorize them.
If a Division contains automatically allocated computers only (by Rule or client authentication) its icon will be pink. If it contains any anchored systems (or no computers) it will be blue.
Right Side — Computer records
The various columns on the right hand large pane show various hardware characteristics and other attributes for each computer (or virtual computer) that has connected to the KeyServer using the KeyAccess client. Right-click on the column headers and choose Arrange Columns to select which fields are shown. You can also Remove a given column from display that you right clicked on. Define Columns allows you to label and therefore make available any of the 10 custom columns available for use. The few columns displayed in the Computers window by default are described below:
- The Computer column shows the name of each computer, as defined by the computer itself. As such, more than one computer may have the same name. However, KeyServer uses additional characteristics to distinguish between two different machines with the same name. To display the unique computer identifier in this column instead of the name, right-click a column header and select “Arrange Columns...”, then drag “Computer ID” from the list on the right to the list on the left. See Computer ID Order for more on this topic. The icon color indicates what kind of computer record it is:
- Blue - Physical computer. KeyAccess is running on "bare metal".
- Orange - Virtual computer, such as a VDI pool.
- Green - Thin client session, as from Remote Desktop Services. Note the host for such sessions will have its own orange record.
- The Division column shows which division each computer belongs to. The column is blank if the computer is Uncategorized. An anchor icon is drawn if the computer has been Anchored to its Division, and is no longer subject by the configured discovery rules. If there is no anchor icon, then the computer will be subject to the configured discovery rules.
- The Version column displays an icon indicating the platform of the computer (Windows, Mac, Linux) along with the KeyAccess Client version number.
- The Last User column shows the logon name of the user account that has most recently connected to the KeyServer from this computer. If the computer is connected to the KeyServer with an active session, there will also be a "current user" icon, which indicates that the session will be listed in KeyConfigure's Connected Clients Window.
- The Last Session column shows the date and time at which the computer was last logged in to the KeyServer and an icon corresponding to the Login type for this computer is also displayed to the left of the date. For a computer with an active session this value reflects the logon event, and will be updated when the session ends. If KeyServer for any reason denied a computer's most recent logon attempt, this field reflects when the denied session request occurred.
- The Last Audit column shows the date and time at which a software audit was last uploaded from the computer if it is in a Dedicated or Leased state. When viewing the installed software information for the computer in various reports, it will be accurate as of this time but changes since then will only be reported to KeyServer at the time of the next audit. The Audit icon is also shown when the computer is configured to update audits automatically. If a computer has a last audit date, but no audit icon, it means for this computer that an administrator has disabled future audit updates or automatic audits were never enabled but an explicit one time audit was requested.
When you double-click on a computer record, its Computer Details Window will open showing all the field values for this record along with panels that show related Policy and Audit information. Note: various versions of KeyAccess have added the ability to gather additional hardware properties — older clients do not gather all possible hardware properties.
Reports are available via right-click that summarize computer data for the set of currently displayed records – however, Audit reports (for software) will never include Dormant or Excluded computers. To report on a single computer record, select just this one record and use right-click, or use right-click from its Computer Details window.
Computer list windows
Double-click on any selector (Login type, Division, Rule or Filter) in the left column of the Computers window and a separate window opens listing all the matching computer records. In the case of a filter (or rule), you can show or hide the filter conditions under the disclosure triangle icon at the top.
Context Menu Actions
Right-clicking on a computer in the computers window will offer the following options, in addition to any applicable Scripts you have installed:
In addition to context menus, whenever you see the icon representing a computer anywhere in the KeyConfigure interface, it will generally be clickable to expose relevant context or detail and it will be dragable into other user interface elements whenever such a drag has an obvious meaning.
Drag and Drop Actions
Computers in the computers window can be Dragged and Dropped to the following locations, among others:
- Into any Login type on the left hand side of the window (Dedicated, Leased, Dormant, or Excluded). This will set the login type for the computer.
- Into any Division in the Divisions section on the left. Each computer is a member of exactly one division.
- Onto any Tag in the Tags section on the left. This will add the tag to the computer. Computers can have any number of tags.
- Onto any Policy in the Policies Window to add the computer to the Policy, which might also change the computer's login type to a Dedicated or Leased.
- Into any “Computer Node List for Policy” window, which might also change the computer's login type to Dedicated or Leased.
- Onto any group in the Groups Window. This will add the computer to the Nodes list for the group.
- Into the Nodes list of any Group Details window.
Importing
It is possible to import computers from a CSV (or tab separated text file) rather than have them populate from a client session. This can be useful for adding offline systems to KeyServer for inventory purposes, or pre-populating records before the hardware is delivered on site. These records will be created in an Imported state (Dormant if pre 7.8) so they do not consume a license seat. If they are created with proper Computer IDs, then if a KeyAccess client connects to the server with a matching ID it will join the prestage record and update the Audit data.
Note that when importing, if there is no computerID field explicitly defined that uses the proper ID syntax, the import will attempt to match in order based upon other supplied information: Name, MAC, Serial, UUID. As of 7.8.0.4 however, we will perform the search in the order specified in your Computer ID Types setting. If none of these are supplied, a record will not be created as there is insufficient valid data.
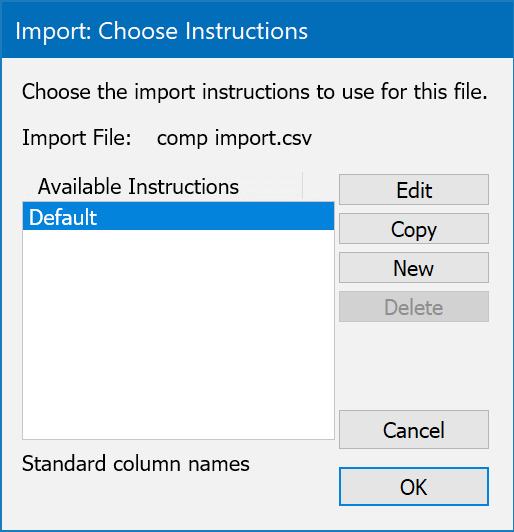
To perform an import, simply drag your CSV with header row included into the Computers Window. You will be prompted to choose Import Instructions. Select New to create a new mapping and call it whatever you like for later use. This is handy when you'll be bringing in data again from the same source (matching format) so you don't have to create a new import map each time.
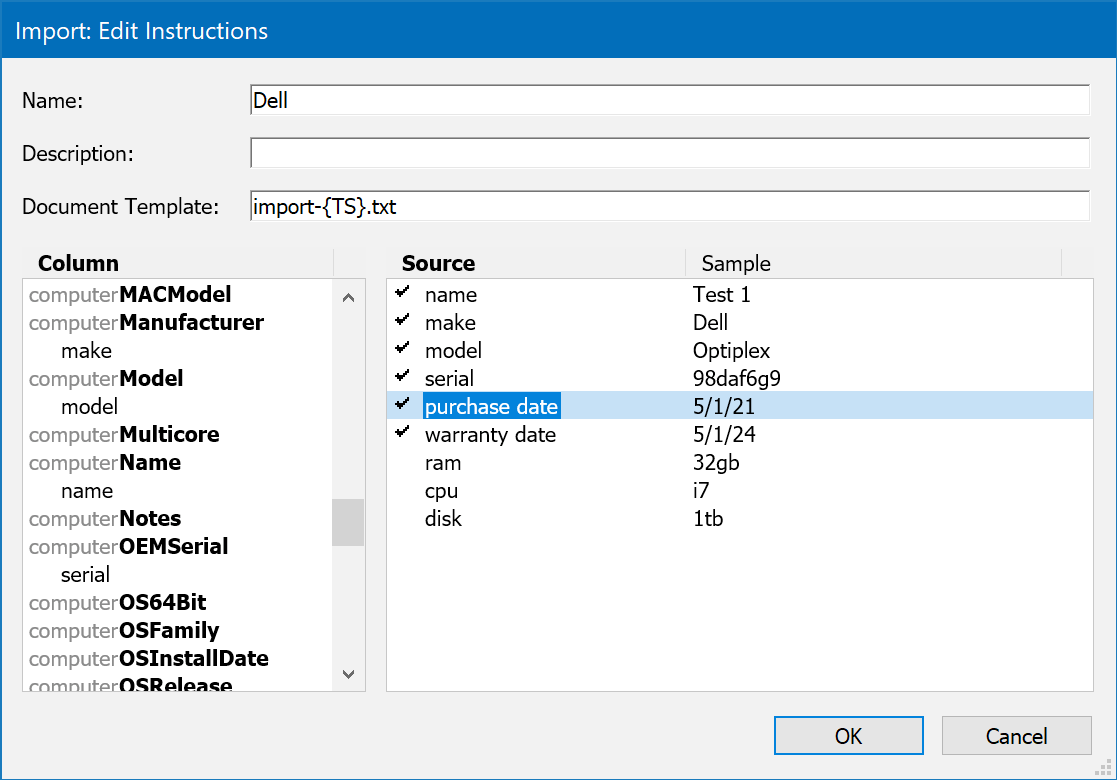
You will now see a window with destination fields on the left, and your import file source headers on the right. You can name the import instruction set at the top of the window. Drag the header names from the right and place them under the appropriate target field on the left to create the mappings. You can map multiple fields in some cases (like Notes) and the data will be concatenated in the target. Click OK when you're finished.
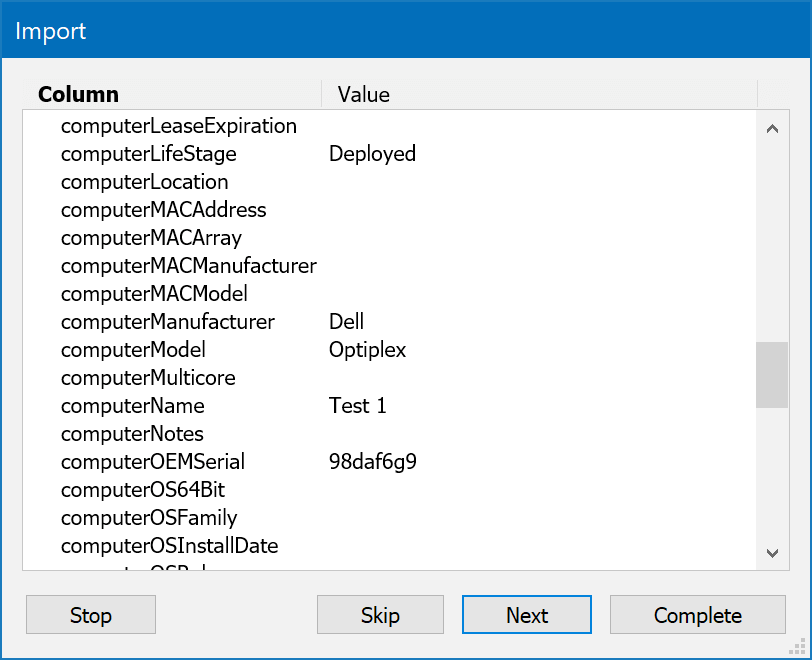
Make sure the import set you just created is selected in the Import window and click OK to see a confirmation of the import mapping. You can click Next to go through each import row and confirm the data looks right, or click Complete and all records will be imported. If there are any questions during the import you will be prompted to address them. For example, if you are importing warranty dates the format will be confirmed. You'll then be prompted at the end to remember your choices as part of the import map for future use.
You can edit the imported computer objects just like any other computer. You can repeat this process to update records in the future. Be aware that if you do this for any system that has KeyAccess, the client will update and replace fields as needed when it checks in. Manual fields will not be affected, but if you set the Model for example that will be replaced by the client gathered information.