Purchases Window
Note that this window is only available in the AllSight tier of the Sassafras Software Suite
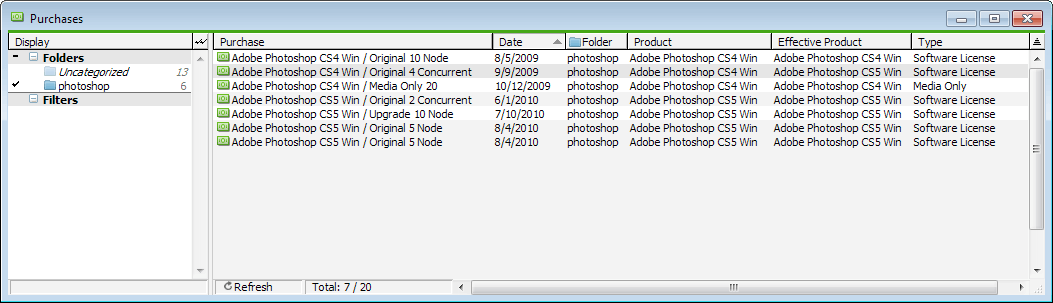
The Purchases window lists all of the purchases which have been entered (or imported) into the Sassafras Server. Entering purchase information allows you to have an accurate count of entitlements. The server will do a correct count of entitlements, properly reflecting expired entitlements, upgrades which rely on a prior entitlement, etc. Careful entry of purchases will mean that you always have an up-to-date summary of entitlements.
Right Hand Side
The right hand side shows a list of purchases, with some of the most essential properties displayed. Purchases are very complex, and can be hard to fully understand without looking at the full Purchase Details. One particular subtlety to notice is the difference between the Product and Effective Product columns. Usually these will both show the same product, which is the product which was purchased. However, some purchases may include Future Upgrade rights, which means that a future version of the product is entitled by the purchase of the earlier version. During reconciliation of purchases and policies, KeyConfigure will only count a purchase under a single product - so for a purchase with future upgrade rights, you can explicitly decide that the purchase will now “count” towards entitlements of the newer product. This decision to upgrade is done in the Reconcile Window for a single Product.
Left Hand Side
As in other main windows, the left hand side allows the items displayed on the right to be filtered in different ways. Each Purchase can belong in a single Folder, mainly just for convenience in filtering the purchases window or report results. Filters are just like in other windows, and are described in greater detail in the Filters documentation.
Context Menu Actions
Drag and Drop Actions
Purchases in the Purchases Window can be Dragged and Dropped to the following locations, among others:
- Onto any folder in the left hand side of the Purchases Window. This will add the purchase to the folder. Each purchase is a member of exactly one folder.
- Into the Policies window. This will make a new details window for a policy describing the same metric and quantity of the same product from the purchase which was dragged. The policy will not actually be created until the window is saved.
Importing purchases
See also our Tutorial Video on this topic.
Note also that importing in the Web UI is a bit more visually friendly, and has some differences from the below.
Purchases can be imported from a tab delimited text file or from a CSV with a header row. To start an import, drag the text or CSV file from Windows Explorer (or Mac Finder) directly into the Purchases window within KeyConfigure. You will see a window like this appear:
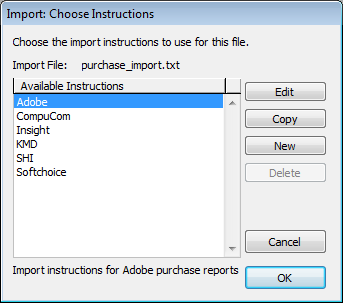
Data from the import file must be mapped to the fields in the Purchases database. You must specify how to do this mapping via an Instruction file. Some common file formats used by software vendors and resellers are included by default. If you select one of the pre-defined instructions you will be able to see a preview of each record before it is imported. Often you will need to define your own import instructions by clicking New.
Instructions
If you click New you will see a window showing field names for the Purchase Database on the left, and field names / sample data as discovered in the import file on the right.
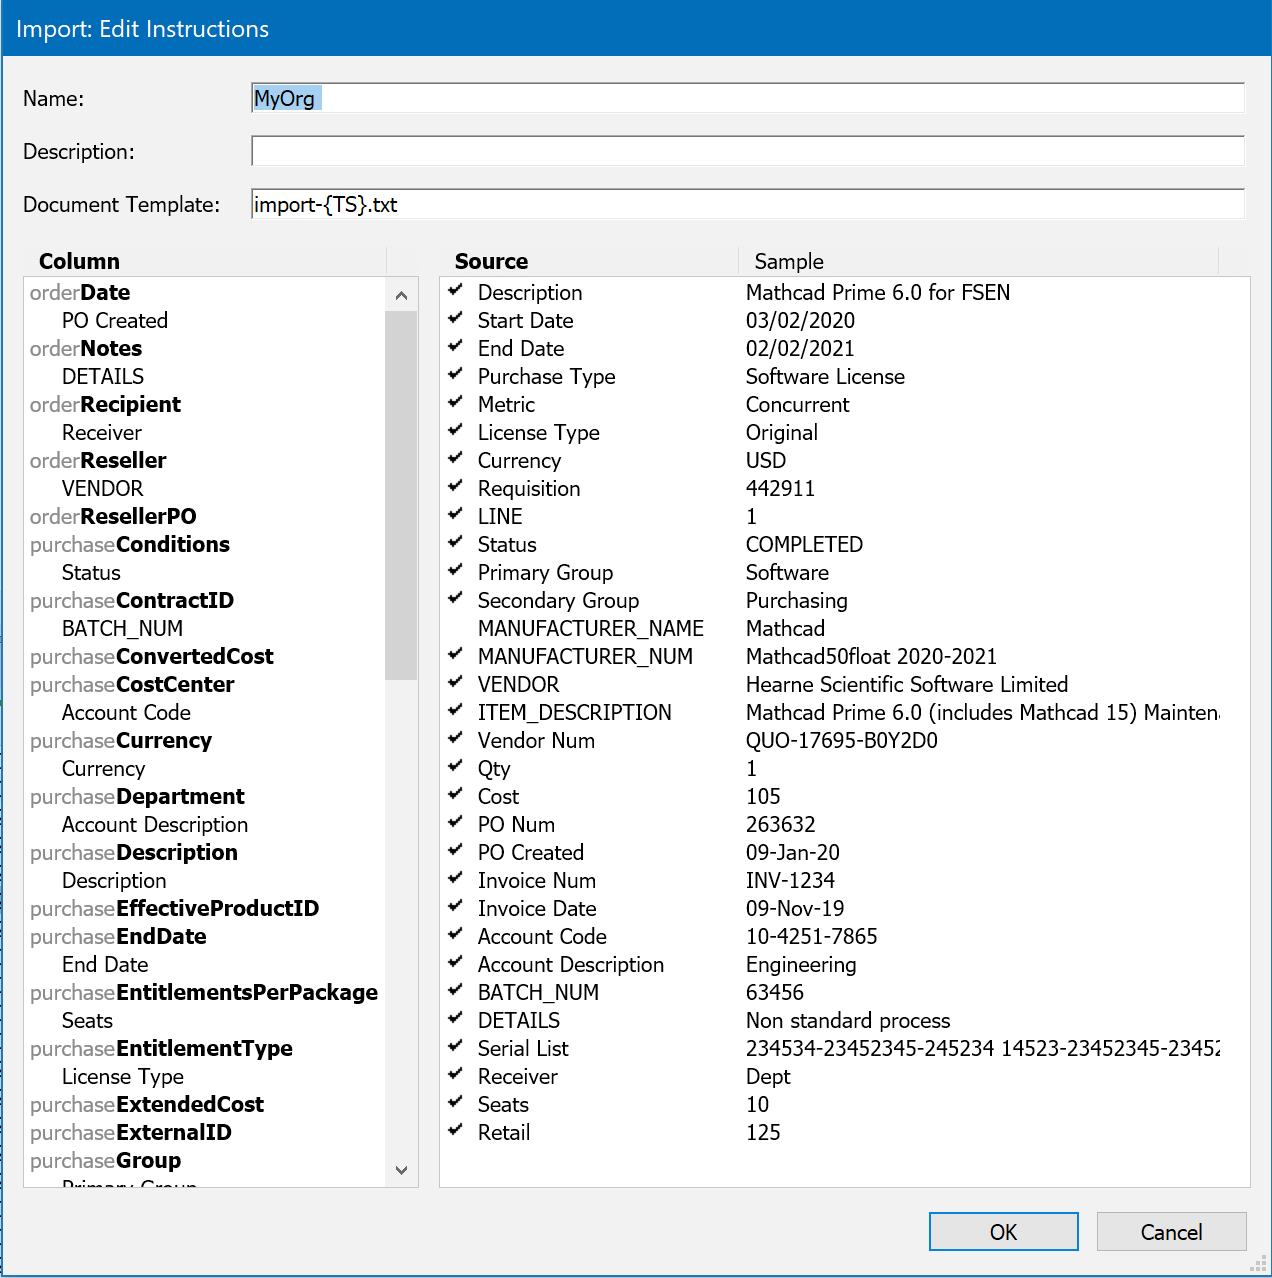
To configure your purchase instructions, drag fields from the list on the right (your source data using header row) into the list on the left (database fields). This allows you to specify where the data is mapped on import. You can copy a single value from the input file into multiple database fields if you like. Dragging within the left hand side will move a field to a new destination. Dragging from the right will add it a second time to a new destination. You can also concatenate two values from the input file into a single database field by simply adding both to the destination.
Notice that the Columns show the Table (gray) and Field (bold) as not all fields are in the Purchases table. You can also import to the Order table which allows you to populate the Purchase Order side pane of the Purchase. There are also sub tables for serialNumbers and urls. Using the x-product fields can help identify the Product the Purchase is for.
Notable Fields
- purchaseOrderID - The actual PO number which will appear in the Purchase Order side panel.
- purchaseItemNumber - The PO line item number. This lets you associate multiple Purchases with a single Purchase Order. If the ItemNumber and OrderID are the same on multiple records, a replace operation will occur. If the ItemNumber is different or not pressent, additional records will be added to the PO. This makes it imperative to have if you are doing an "update" import of data. The Enumeration Constant can be leveraged for this if you don't have multiple line items in a Purchase and lack the line item in your import data.
- orderNotes - Comments field in Purchase Order sidebar.
- purchaseProductID - References record in Product table. This will not be a known value in most cases. Use the x-product fields to narrow results and specify the Product on import for each record.
- purchaseEntitlementType - Corresponds to the License Type radio button selections (Original, Addendum, etc). Note that there is no import field for the Entitlement state of active, legacy, dormant.
- purchaseRenewDate - "New Version Upgrade Rights Until"
- purchaseEndDate - "Expire Date (license term ends)"
- purchaseType - Software/Hardware/Support/Other
- purchaseMetric - Concurrent/Node/Site/User/etc.
- purchaseFolderID - Name of the Folder in the Purchases window you want this purchase record to be assigned to. Folders must exist at time of import, they will not be created. If there is no match the record will be put in Uncategorized as normal. Added in 7.8.0.4
Note that the PO# itself should be put into purchaseOrderId. The field named orderResellerPO is there to record additional data but is not the primary PO#. Once you start dragging fields from right to left you should have something like this:
Once you have chosen instructions (either predefined or defined by you), click OK, and KeyConfigure will start to process the text file. You will see a preview of the first record. Each field in the Purchase database will show the value it will receive as a result of the instructions.
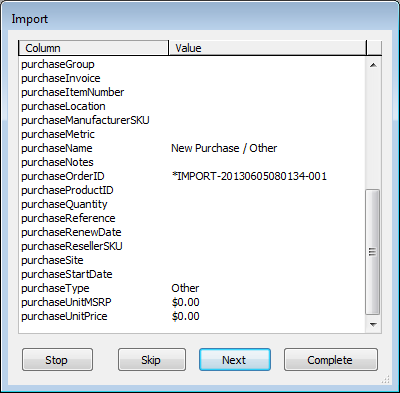
The screenshot above is using instructions that only specify a few fields. Notice that certain fields will be given default values. In particular, every purchase must have a purchaseOrderID. Here since no PO# has been associated from the import file, the import process chooses a text value for the purchaseOrderID field, which is based on the date and time of import. After looking at this preview, you might decide to Stop and edit your instructions some more before importing. If the instructions are correct, you can step through the purchases, either clicking Next to import the current record and move on to the next, or Skip. Alternatively you can click Complete in order to import all of the remaining records. You should always check that an import has recorded all data accurately, but you can either do this as you are importing, or once the import completes.