Computers and Devices
Both the Computers and Devices sections of the Web UI are very similar. They are also similar in function to the Computers and Devices windows in KeyConfigure, but include newer features not found in the desktop app.
Basic Concepts
Clicking on the icon in the top left of the Ribbon will toggle the Sidebar (if you accidentally close it).
Further details per each asset page type are found below.
Computers
The Web UI has many powerful tools, some of which are not available in KeyConfigure. Conversely there are still some options that are only in the desktop tool, like making Sections and using the Show Intalls command. While everyday users will find what they need in the web, a back end Admin will still want to have KeyConfigure on hand.
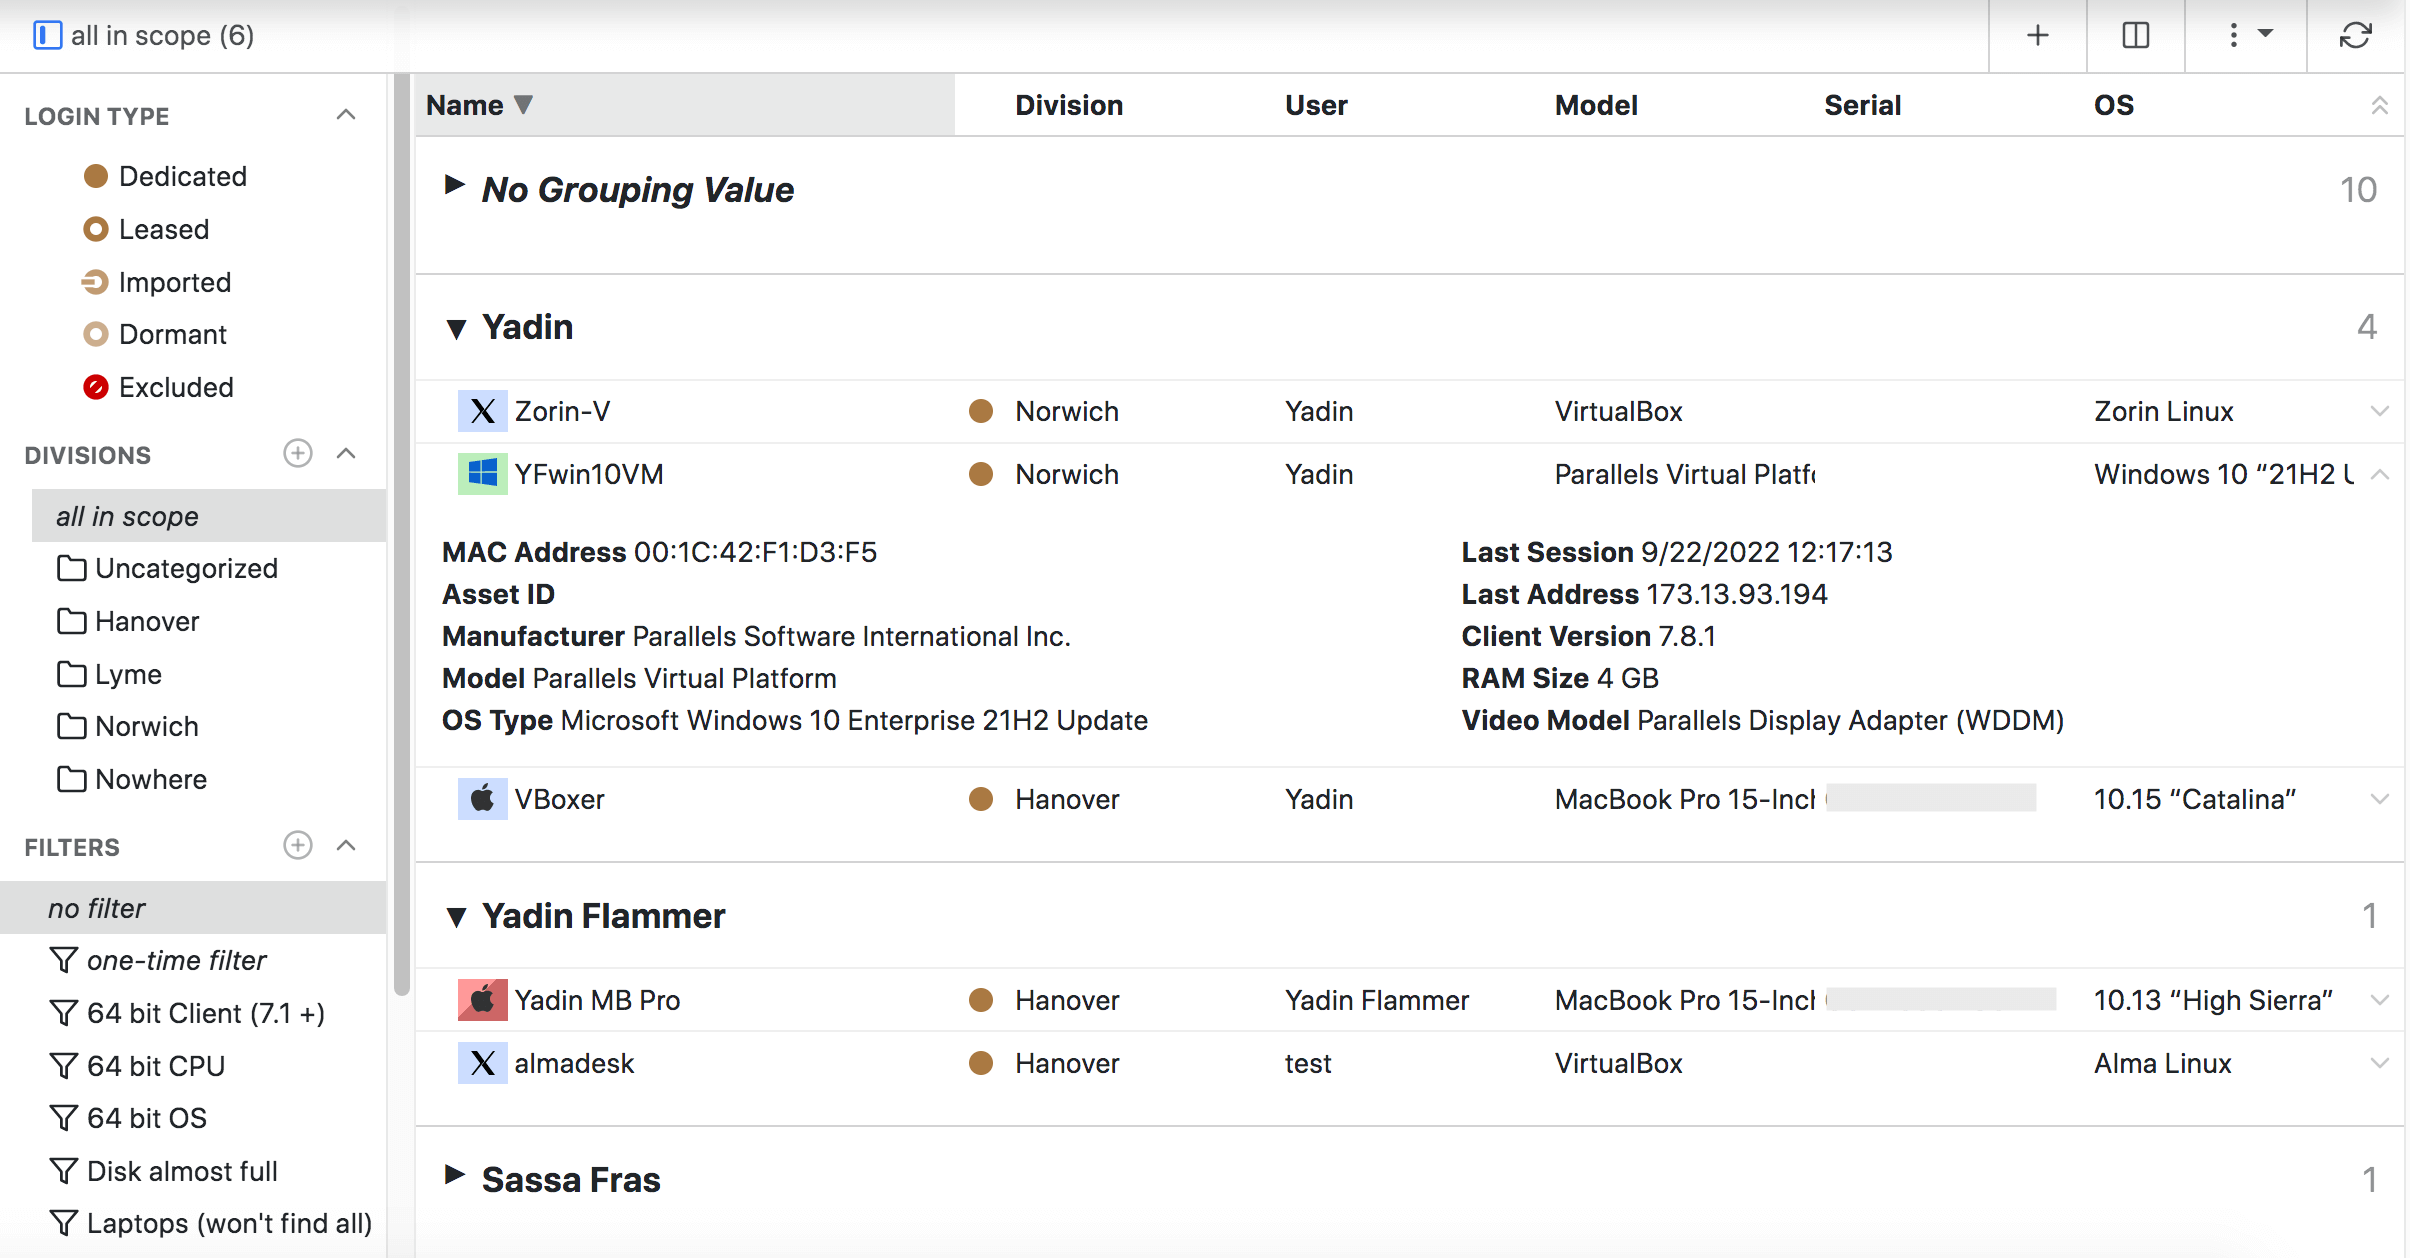
The Computers page will show an icon next to the computer name with the platform and status indicated much like on Availability Maps. That is, Green are available, Red are in use, Blue are offline, and Gray are in Maintenance. This means the listed User may either be logged in if In Use, or the last person to use the system if in other states.
Top Ribbon
In the top left you will see a button to toggle the display of the left hand navigation pane on and off. Next to this is an indication of what scope is applied due to selection of a Division in the navigation, as well as a total number of computers in the current selection. On the right side are several tools.
The first is the + to add a new record. Using this you'll be prompted to choose a primary ID type for the new record and the corresponding data for that field. It's also highly recommended to provide a Name for the record. You'll then be taken to the Details page for the new record to add in the other data.
Next is the Arrange Columns button ◫. This will bring up a modal where you can choose which data fields will be displayed as columns and what oder they appear in. You can also select the Grouping field to use, if any. Grouping allows for powerful display of the computer records by any available field in the database, like Owner, Model, RAM, etc. By grouping and then sorting by another column, you can achieve sub-sorting of objects.
The More menu ⁞ ▾ contains a number of other actions. Many items will be grayed out if you do not have one or more Computers selected in the main pane.
- Open Details - Same as clicking on the computer name, go to the details page for the record.
- Quick Edit - Open the quick edit dialogue which allows change of any number of fields on any number of records at once.
- Any Forms will be listed here to view a selected record with. When used on a Detail page, if you have any Forms defined you can easily flip between these views.
- Request Audit - Ask the client to gather a fresh audit ASAP. If you hold Shift when clicking this, a Full Audit will be requested instead of a Delta Audit.
- Anchor in Division - Force the computer to stay in the current division assigned so it is not moved by Rules or AD mapping.
- Scripts - Sub menu of Admin Scripts you can run on the selected computer(s).
- Reports - Sub menu of Reports you can run on the selected computer(s).
- Import - This choice starts an import process for the type of item you're viewing (Computers or Devices).
- You can choose from a number of formats to Download the current displayed list of object to. This will save only the displayed rows and columns. It will not show the Grouping if one is set.
- Delete - Remove the computer record(s) from the database. Not recommended in most cases. Generally you should move retired hardware to a Dormant Login Type to free the license seat but retain historic usage data.
Left Navigation
The left hand navigation for Computers contains multiple sub sections. If you make the divider between the sub navigation and the main pane wide enough you will see Counts displayed for each Login type and Division.
- Login Type - You can filter by one or more Login Types. These are a status that determine the license state of the computer record. The icons correspond to what is seen in front of the Division for each record in the main pane.
- Divisions - These are groupings of computers (hence the folder icon). You can click the + to add a new Division, or right click on a division to renmae or delete it. An additional layer of organization, Sections, can only be managed in KeyConfigure.
- Filters - You can use Filters to set display criteria for the main computer list. Only one Filter can be active at a time. You can use the one-time filter to apply custom criteria on the fly without saving it. Click the + to add a new filter, or right click a filter to edit, duplicate, or delete it. At the top of the filter list are Rules. These are used to move computers to Divisions when they connect, set audit type, and login type. The default rule is called Discovered and is in pink. All other custom rules are above that, and are processed in top down order. The icons indicate what actions are being taken by the rule. To turn a Filter into a Rule and vice versa just drag and drop across the dividing line.
- Tags - Once a Tag is created it will appear in this list. Tags are initially made by adding one to a Computer or Device (note they are not shared across these data tables). You can then drag and drop items onto a tag to add that tag to the items. Because Tags are many:many, a computer could be under multiple tags not just one like Divisions. Like Divisions and Filters, selecting a tag will filter the displayed items.
Main Pane
The large area of the page where the list of computers is displayed. You can change the displayed columns and grouping from the Arrange Columns ◫ button in the ribbon.
- Click any column header to sort by that column.
- Click on a computer to view its detail record.
- Click anywhere else on the line to select that row, and then shift or control click to select additional rows. With multiple selections you can then use the more actions menu ⁞ ▾ in the ribbon to make bulk edits, run scripts, or start a report.
- Right click on an item row to access these actions for one record (context menu), or choose a Form to display the record in.
You can use the Search bar in the header to search for anything in any displayed column. Combining the Scope and Divisions filtering options allows for robust and detailed results that can then be further quick searched.
Devices
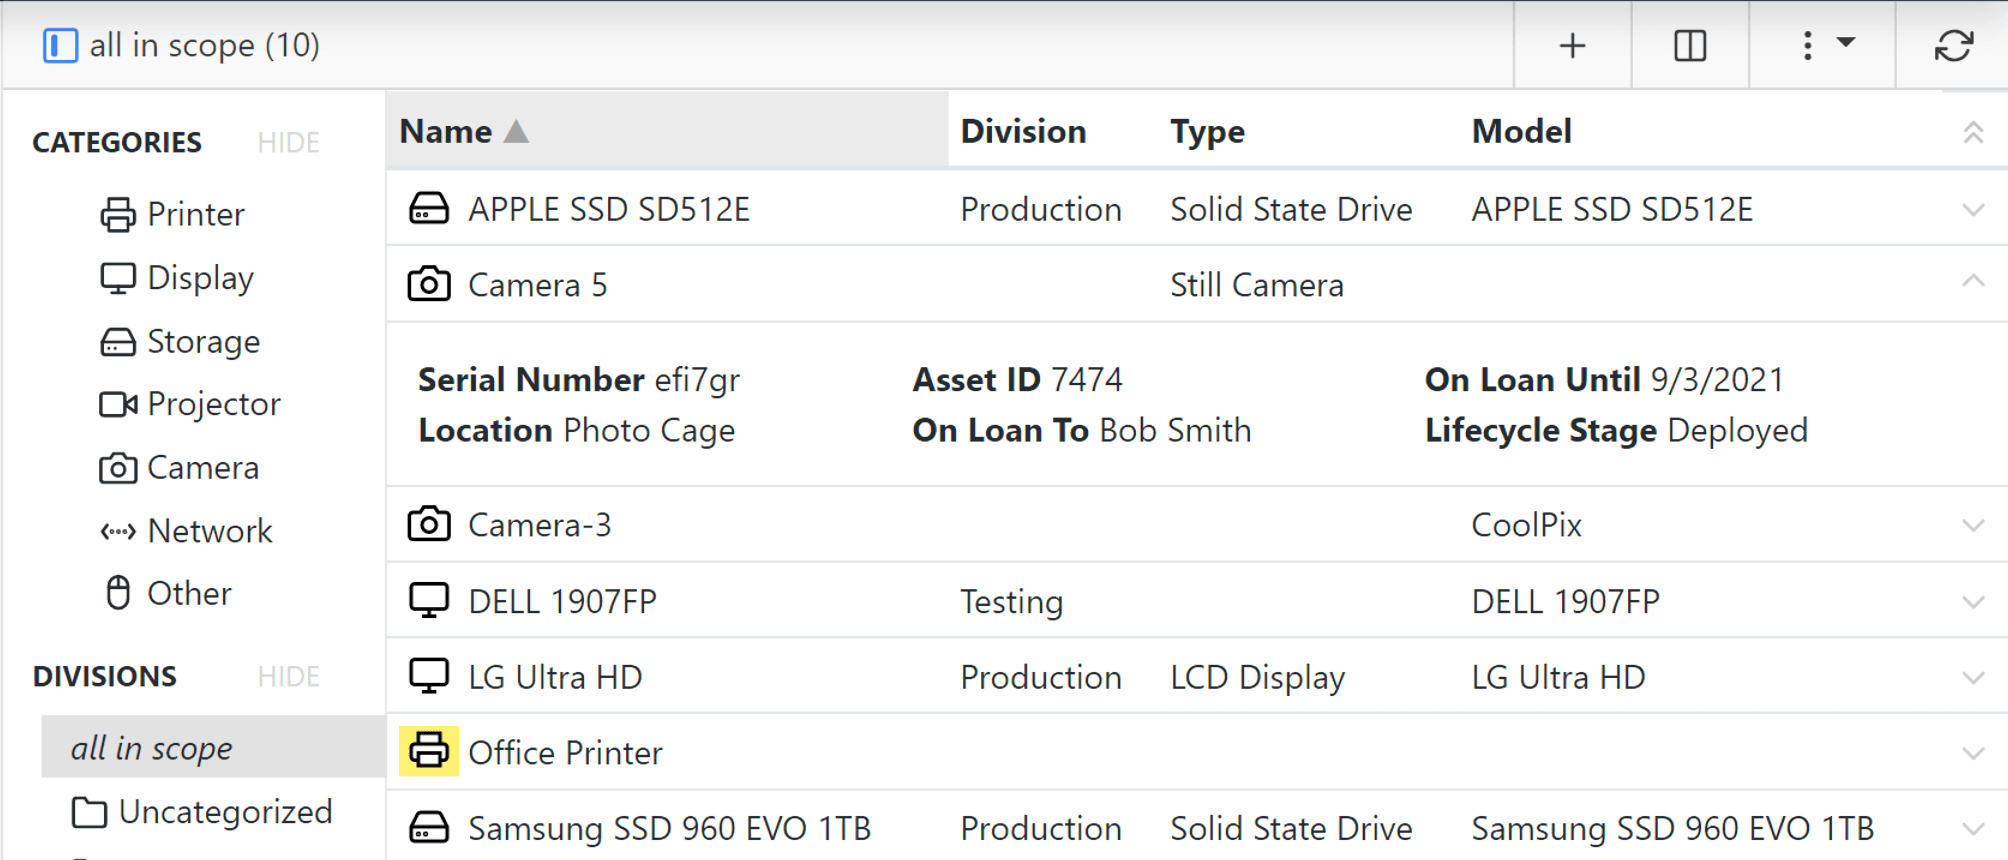
The Devices page is much like the Computers page, but you can not create or edit Divisions here. The main difference is instead of the Login Types you see Categories. These are built in and can not be modified, but you can create custom Types under any Category using the Custom Columns under Settings. Sassafras tends to consider things like tablets and mobile devices as Computers, and all other peripheral items and other equipment as Devices. That is, although we do not have a client for iOS or Android, those mobile devices can be imported using our admin scripts from Jamf or InTune, and we create them under Computers due to the amount of data available for them. Devices have many fewer data fields, but also highly customized ones by Category.
Details
Once you click a Computer or Device and are taken to its Details screen, you will see the sub navigation is a list of the various panes of data. Some panes like Policies (for computers) and Custom will only appear if they are applicable (i.e. the data exists). Clicking Edit will allow you to make modifications, and you can click through the various panes before saving all your changes for the entire record. For a full list of fields in the various panes, see Computer Details and Device Details in the older KeyConfigure documents.
A feature in the Web UI as of 7.9 is the ability to make Forms to customize the display of these detail pages. This allows you to set the default view for an account to only the fields of interest.
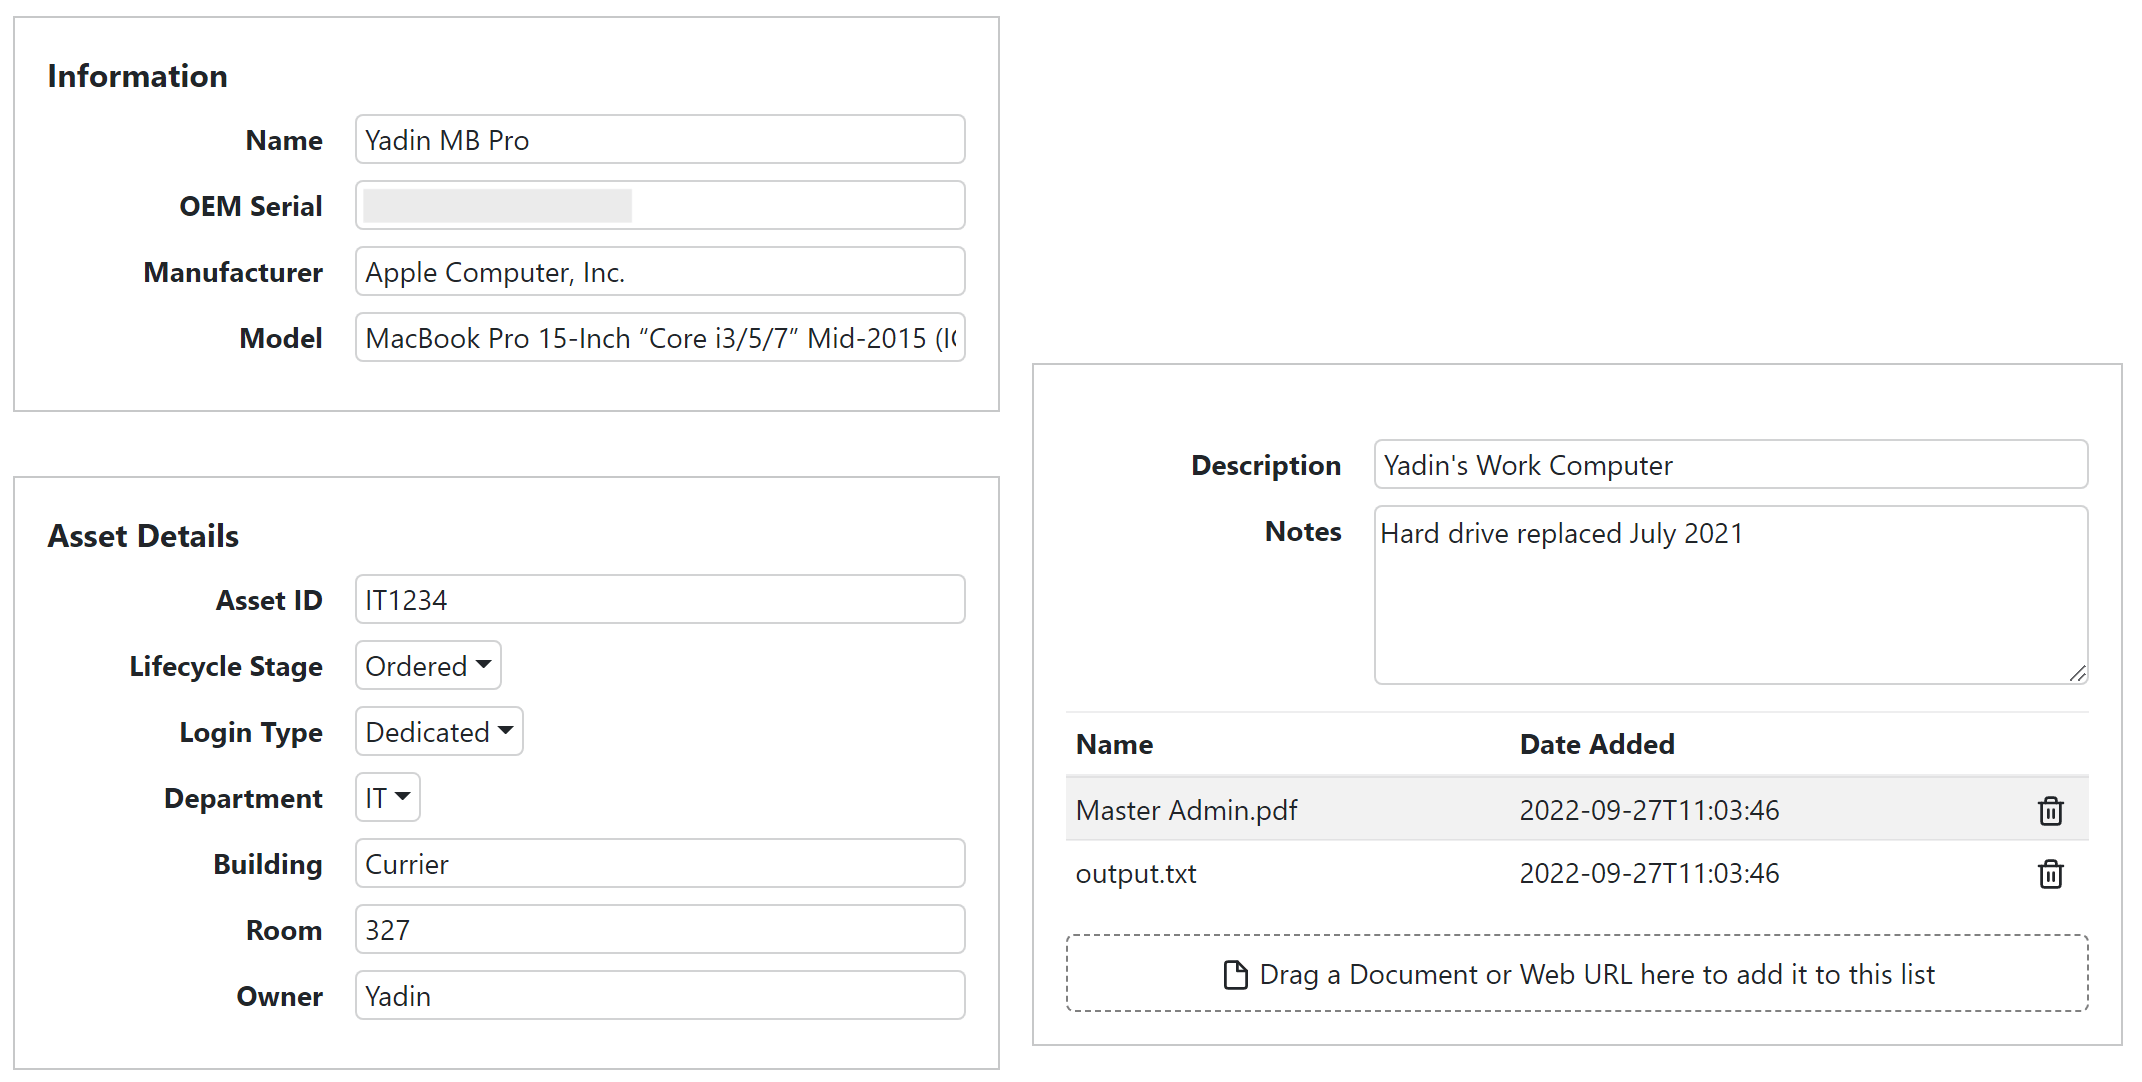
Note that you can edit certain fields like Computer Name that are populated by the KeyAccess client, especially when using the Quick Edit feature in 7.9. If you change these, an update from the KeyAccess client will restore the actual value. Likewise if you import a CSV that changes these, they are changed from manual, and would be again changed by client. The intent is that you can rename retired machines or manually imported machines for example as a convenience, not override the actual computer name. This applies to some other fields as well that allow edit but are agent provided. These are distinct from the Asset and Custom fields which can be Locked against client update.
Linked Records
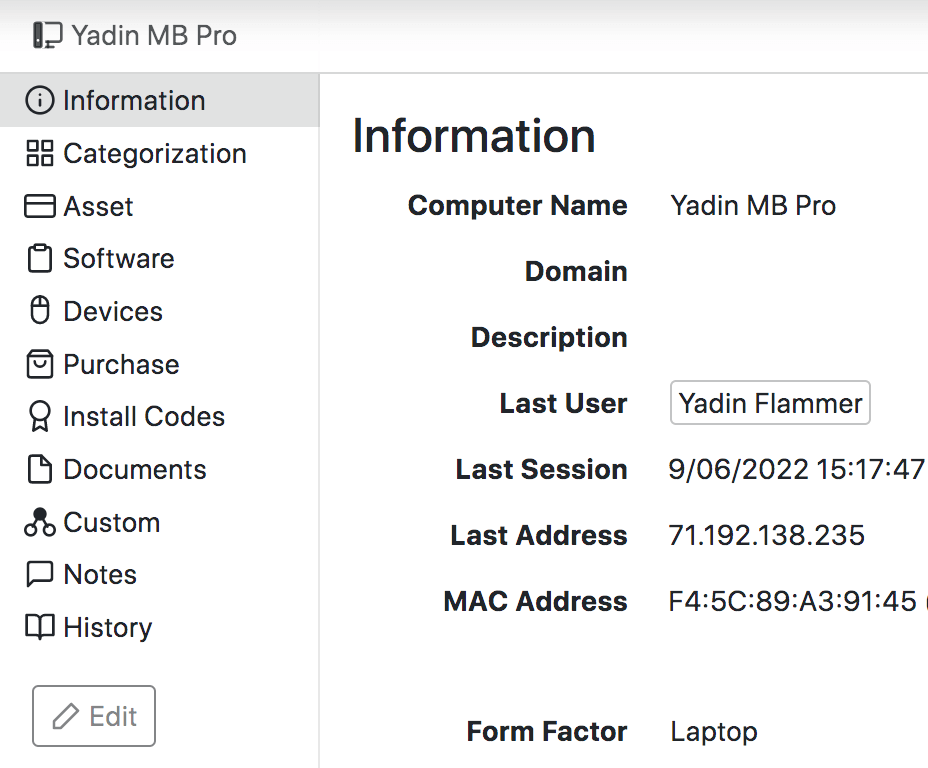
Some information is interlinked in records, and may even lead you to screens not accessible from the main navigation. For example, if you click on the Last User of a Computer, you'll be taken to a User detail record that you can also edit!
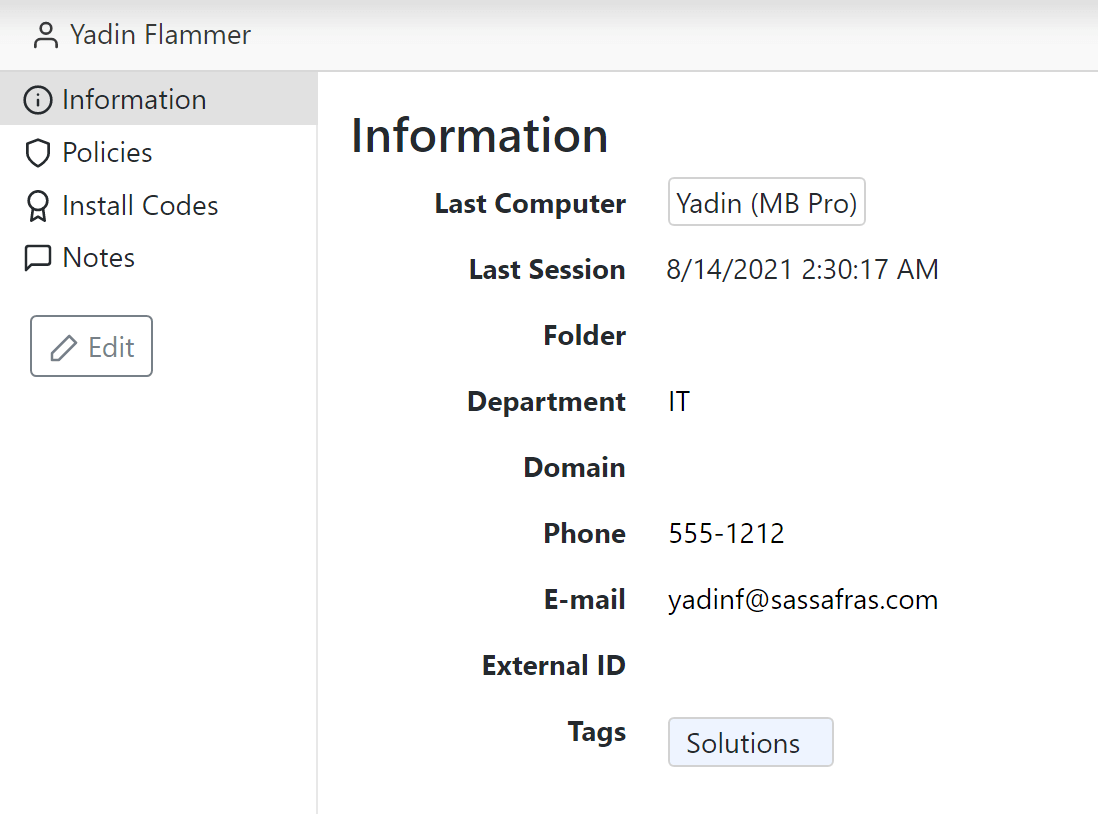
Note that the User details include panes to show a list of Policies assigned to the user, as well as any Purchase Install Codes.
Other links include Devices and Software. Purchases and Models can also be linked.
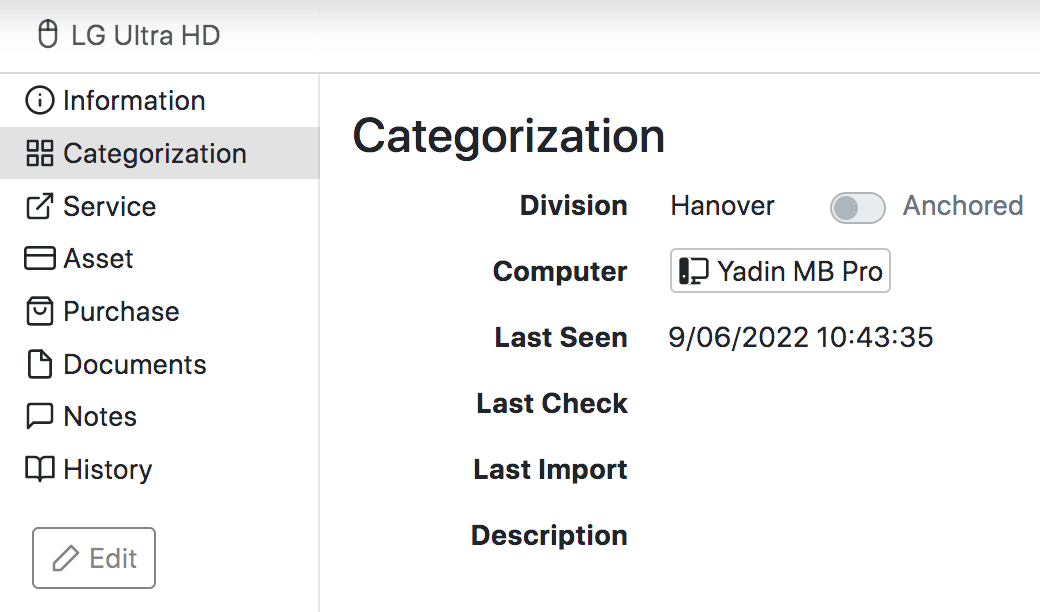
Information and Categorization
These panes contain various information reported from the computer and a few management setting options. Of note in the Web UI is the Maps list for a Computer on the Categorization pane. This is not present in KeyConfigure and shows what Map Set and Floorplan the computer is a member of.
Software
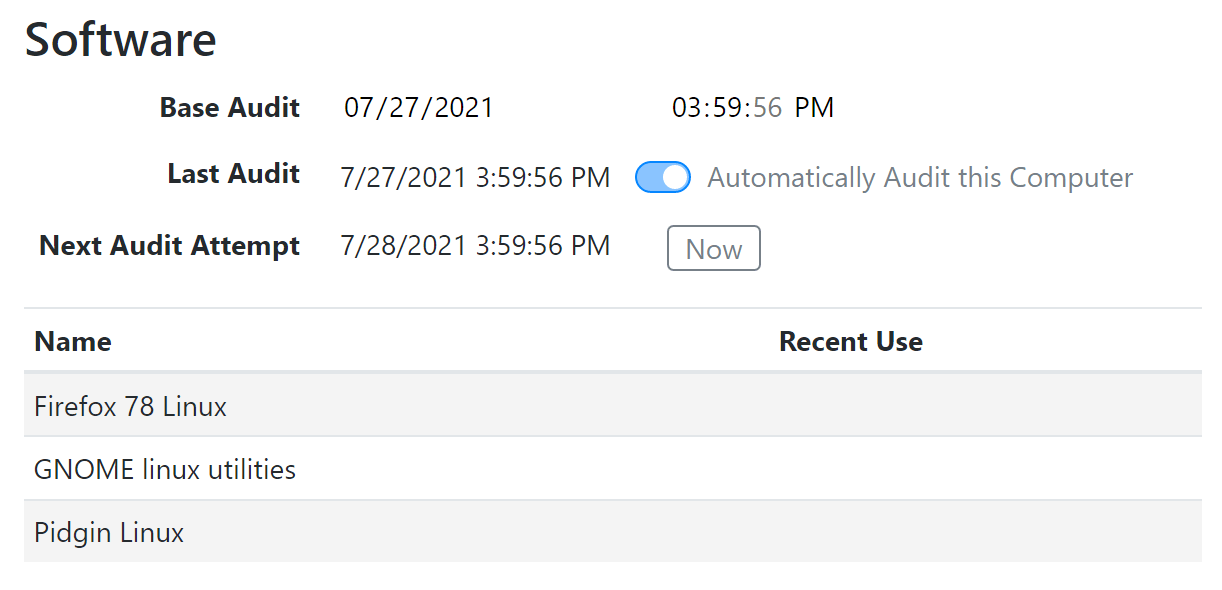
The Software pane in the Web UI of Computer Details is the equivalent to the Audit pane in KeyConfigure. However, it not only contains the Audit information, it also shows a list of all installed Products on the computer. This is similar to the Show Installs function in KeyConfigure except this shows Products instead of Programs. With the Recent Use displayed, this makes it very easy to check what known softare is being used on a given computer without running a report.
Install Codes
This is a list of "codes" linked to the computer by way of the Install Codes pane of a Software Purchase record.
History
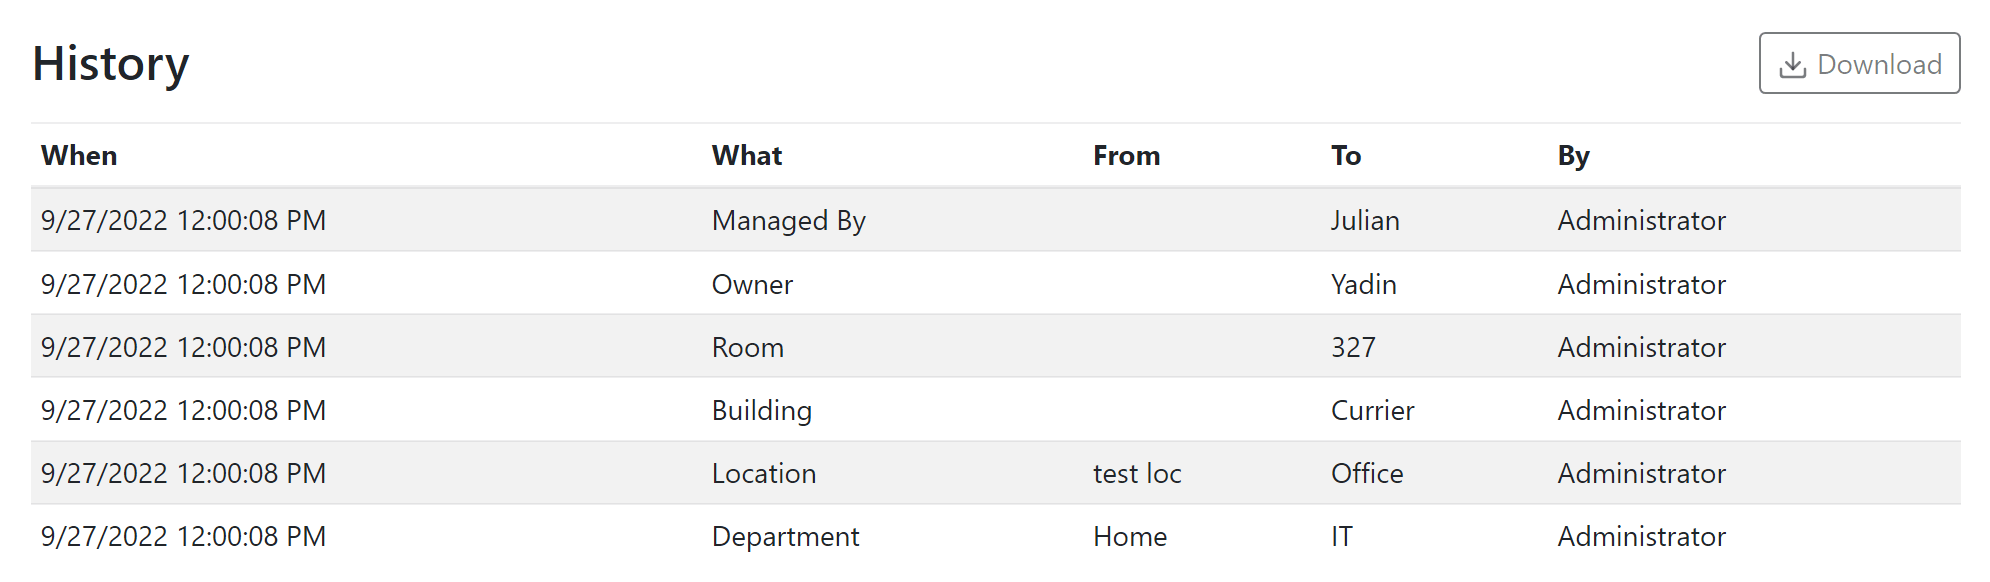
Added in 7.9, this pane shows a history of changes gathered since the 7.9 server update was applied. While you can not sort the display columns in the web as you can in KeyConfigure, you can use the Search bar to filter the items to a keyword. You can also Download the displayed results.
Importing
New in 8.0 is the ability to import records for CSV in the Web UI. While this section talks about Computers and Devices, this also applies to Purchases. To initiate an Import, click the ⁞ ▾ menu in the upper right of the Computer, Device, or Purchase page and chose the Import option.
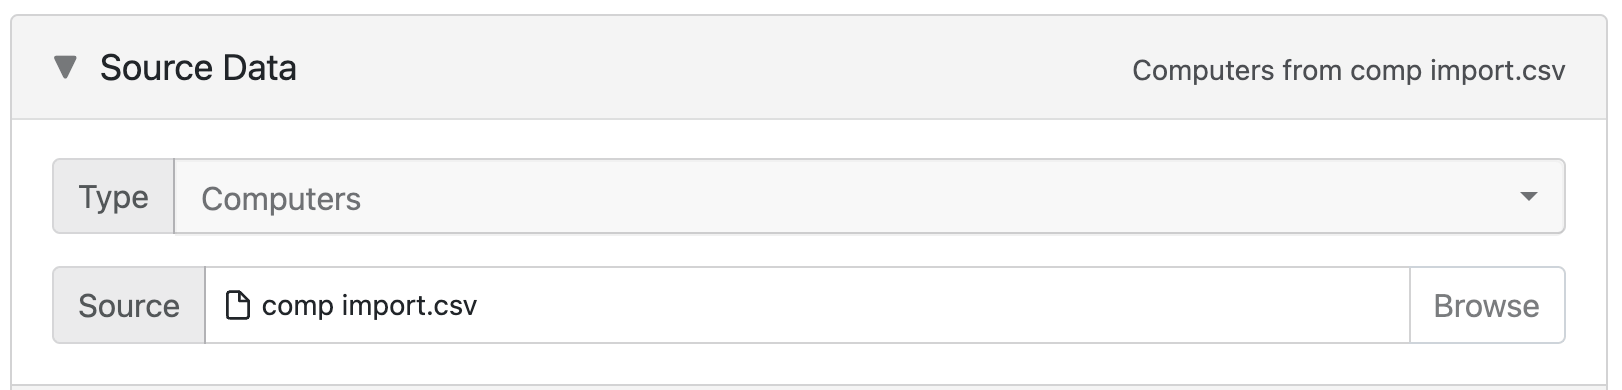
Source Data
The first step of an import is to choose a CSV file with your source data.
Mapping Instructions
If you have previously saved import maps, you can select from them here. You can also Save the current instruction set you have made. A popup will ask you to name the mapping set.
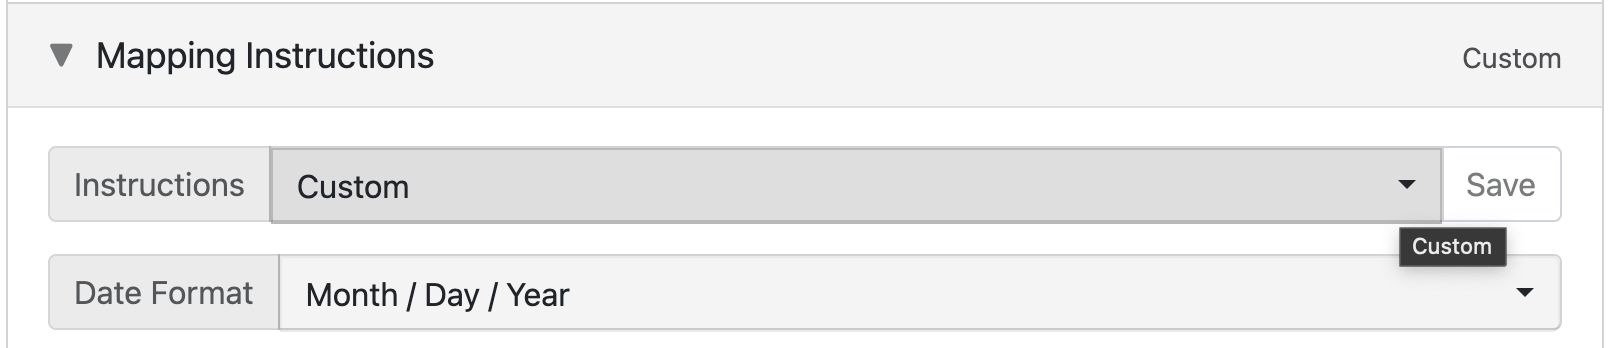
If you are importing any date fields, you can choose the Date Format that will apply to all such fields.
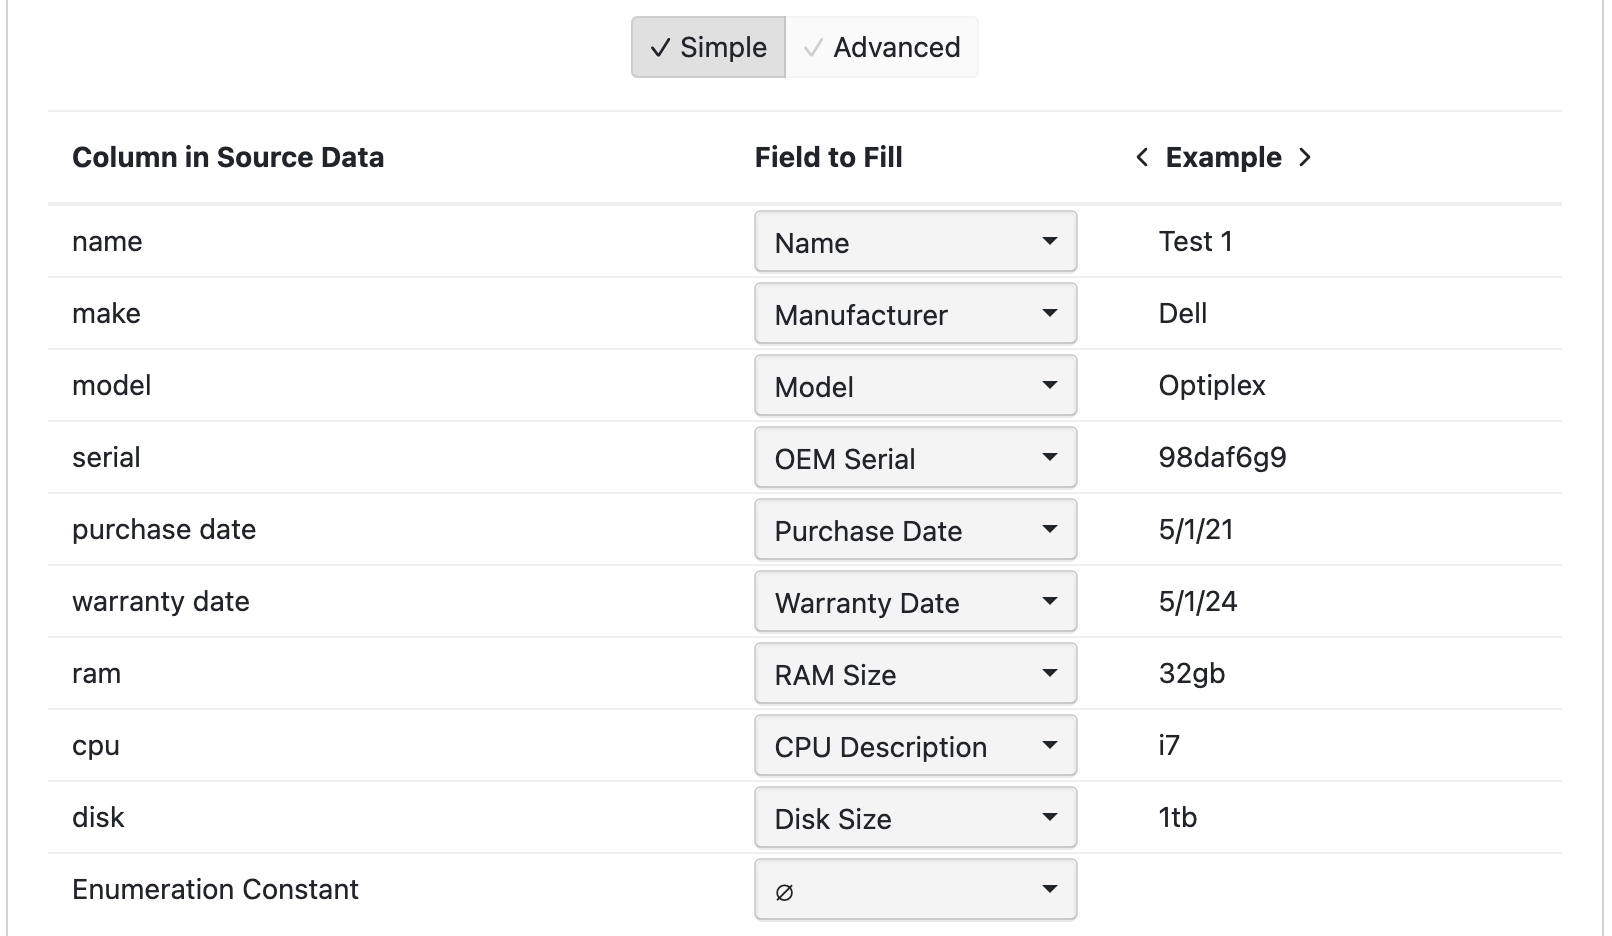
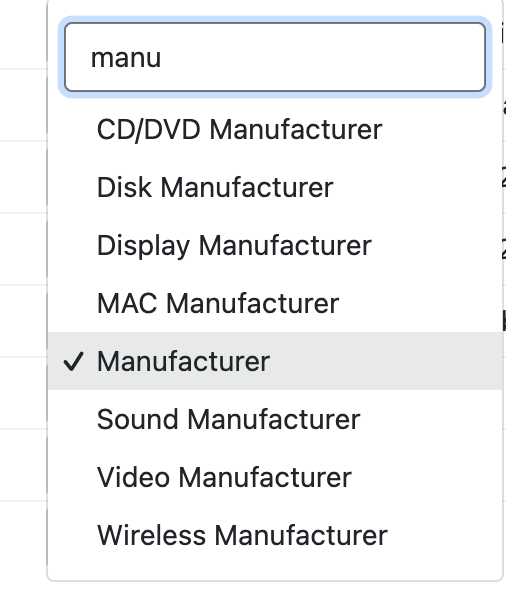
Once you have chosen a source file, you will see a list of the headers in your source data. This is the Simple mapping option by default. For each field you can then choose a destination to map that data to. If any header names match field names they will be auto matched for convenience but you can change them as needed. A search box appears at the top of the drop down so you can perform a find for the field you want. The example shows the first row of data so you can verify your mapping makes sense, and you can click the arrows to view other row results before importing.
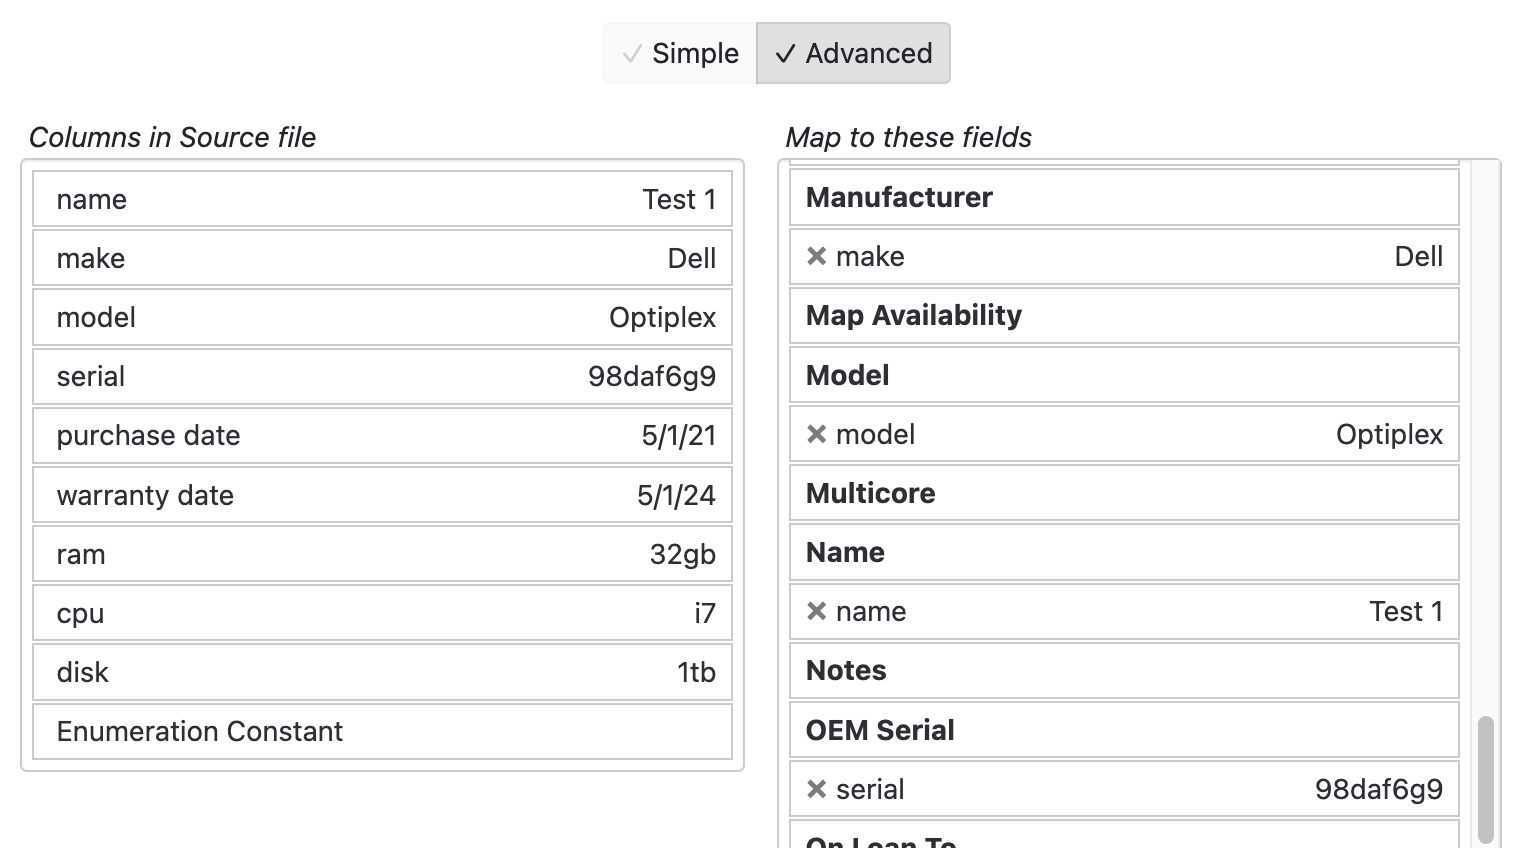
If you choose the Advanced button for mapping, you can do more complex manipulations. For example, you could send one input field to multiple destinations, which is not possible in the Simple mapping. This interface is a drag and drop mechanism. Drag fields from the source columns on the left under fields on the right to set the relationships.
Mapping Values
In a saved mapping, there may be fields where the values did not match exactly to internal values. For example, perhaps "In Use" was mapped to "Deployed" for the Lifecycle Stage. These value mapping choices will be displayed in this section.
Import Results
Once you perform an Import the results are displayed here. This allows you to verify success or failures.
