Authentication Modules
Authentication modules are implemented as library files stored in the Authentication Modules folder within the KeyServer Data Folder. Module selection and the corresponding configuration options are specified in the Web UI under Settings -> Account Setup and Clients. They can also be specified in KeyConfigure under the Config menu using Admin Authentication... and Client Authentication... respectively.
Client vs Admin
The same module can be used for both Client and Admin authentication. In this case, the module's connection settings can be entered just once in the client auth setup – then as a convenience, the Copy Client Auth option can be used when setting up the module for Admin Authentication.
Client authentication refers to the KeyAccess client communicating to the server. It most often used to automate the placement of client computers into Divisions based on group membership data that is available from an external authentication service (e.g. Active Directory). It can also be used when defining a Policy scope in order to control usage of a product based on client computer or user login credentials.
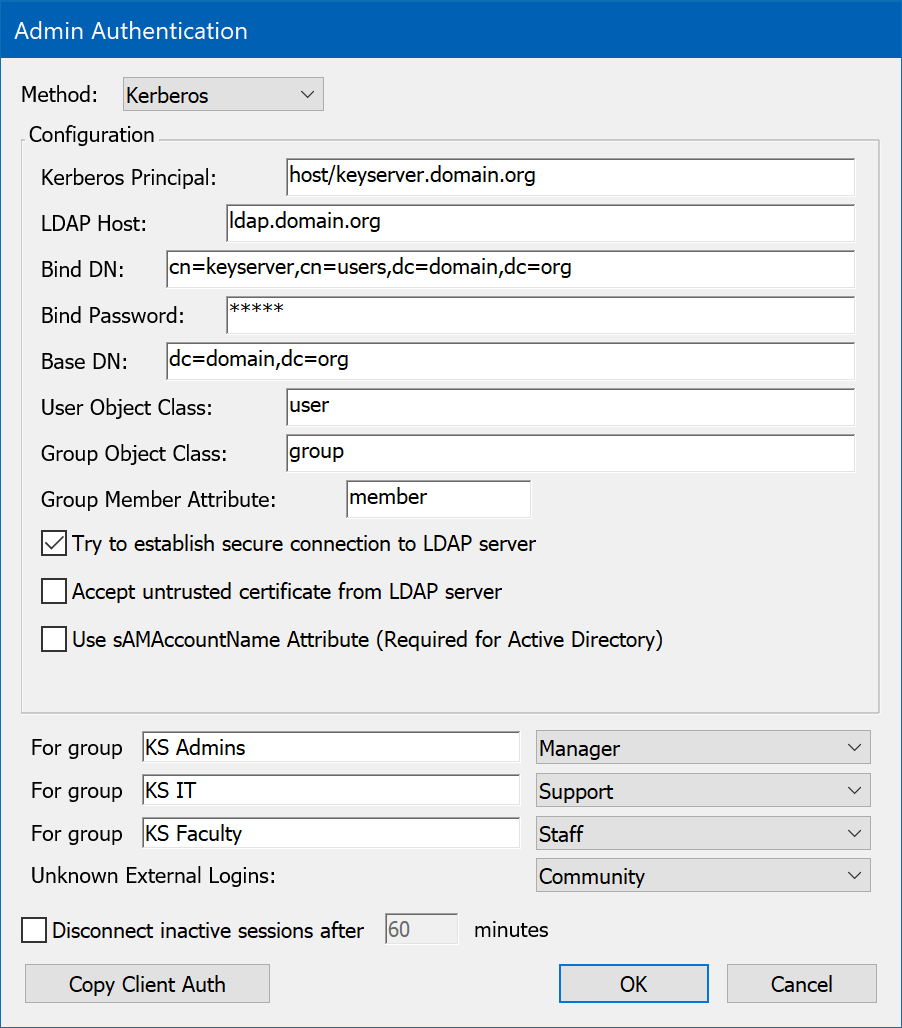
Admin Authentication lets you configure an external authentication service to manage privileged user logons to your Sassafras Server. This includes logons using KeyConfigure as well as through the Web portal. Just like the internally defined admin accounts, various configuration options and platform features can be granted based on group membership. It is important to understand this only deals with the authentication, not the authorization in the Sassafras Server. For more on permissions, refer to the Admin Access Window and ACL Details Window.

![]() Note: the check box for "Assign Division automatically" is always displayed in the Client Authentication configuration dialog even when this option is not supported by the module. For example, the "Single Password" module has no access to data specifying computer group membership – so there is no way it could automate the placement of a client computer into a Division.
Note: the check box for "Assign Division automatically" is always displayed in the Client Authentication configuration dialog even when this option is not supported by the module. For example, the "Single Password" module has no access to data specifying computer group membership – so there is no way it could automate the placement of a client computer into a Division.
![]() Several modules are designed to request a password from a user on a client computer. By default, KeyServer disables communication from KeyAccess 6.0 and older– on newer clients, Passwords are always conveyed to the Server in encrypted form. The Server may convey the password to the designated authentication service either in encrypted or clear text format, depending on the module chosen and the capabilities/configuration of the authentication service. When clear text is the only format supported by a module, it will be mentioned in the documentation. In this case you should host the KeyServer process and the authentication process on the same host, or at least on hosts using a network connection secured against eavesdropping.
Several modules are designed to request a password from a user on a client computer. By default, KeyServer disables communication from KeyAccess 6.0 and older– on newer clients, Passwords are always conveyed to the Server in encrypted form. The Server may convey the password to the designated authentication service either in encrypted or clear text format, depending on the module chosen and the capabilities/configuration of the authentication service. When clear text is the only format supported by a module, it will be mentioned in the documentation. In this case you should host the KeyServer process and the authentication process on the same host, or at least on hosts using a network connection secured against eavesdropping.
General Options
Note that there are several common fields between modules. As of 7.7, there are default accounts and easy assignments for Admin Access to external groups right in the authentication module. If you need more granular control you can still use the Admin Access window to create custom Roles. The most notable option is for Unknown External Logins. The default setting of Community will create Guest level access for any account that is not otherwise linked to a Role via an External Group. Using Create Accounts as Needed will result in a stub account being made in the Server if membership is resolved to a referenced group, and the related Role being applied. Conversely Determine Access on Demand will still resolve the privileges of a linked Role, but will NOT create the local stub account. This can be useful in large environments with full authentication but granular access.
- Assign Divisions automatically - Options for how to handle computers that are connecting for the first time. If you do not use this when you're using a directory system, computers will still need to be manually assigned. Otherwise, if you're using AD for example, this will cause the Division organization to match your OU organization.
- Create Divisions as Needed - Simply, when a computer connecting for the first time is in a Division (OU) that does not yet exist in KeyServer, make that Division and put the computer in it.
- Reverse order of parts - This will put the OU structure in reverse order instead of matching the OU tree in AD.
- Mapping takes precedence over Rules - If you set up Filters to move computers to certain Divisions, you can use this option to dictate how conflicts are handled. That is, force the computer to go to the OU matching the AD location, or allow the KeyServer filter to put the computer somewhere else as an override.
- Unknown External Logins - Offers 3 options when dealing with external account authentication and how we should react when no local account record exists.
- Create Accounts As Needed - This will make an account in KeyServer marked as external and inherit roles as configured.
- Disallow Login - This will deny login. You will need to make the external account in KeyServer manually to allow login. This is a double layer of security.
- Use an Account - This is not listed as an option, you simply see a list of accounts in KeyServer. Creating a "fake" external account and setting it in this option means any unknown external account (that is, no record in KeyServer) will operate as if it was the selected account in regards to assigned privileges. This would allow for example all members of your AD to log in with a "guest" level of access, while admins have assigned roles. With a disabled guest account, this means you now have a fully authenticated system with no public view, and no massive list of user accounts created in KeyServer.
- Establish new LDAP connection for every bind - This option was added to the LDAP and AD modules specifically for the consideration of DUO second factor authentication. It forces a new connection for each communication to ensure the Gateway differentiates between the bind account and the authentication account.
Screenshots of both the client and admin modules are provided in the specific sections to illustrate the different options.
Modules Compared
The table below summarizes some properties of the standard authentication modules.
| Module | Groups support | "True" SSO | Assign Divisions | Server Host |
|---|---|---|---|---|
| Single Password | No | ❌ | ❌ | |
| Text Authent | Group membership can be defined in the authent.txt text file | ❌ | ❌ | |
| Kerberos | Group membership defined in the LDAP directory can be made accessible | ❌ | ❌ | |
| LDAP | Group membership defined in the LDAP directory is accessible | ❌ | ✅ | |
| Windows NT | Group membership defined in each NT domain or in Active Directory | Conditional | ✅ | |
| Active Directory | Group membership defined in Active Directory is accessible | Conditional | ✅ | |
| OIDC Methods | Group membership defined in the directory is accessible | ✅ | ❌ | |
| SQL | Group membership defined in the SQL database is accessible | ❌ | ❌ | |
| CAS | No | ✅ | ❌ | |
| Unix | Group membership defined in the Unix system is accessible | ❌ | ❌ |
- Disabled. The authentication feature is disabled, so Administrative accounts can only be defined internally within the Sassafras Server using the Admin Access window. Client group membership (used for scope limitations) can still be defined based on network location or computer id but not based on any other data source.
- Single Password. Users become authenticated by typing in a password, which you choose. The password is the same for all Sassafras Server users. This module does not define any groups. This is only available for client auth, not admin.
- Text Authent. User names, passwords, and groups are specified in a text file. A user becomes authenticated by typing a correct name and password. Users may be members of multiple groups, and thereby gain access to policies.
- Kerberos. To gain access to the Sassafras Server, users must authenticate with a Kerberos server. Kerberos does not directly support groups but can be access group data from LDAP. This authentication module requires a Kerberos server on your network.
- LDAP. To gain access to the Sassafras Server, users must type their name and password as it exists on the specified LDAP server. Once authenticated, users can be given access to policies based on membership in groups defined on the LDAP server.
- Windows NT. To gain access to the Sassafras Server, users must type their name and password as it exists in the specified NT Domain, Active Directory, or on the Windows NT computer that is running the Sassafras Server. Once authenticated, users can be given access to policies based on their membership in groups as defined in the authentication database. For most purposes, this module has been superseded by the Active Directory module. This authentication module is only available if the Sassafras Server is hosted on Windows NT, although clients on all platforms are supported.
- Active Directory. Typically sites using Active Directory are configured so that users and computers authenticate to active directory at computer logon. Using the Active Directory module, either for Client or Admin authentication, the credentials verified at logon are relayed to the Sassafras Server without requiring authentication a second time. When used for Client authentication, in addition to being available for Policy scopes, this module can automatically populate Divisions based on AD organizational units. This authentication module is only available if the Sassafras Server is hosted on Windows, although clients on all platforms are supported.
- SQL. User names, passwords, and groups are defined in a database that supports SQL. This authentication module is only available if the Sassafras Server is hosted on Windows, although clients on all platforms are supported.
- CAS. This module is useful for taking advantage of CAS's single sign-on functionality when configuring Admin authentication for the Sassafras Web UI. Logons through KeyConfigure can also use CAS authenticated accounts if your CAS service supports the REST API.
- Unix. To gain access to the Sassafras Server, users must type their name and password as it is defined on the Unix computer running the KeyServer process. Once authenticated, users can be given access to policies based on their membership in groups as defined in the authentication database. This authentication module is only available if the Sassafras Server is hosted on MacOS or Linux, although clients on all platforms are supported. Linux, and MacOS can use PAM to relay the unix authentication from a broad variety of authentication service choices (e.g. LDAPv3). When the Sassafras Server is hosted on MacOS, Apple's Open Directory architecture is also available for authentication.
Disabled
When no other module is chosen, or when a module that you choose can not load, authentication defaults to the Disabled method. With Client Authentication is disabled, the Sassafras Server authenticates every user so groups based on user names are not available. With Admin Authentication disabled, only internally defined KeyConfigure administrative logons are available.
Single Password
Single Password is so named because it maintains one global password for all users of the Sassafras Server. This password can be up to eight characters in length, and can contain any characters. Users must type the password exactly as you entered it, including the upper and lower cases of each letter. Users who know this password are given full access to the Sassafras Server, regardless of their names.
As with the Disabled module, there are no user based groups defined by this module so the Assign Divisions option for clients is meaningless. But you could allow guests logons for some group – perhaps a group defined by location. This module is useless for Admin Authentication since internal admin account and password credentials can already be defined from the Admin Access window.
Text Authent

With Text Authent authentication module, users are authenticated based on their name and a corresponding password. Unlike the Single Password module, each user may have his or her own password, and users can belong to any number of groups. Although this method could also be used for admin authentication, the only point would be in order to re-use group and password info that was already entered for client authentication – there is no additional functionality beyond what is already available from the Admin Access window.
All of the names, passwords, and groups are stored as clear text in a file named “authent.txt” in the KeyServer Data Folder. Use any text editor direct access to the authent.txt file on the Sassafras Server machine to enter and edit the authent.txt file. It may be convenient to use an editor that can make the tab and return characters visible. Make sure you save the file as text.
You can modify the authent.txt file at any time, even when the KeyServer process is running, and any changes automatically take affect within ten minutes. If you want the changes to take affect sooner, choose the Client Authentication option from KeyConfigure's Config Menu, and click OK.
Each line in the authent.txt file is of the following form:
user name tab password tab group1, group2, group3, ...
The user name, password, and individual group names can contain spaces, but cannot contain tab characters or any of the reserved characters:
* ! @ # , ; { }
Only the first eight letters of the password are used, the rest are ignored. The list of groups (which may be empty) specifies which groups the user belongs to.
The character “*” has a special meaning when it appears alone in the name or password field. If the password for a user is simply “*”, the user may type any password, and will be authenticated (of course the user must type the exact name). This can be useful if you want to have an account for a user named “guest” that does not require a password.
If a user types a name that is not recognized, then the Text Authent module searches for an entry with “*” for the user name. The corresponding password is then used for this unknown user. Note that only one “*” user should be in the authent.txt file. If there is more than one, then the first one is used. The “*” user is useful if you want to give access to unknown users (users with any name and any password), or if you want to mimic the Single Password authentication module. You can also allow any user access to the Sassafras Server by including the entry:
* *
This effectively says “an unknown user may type any password.” You can then restrict these unknown users by excluding them from all groups (i.e., don't type any group names after the “* *” entry). Note that if you do not specify any groups, then a “* *” entry is equivalent to allowing guest access. However, if you do specify one or more groups, it is different - it gives you membership in all groups simply because of your name and password.
The “*” also has a special meaning when it appears in the group list. Any user who belongs to the “*” group belongs to all groups. Thus, the user
root leaves *
belongs to all groups, and therefore all policies will apply, however the scope is defined. It is not necessary to list any other groups when the “*” group is listed. However, you may wish to explicitly exclude the user from one or more groups. To do this, list each group with an exclamation point (“!”) preceding it, and then list the “*” group last. For example,
John Doe s2Cr5t !keysentry, !admin, *
specifies that the user named John Doe belongs to all groups except the keysentry group and the admin group. The “*” group must be the last group listed.
Be careful when you use the “*” in the name, password or group fields. You can actually turn authentication off (mimic the Disabled module) with the following entry:
* * *
This entry tells the Text Authent module that an unknown user who types any password is in all groups. In fact, this is even worse than Disabled, because any user gets membership to all groups. This essentially overrides the group definitions for location and computer - they are rendered useless because any user can get membership in any group.
Text that is ignored or commented begins with a ";", and continues to the first return character. Make sure you type a return to end every line of your authent.txt file; automatic word-wrap does not suffice as an end marker for comments, and does not separate users.
Below is a summary of the format and rules of the authent.txt file:
- Lines contain a user name, password, and optional group list. These three components are separated by the tab character.
- Each distinct user name can only appear on a single line.
- Users must spell their names correctly, as they appear in the authent.txt file. Upper and lower case do not matter.
- User must type their password exactly as they appear in the authent.txt file. Upper and lower case do matter.
- Group names are listed optionally. Group names are separated by commas.
- User names, passwords, and group names cannot contain tab characters or any of the reserved characters: * ! @ # , ; { }
- The “*” character has special meaning in the user name, password and groups.
- The exclamation point (“!”) excludes a user from a group.
- Comments begin with “;” and end at the following return character.
The Text Authent module will not Assign Divisions automatically.
Kerberos
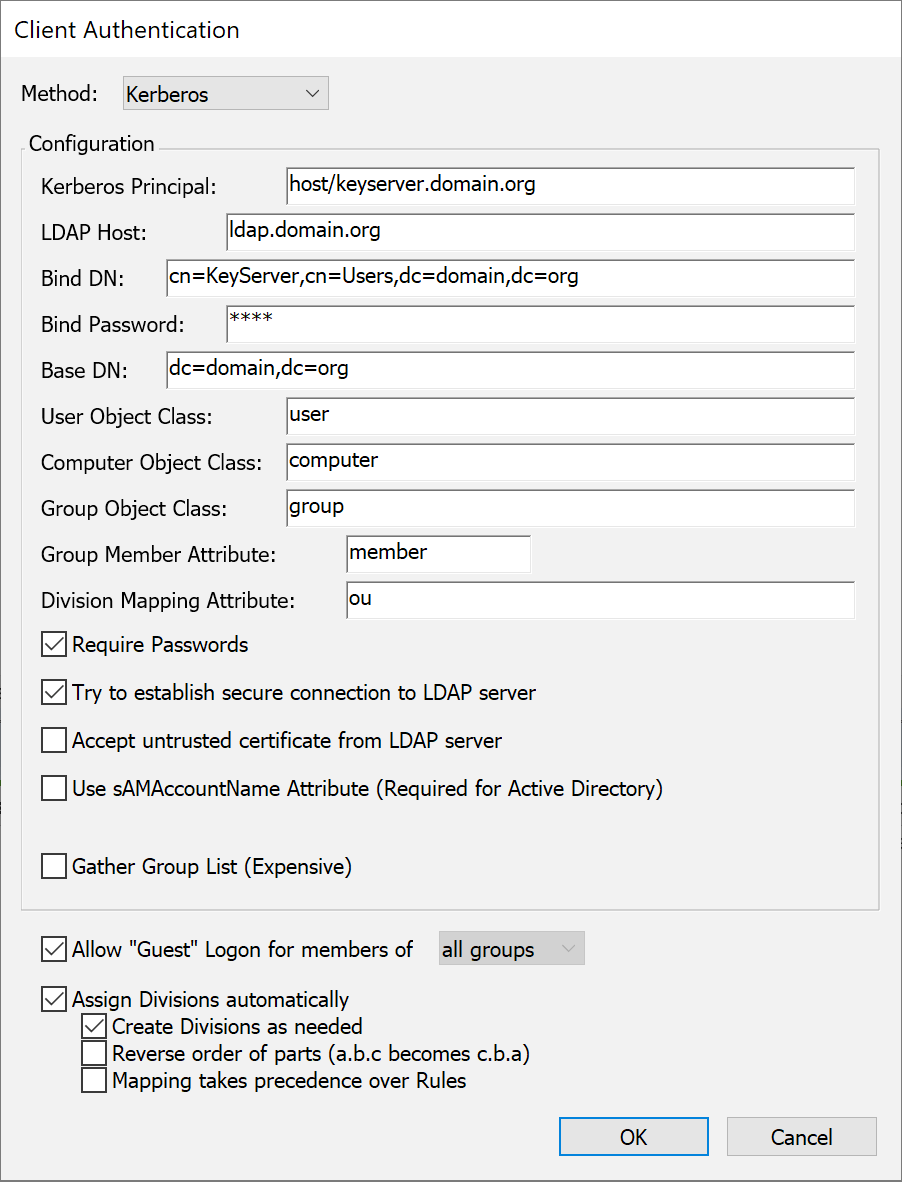
Since Kerberos only provides authentication services, the setup screen for the Kerberos module also includes fields (as described below) for connecting to an LDAP server for group definitions. Using Kerberos for authentication together with LDAP for authorization (group membership) has the advantage of a more secure authentication phase compared to LDAP authentication – but the LDAP connection information is optional here unless group membership information is needed.
To use this authentication module, you should already be familiar with the basic configuration and maintenance of a Kerberos server including the terminology that is used and the procedure for adding items.
Configuration of the Kerberos authentication module is done both in KeyConfigure and on your Kerberos server. First, on the Kerberos server, you must create a new principal that will be used in the authentication process. Once the principal has been created on the Kerberos server, you must install a "keytab" file on the computer running the Sassafras Server. This file contains information about the principal, and is used by the Kerberos authentication module when verifying users' identities. Details on creating and installing this file depend on the Kerberos server you are using.
With the principal created and the keytab file installed, configure the Kerberos authentication module by entering the Kerberos Principal name in the setup dialog. Do not include the realm with the principal name, since that value is retrieved from the keytab file. The rest of the fields are only relevant if you need to access group definitions from an LDAP server.
Divisions can be assigned automatically if you specify a "Division Mapping Attribute"
Active Directory
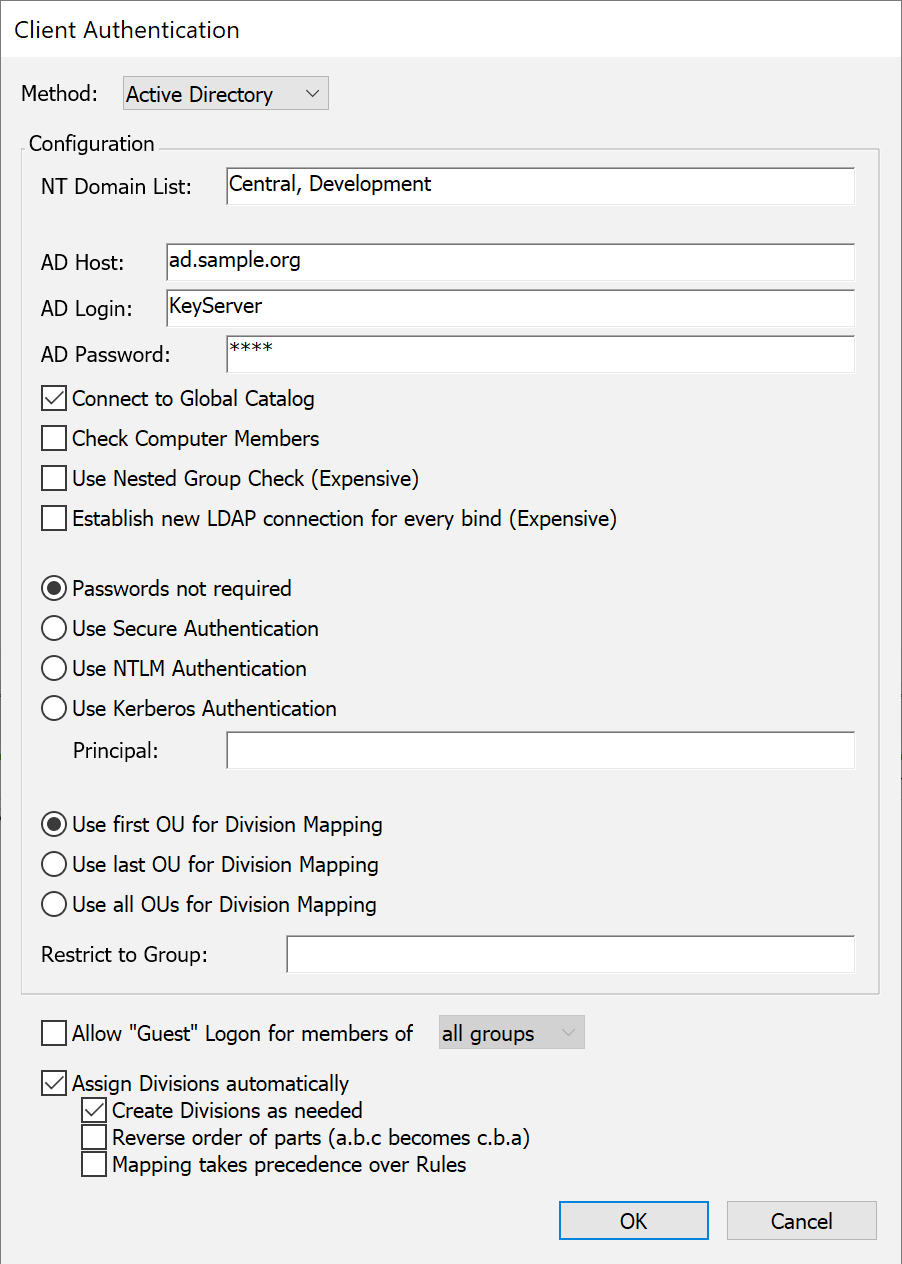
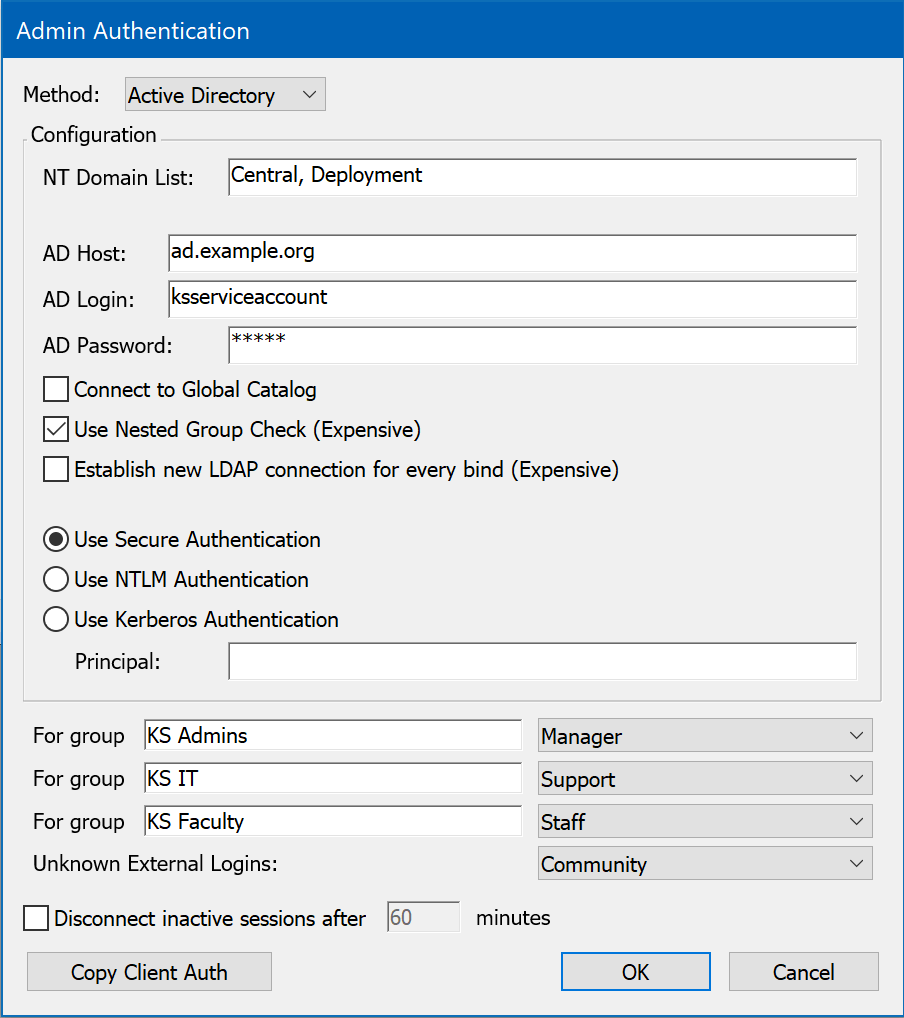
Sites that use Active Directory can use this module to give the Sassafras Server access to the AD names and passwords. All group membership information defined in the Active Directory domain will be available to the Sassafras Server for use in controlling application access, auto-populating divisions, and authenticating admin logins. To use this authentication module, you should already be familiar with the basics of Active Directory configuration and maintenance.
Because the Sassafras Server must access information directly from Active Directory, this authentication module can only be used from a Windows host computer that is itself a member of the domain forest you want to authenticate against. If your server runs on MacOS or Linux, and you wish to access your users and groups data in Active Directory, consider using the Kerberos or LDAP authentication modules. In any case, KeyConfigure running on Mac or Windows can be used to set up or maintain the Authentication settings without any domain membership requirement.
This section describes basic use of the Active Directory authentication module. For more detailed instructions and screenshots you can refer to the Active Directory Integration — Admin Authentication and Active Directory Integration — Client Authentication pages.
 In order for the Sassafras Server to be able to access the names and passwords, it must operate with the user right “Run as part of the operating system”. This advanced user right can be enabled via the User Manager program. If your Sassafras Server runs as a service in the LocalSystem account, that account already has the necessary user rights.
Note that in a standard AD structure with the KeyServer service running under the system account, no configuration is necessary in most of this module. We will simply be able to use the machine membership in the domain to make queries. You need only select your client mapping issues, the other options will not be needed. In more complex structures of child domains and changes to security defaults, you may need to attend to these other options.
Click here for detailed information on possible configuration options.
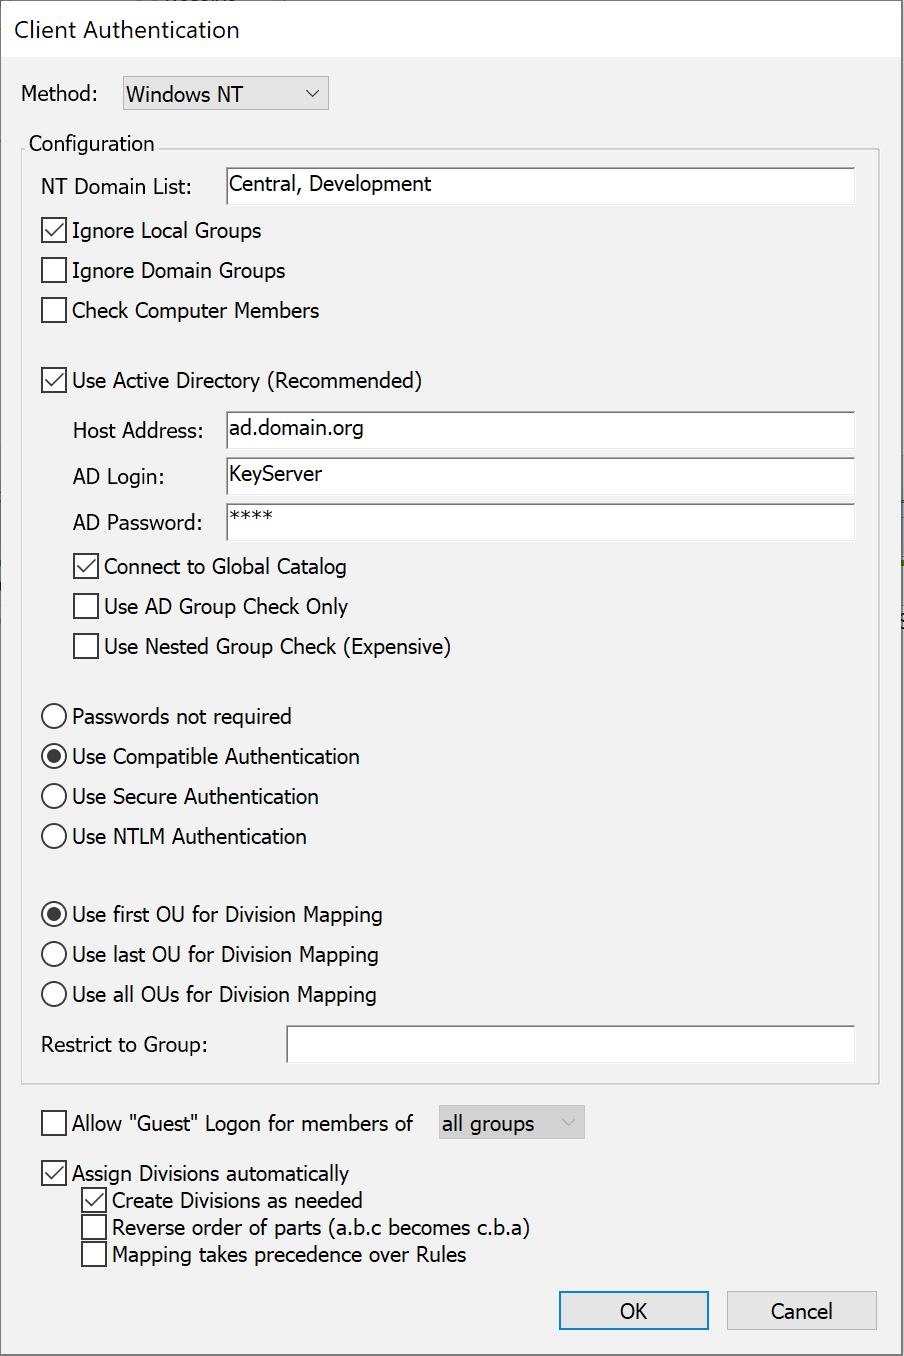
Enter the name(s) of the domain(s) from which users will be authenticated in the NT Domain List field. If you leave this field blank, the local domain of the Sassafras Server machine is used. Users may specify the domain they belong to when they login using the standard notation: DOMAIN\name. If the user does not provide a domain, all domains listed in the authentication module configuration dialog will be searched in the order given.
There are four options for password verification:
- Passwords not required - With this option, users will not be prompted for passwords. The current user name of the computer login account is assumed to be correct and authentic, and will be used when checking group memberships.
- Use Secure Authentication - Users will be prompted for their password by KeyAccess when it logs on to the Sassafras Server. To take advantage of “single sign-on” when available, choose the Kerberos (or NTLM) authentication option instead.
- Use NTLM Authentication - NTLM Authentication supports “single sign-on” for Windows OS versions – Windows 98 , Windows NT 4, and better. These operating systems retain authenticated user account login information so that KeyAccess can make use of the previously validated credentials without itself prompting for a password. For Mac or Linux clients (or old KeyAccess versions), this option falls back to the Secure Authentication behavior – users will be prompted by KeyAccess for a password when it logs on to the Sassafras Server.
- Use Kerberos Authentication - With correctly configured Kerberos access to Active Directory, this authentication module can support “single sign-on” for KeyAccess running on Windows, Macintosh, and Linux. You will need to specify a Principal and setup some configuration options on the Windows server in order to allow the Sassafras Server to use Kerberos (more details later).
Access can be restricted to members of a particular group, as well. If a group name is specified in the “Restrict to Group” field, access will only be granted to users who enter their correct name and password and who also belong to this group.
With the Active Directory module, Active Directory group definitions are accessible to the Sassafras Server but groups defined in the Local computer operating system are not. If you want to also include Local OS groups, you should instead use the “Windows NT” authentication module. Note: with or without any authentication module, groups defined within the Sassafras Server itself are always accessible.
Typically, group membership is determined based on the name of the user who is logged in to the Sassafras Server. In addition, the Active Directory authentication module can check for group membership based on the name of the computer from which the user is logged in. To enable this option, check the option "Check Computer Members". This option must be enabled in order to use the "Assign Division automatically" option for Client Authentication.
If the KeyServer process runs in a Domain Account, you can leave the Host, Login and Password fields in this dialog blank. If however KeyServer was installed to run as Local System (the default), you will need to enter Login and Password values here. In that case, you should enter the DNS host name or IP address of the Active Directory server, as well as the name and password of an object on the server that has permissions to check group memberships (this means the object must have read rights to the “member” attribute of a group object). The object must either be qualified with the NT domain, as in "DOMAIN\accountname", or must be in one of the domains listed in the "NT Domain List". This account must be defined in Active Directory. It cannot be defined locally on the computer running the Sassafras Server. It does NOT have to have admin level privileges.
|
If your Active Directory server runs only in “native” mode and not “mixed” mode, this authentication module cannot retrieve the list of groups from the server. However, you can still use the groups on your AD server simply by typing them into the Scope field in any policies. The group name must be entered as it appears on the AD server (just the group name, not the fully qualified name). After entering a group name in a policy be sure to test launch a program in that policy under an account that is a member of the group so you can be sure that the group name was typed correctly. |
When specifying group names in Policy Detail windows, you can “qualify” the group name with a domain name using the standard notation: DOMAIN\name. This tells KeyServer to look only in that Domain Group for the user. If the group is unqualified (i.e., no Domain is given), then KeyServer will look in each listed domain for a group of that name, and if the group exists, it will be checked for the user.
Active Directory allows for "nested groups", where if group A is a member of group B, then all members of group A are also members of group B. This feature can simplify management of users and groups with Active Directory, but it is also more computationally intensive for programs to check for group membership. Therefore, support for nested groups is disabled by default in this authentication module. If you use nested group in your Active Directory, you can enable KeyServer support for them by checking the "Use Nested Group Check" option. Lastly, the "AD Login" account described above must have sufficient permission to read the "memberOf" attribute for users and groups.
In order to use the “Kerberos Authentication” option, you will need to do some additional configuration:
- Create an account in Active Directory which will run the KeyServer process - e.g. “KeyServer”
- In the Services control panel on the computer running KeyServer, edit the KeyServer service and configure it to Log On as the account you have just created
- On the domain controller (where the Active Directory is installed), register a Service Principal Name for the account you made, using the setspn command, e.g.:
setspn -A KeyServer/DOMAIN.ORG KeyServer
- In the KeyConfigure Authentication dialog, fill in the Principal field with the string you used for the setspn command, but with an '@' character instead of a '/' - e.g. “KeyServer@DOMAIN.ORG”
Client Mapping
You can use OUs to determine what division to place a computer in. Within these modules you can choose between using the first, last, or all OUs for divisions.
For example, if a computer has the distinguished name (dn) "cn=computername,ou=sales,ou=northeast,dc=company,dc=com", then:
- Use first OU would result in a division name of "sales"
- Use last OU would result in a division name of "northeast"
- Use all OUs would result in a division name of "sales.northeast"
Note that computers must be in OU containers in order to be mapped to a division. The default configuration of Active Directory places most computers into the Computers container, which is not an OU container. You must create OU containers in your Active Directory and place computers into these containers in order for them to be mapped to Divisions within KeyServer. Otherwise the computers will remain in the Uncategorized Division.
Generally you will want to enable Allow Guest Logon for members of all groups so that client machines have open access to the server. If you wanted to force directory authentication to establish a server session, this could be changed, but that is a rare use case.
The final set of checkboxes in this dialog allows the Administrator to specify how the automatic assignment occurs. The parent option for Assign Divisions automatically is needed to actually enable the mapping, otherwise nothing happens from the above settings.
LDAP
In order to setup the LDAP module module, you should already be familiar with the configuration and maintenance of the LDAP-compatible server you are using. With the LDAP authentication module you can use any LDAP compatible directory server for your source of users, passwords and groups. But as noted above, Kerberos provides more secure authentication of name and password so you may want to use the information in this section for LDAP details, but configure the actual LDAP connection using the Kerberos module.
LDAP version 2 and 3 using the original LDAP server from University of Michigan, OpenLDAP, Netscape Directory Server, NetWare Directory Services (with LDAP support enabled), and Active Directory are all supported. Communication between KeyServer and the LDAP server can be configured to use secure (SSL) when available by checking the option named "Try to establish secure connection to LDAP server". But if the secure connection is unsuccessful, an insecure connection will be used so make sure that your server and the KeyServer host computer are correctly configured so that secure communication is possible. Test with a standard LDAP client tool (such as ldapsearch). When a secure connection cannot be made, all passwords will be visible as clear text when conveyed between KeyServer and the LDAP server.
Configuration for the LDAP authentication module consists of specifying the network location of the LDAP server, providing the DN and password of a directory object with sufficient permission to search for users and check group membership, indicating the base DN within which all searches will be performed, giving the object classes for user, computer, and group objects, and giving the attribute type for group members. Each of these is described in more detail below.
The Host field contains the network address where the LDAP server is located. The Host field can be either the DNS name of the LDAP server or the dotted IP address. Depending on how permissions are set on your LDAP server, you might need to provide a specific “Bind DN” and password. The Bind DN should have permission to search for users and groups and check for membership in a group. If all these can be done by an anonymous user, then you can leave the Bind DN and Bind Password fields empty.
The LDAP module searches for users, computers, and groups within the subtree given in the Base DN field. This value should contain (either directly or in the subtree) objects for all users that will be logging into the KeyServer, all groups that you will be using to control access to policies, and any computers that belong to these groups.
The User Object Class, Computers Object Class, and Group Object Class fields specify the object classes that users, computers, and groups must have. The Group Member Attribute field specifies the attribute type that contains group members. The object classes and attribute type will be used in searches when authenticating users or determining group memberships. If you do not want to use LDAP to determine group memberships, leave the Group Member Attribute field blank. If you do not want to check for group memberships of computers, leave the Computers Object Class field blank.
When verifying a user's password, the LDAP authentication module first searches for the user in the Base DN subtree, and then attempts an LDAP “bind” operation with the resulting DN and the password. When searching for the user, the “cn”, “uid” and “sAMAccountName” attributes are checked to see if they contain the user name (The “sAMAccountName” attribute is included for support of short login names in Active Directory, and is only included in the query if the "Use sAMAccountName Attribute" option is checked). For example, if “John Doe” is attempting to log onto KeyServer, then the following search filter is used, starting from the Base DN and using a subtree search (assuming that User Object Class is “person”):
(&(objectclass=person)(|(cn=John Doe)(uid=John Doe)(sAMAccountName=John Doe)))
Once the user's full DN has been found in the directory, the LDAP module checks the password using an LDAP bind operation.
To check if a user is a member of a group, the LDAP module searches for the group in the Base DN subtree and then verifies that the user is a member of that group. The first search uses the same filter as given above. To check membership, a search filter like the one below is used (assuming the group is named “Some Group”, the Group Object Class is “groupOfNames”, and the Group Attribute is “member”). A subtree search is done in the Base DN subtree:
(&(objectclass=groupOfNames)(cn=Some Group)(|(member=<user DN>)(member=<user name>)(memberuid=<user name>)))
where <user DN> is replaced by the user's DN determined in the first search, and <user Name> is replaced by the user's name as known to KeyServer (“John Doe” in the example above).
If the group membership test for the user fails, and if you have specified the Computers Object Class, then the LDAP module checks if the client computer is a member of the group. First the client computer name (e.g., “JOHNS_PC”) is looked up:
(&(objectclass=computer)(cn=JOHNS_PC))
then a search filter like the one below is used (assuming the same settings as above). A subtree search is done in the Base DN subtree:
(&(objectclass=groupOfNames)(cn=Some Group)(|(member=<computer DN>)(member=<computer name>)))
The table below suggests some values for the object class and attribute names for some common LDAP servers. Note that LDAP servers are customizable, so you should check with your LDAP server administrator that these values are applicable in your environment.
| OpenLDAP | NetWare (NDS) | Active Directory | macOS Server | |
| User Object Class | person or organizationalPerson or inetOrgPerson |
person or organizationalPerson or inetOrgPerson |
person or organizationalPerson or user |
apple-user or posixAccount or inetOrgPerson |
| Computer Object Class | computer | computer | computer | machine |
| Group Object Class | groupOfNames | groupOfNames | group | apple-group or posixGroup |
| Group Member Attribute | member | member | member | member |
| Division Mapping Attribute | ou | ou | ou | ou |
If you want the list of LDAP groups to appear in KeyConfigure's Groups window, check the option named "Gather Group List". When this option is checked, the LDAP module will perform a search query that might generate a large result set, placing a (temporary) burden on your LDAP server. Because this search can be expensive, the LDAP module will cache the group list. Changes to the group list on the LDAP server will not appear in KeyConfigure for up to an hour. The following search filter is used, starting from the Base DN and using a subtree search (assuming that Group Object Class is “member”):
(objectclass=member)
Note that the "Gather Group List" option is not necessary in order to use groups within KeyServer's Policies. Gathering the group list is only a convenience so you do not have to type the group names into Policy Detail windows. If you choose not to have the LDAP module gather the group list, you can still use the groups in policies by typing the group names as they appear on the LDAP server. Case is not important, and you should not include the attributes (e.g., "cn=").
Divisions can be assigned automatically if you specify a "Division Mapping Attribute"
Further customization of the LDAP module is possible if the standard queries will not work with your LDAP server. Contact Sassafras Software Support if you cannot get LDAP to work using the standard configuration options described above.
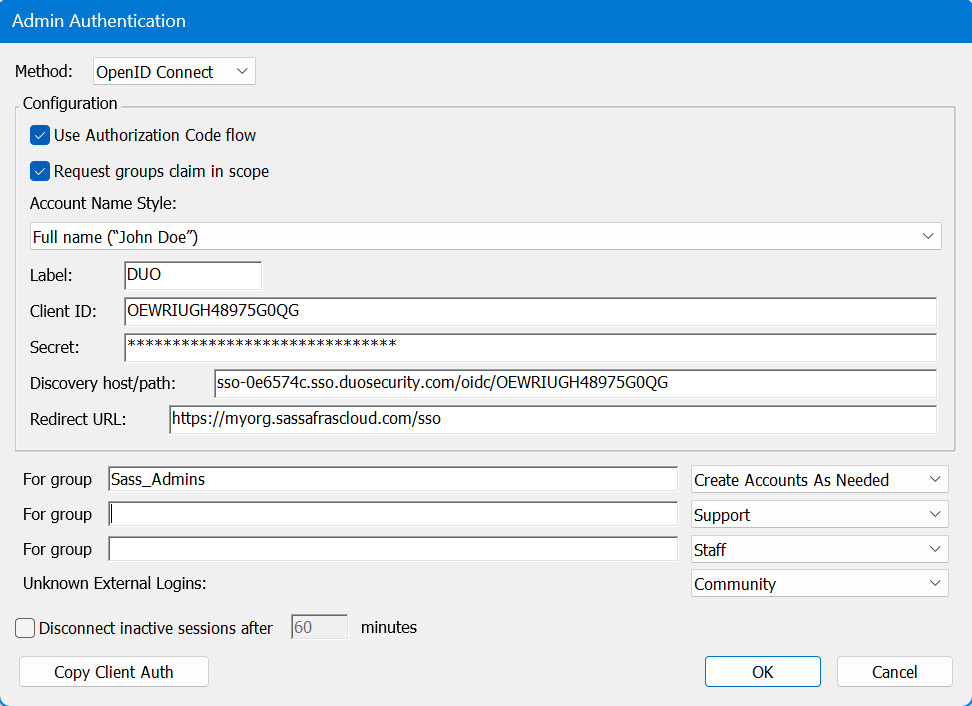
OIDC Methods
This includes the following modules: Azure AD, Google, Okta, AD FS, PingIdentity, and the generic OpenID Connect
These modules are grouped together here as they are nearly identical in configuration due to the underlying mechanim. The only difference tends to be one field like Tenant (for Azure) Admin Account (Google), or Okta Domain. However, the configuration of these services on the service end can be complex and very different, so these are detailed in the expansion sections below. The power of these systems is that they facilitate "true" single sign on functionality in the browser. While they also work for KeyConfigure logins, that mechanism may trigger a different helper than the browser in use for other logins, so "true" SSO will not happen in that you must re-authenticate.
Generally speaking, you will want to enable Use Authorization Code Flow. If there is a problem, you can disable this as a test of falling back to another code flow method.
Account Name Style is largely cosmetic but can have a functional impact. This allows you to set how the account is displayed in the Web UI upper corner, as well as how it is recorded in logs, and shows in the Account list in the platform. This can be important to avoid collisions. If you use Full Name for example and two people are John Smith, we have an issue. But if you use UPN Without Domain and that's jasmith and jbsmith, no issue because those are unique names for account records.
The Label is arbitrary and will be displayed on the login page. In General using the name of the service (e.g. Google or Azure) as the label is expected.
The Redirect URL should always be https://[your.keyserver.hostname]/sso
Azure has two additional options: Use App roles for authorization and Use group memberships for authorization. The second one is ONLY relevant if you use the first. In fact, the default behavior is that it's enabled even when it's off, unless app roles is on. This is for legacy reasons, and again it (group membership) should only be turned on if you enable the first (app roles) in the case you want to use both. Using app roles is an Azure thing that allows you to assign membership by roles instead of groups. This is rarely used so most sites should leave both of these off to avoid confusion unless you have a specific use case.
Other fields are specific to the module and are discussed in the below detail sections.
Click here for a walkthrough of configuring Azure.
- Login to the Azure AD portal
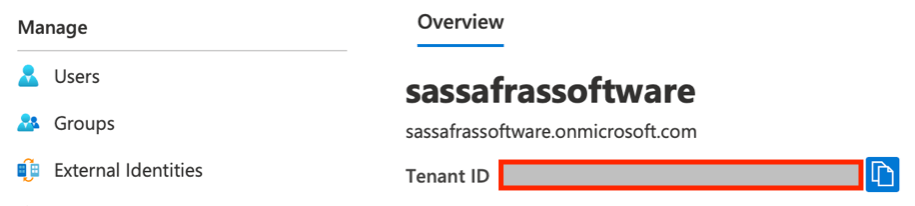
- The Tenant ID is shown on the Overview page. The directory name is an alias for the tenant ID.
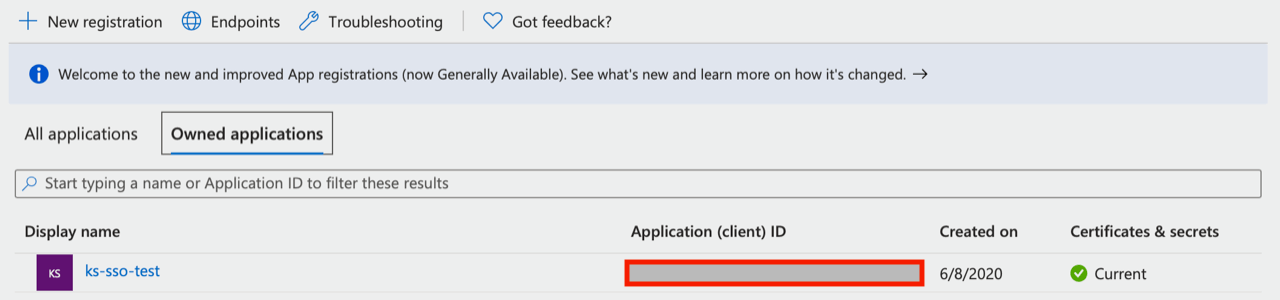
- Click on “App registrations” to create a new app that will be granted access to read various parts of the AD. At the top, click “New registration”, then provide a name for the app. For the “supported account type” choose Single tenant. Click Register to proceed. Now, on the App registrations page you’ll see the app listed. Note the Client ID is shown here as well.
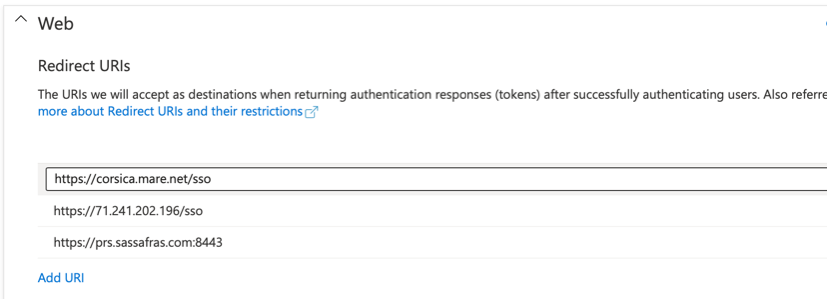
- Click on the app to see more details. Click on the “Authentication” navigation item.
- Add the appropriate Redirect URIs to the list (e.g. https://your.server.com).
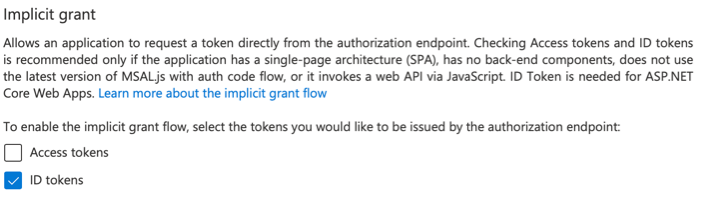
- Make sure “ID tokens” option is checked. Click Save.
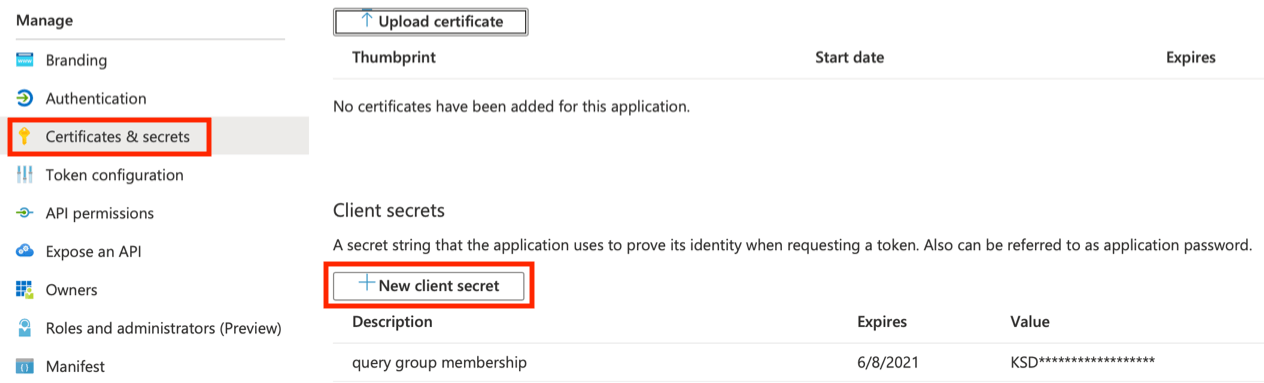
- Click on the "Certificates & secrets" nav:
- Add a client Secret that will be used to query AD for group memberships. Note the actual Secret for our module is the Value of the Secret not the "Secret ID". MS is a bit confusing with their terms and UI.
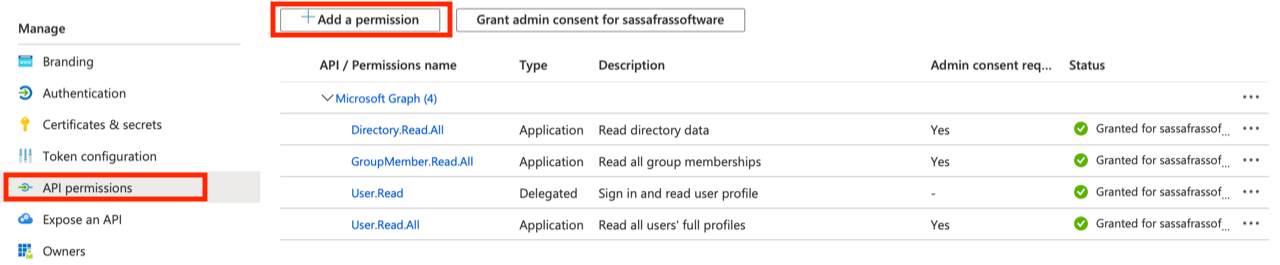
- Click on the "API permissions" nav: (may not be needed if using Roles instead, see below)
- Add these permissions with type Application (not Delegated!): Directory.Read.All, GroupMember.Read.All, and User.Read.All (or User.ReadBasic.All if preferred). Be sure to grant admin consent on these permissions. User.Read should be added with type Delegated and no admin consent.
- Enter the Client ID, Secret, and Tenant created here in the Admin Auth and Client Auth plugins in KeyConfigure.
Note: Azure requires that you use HTTPS (force) which means a valid SSL Certificate is required, and a valid Hostname setting.
Note 8.0.0.3 added the option to Use App roles for authorization. This allows using Azure roles instead of groups. In this case, use the Value of the Role as the group name in all of the AllSight configuration fields (e.g. Account Setup, External Group). This may allow for not adding permissions to the Azure app if you're instead explicitly giving Role access to the app.
Click here for a walkthrough of configuring GSuite.
- Log into the Admin console for G Suite.
- Go to https://console.developers.google.com/apis/dashboard
- Click on the project menu next to the GoogleAPIs title. In this screenshot it reads “maps-in-maps”, but it might say “Select a project” if you don’t have any projects set up.

- Make sure your domain appears in the Select from menu, and click New Project in the upper right.

- Give the project a decent name and note the Project ID. Be sure that the proper organization and domain (location) is selected. Click Create. Once the project is created you might still be viewing the previous project, so click the View button in the popup if Google shows it, otherwise navigate to the new project.
- You might find yourself on an unexpected page. Click on the GoogleAPIs title in the upper right and that will bring you back to a page that has some things we need.
- Next step is to enable the Admin Directory (Admin SDK) API for this project.
- Click the Enable APIs and Services link at the top of the page.

- In the resulting page, type “admin” in the search box. One of the results will be Admin SDK, choose that.
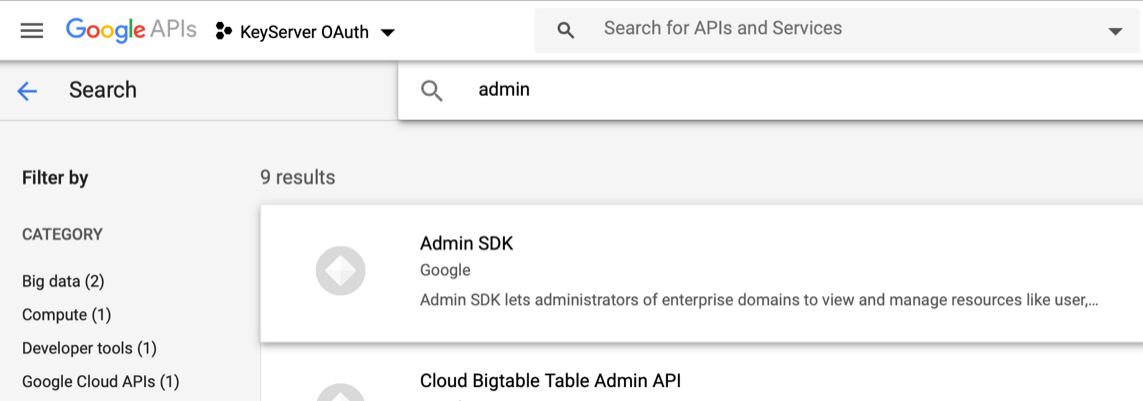
- That will take you to the Admin SDK page. Click the Enable button.
- Once you’ve enabled this API you’ll be taken to the page for managing it, which we don’t need any more. Click the GoogleAPIs title at the top left and you’ll get back to the main APIs & Services / Dashboard page. At the bottom of this page you’ll see the Admin SDK listed, and we’re all done with that step.
- Click the Enable APIs and Services link at the top of the page.
- Click on the “OAuth consent screen" nav on the left hand sidebar. In the resulting page, click “Internal” and then “Create”. That will take you to a page with a bunch of options you can mostly ignore. You should enter an Application name in that field, and make sure the Support email is an account that makes sense. Then click Save.
- Click on the Credentials nav on the left hand sidebar (If you see a message about configure the consent screen, you need to do the previous step again and make sure to click Save). We need to create a Client ID and a Service account on this page.
- Click on “Create Credentials” toward the top of the page and select “OAuth client ID”.
- Choose “Web application” as the type. Give it a name.
- If you know what you are doing you can add an “Authorized JavaScript origin”, or you can just leave it as it is.
- For the “Authorized redirect URI”, click “Add URI”. You must put the correct URL of your Sassafras Server (or KeyReporter stand alone) host, with a path of /sso. The URL must be HTTPS, and if you use a non-standard port that must be included as well.
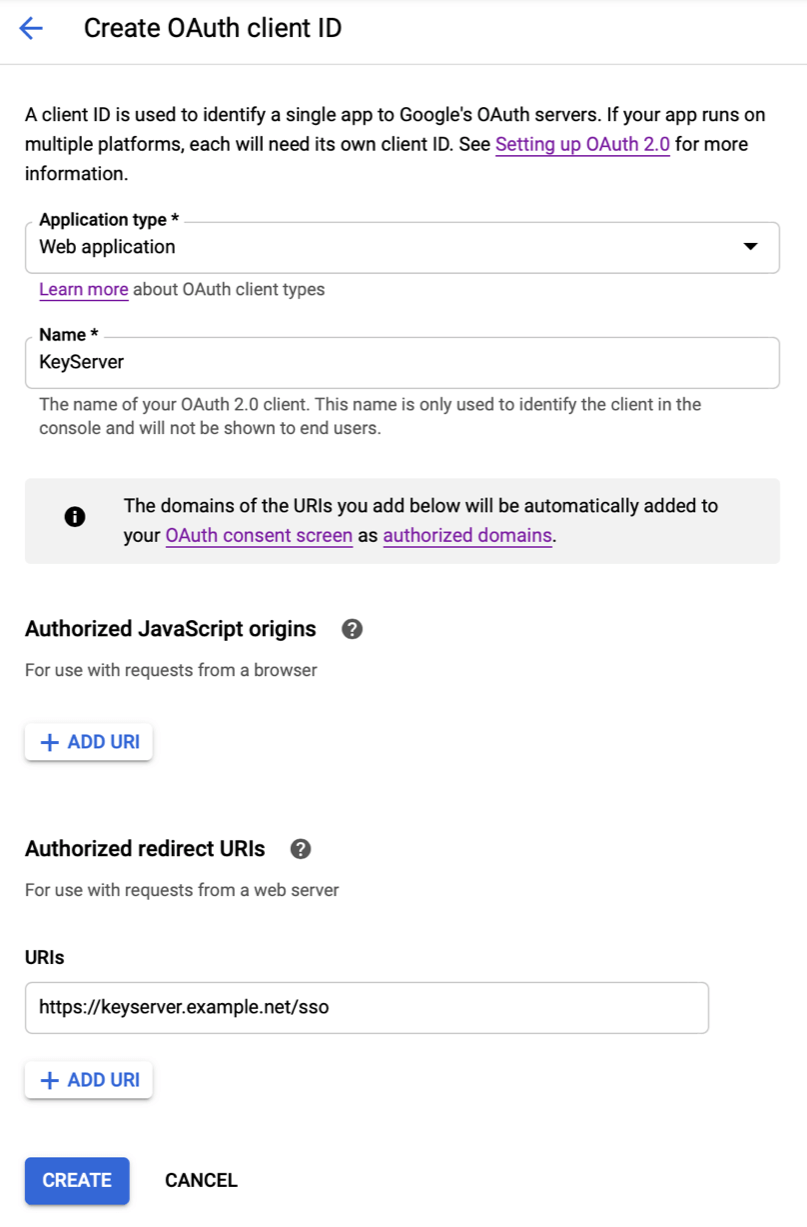
- Click Create. You’ll then see the two important bits of information associated with this new OAuth client, the Client ID and Secret. You can get these values at any time from the Credentials page, or copy the values now.
- Click OK.
- Back on the Credentials page, click on the OAuth Client you made, and you see the Client ID and Secret in the upper right. Take note of that “Reset Secret” button, which might come in handy. Google recommends resetting the secret every so often, which means you have to add the new value to the KS configuration when it changes.
- Go back to the Credentials page, click “Create Credentials” again and this time pick “Service account”.
- Name it, describe it if you want, click Create. The name should probably be something meaningful in your organizational structure for reference.
- On the next two screens you can assign roles for granting access, and give other accounts access to manage this service account.
- Click Continue and then Done.
- Now back on the Credentials page you’ll see the two things you just created.
- Click on the Service account name.
- Click “Show domain-wide delegation”, then click “Enable G Suite Domain-wide delegation”.
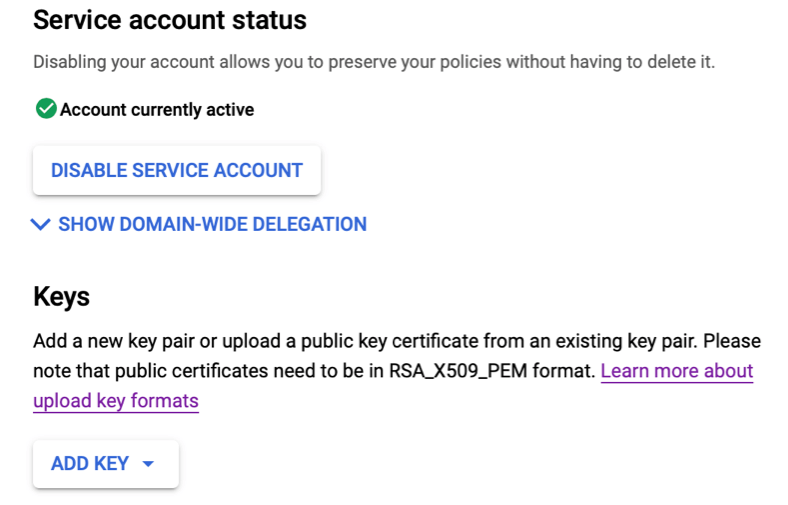
- Click on “Add Key” toward the bottom and select “Create new key”. Choose JSON and click Create. This will download an important and highly sensitive file to you computer. You won’t be able to get this file again, but you can always generate a new key (and redeploy it as we’ll describe below).
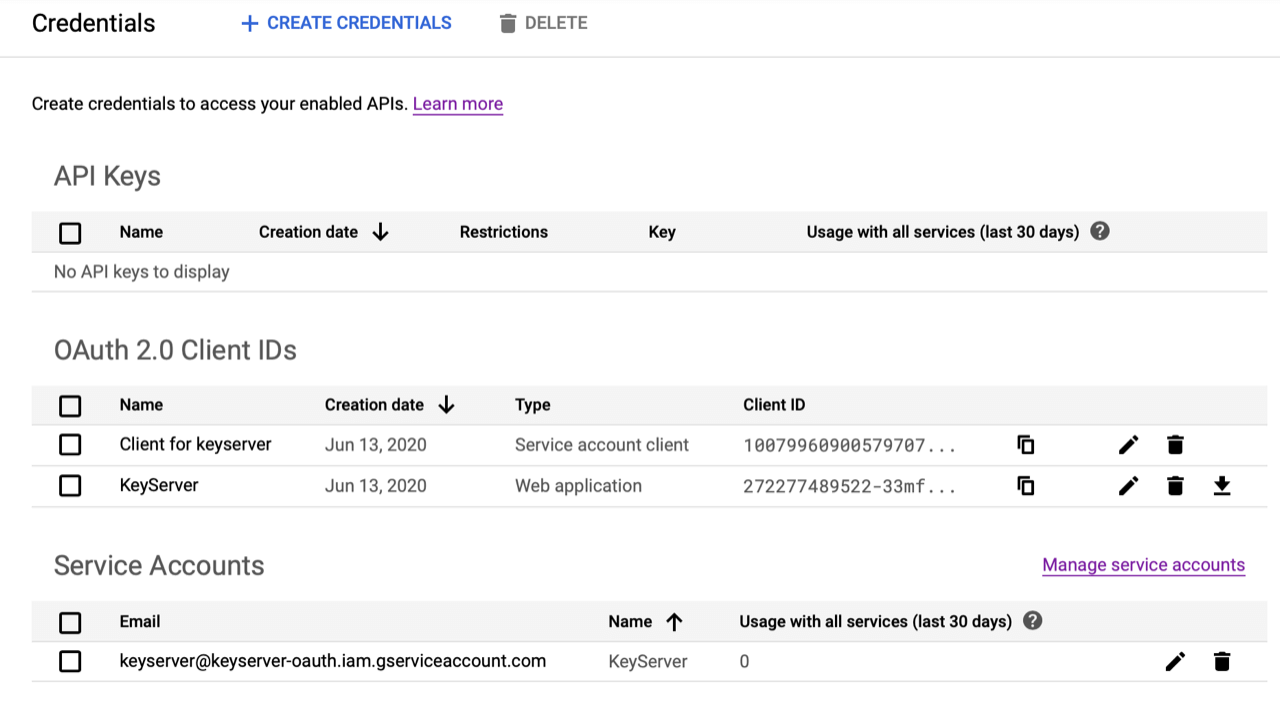
- Now click Save. Here’s what the Credentials page should look like. A new OAuth client ID was created for the service account. (It’s not clear why, but this client cannot have an associated redirect URI, otherwise maybe we could use it instead of creating our own Client ID.)
- Click on the Service account you just made. Select the Unique ID value and Copy it.
- Open a new browser window and go to the G Suite Admin console.
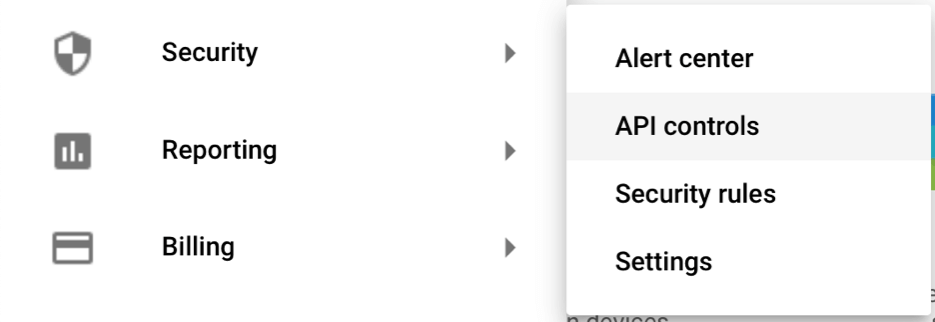
- From the left-hand menu choose Security -> API controls.
- Click “Manage Domain Wide Delegation” at the bottom of that page.
- On the next page, click “Add new” (NOT “Add a filter”, which is directly below that).
- Paste the Unique ID you just copied into the Client ID field.
- In the OAuth scopes field, enter this text (this is not a link, it is two link-looking “scopes” separated by a comma):
https://www.googleapis.com/auth/admin.directory.group.readonly,https://www.googleapis.com/auth/admin.directory.user.readonly
- Click Authorize and you’ll see the Service account listed with the two scopes you just gave it.
- From the left-hand menu choose Security -> API controls.
- Now go back to the GoogleAPIs site (here: https://console.developers.google.com/apis/dashboard).
- Click to the Credentials page. We need those two values for the OAuth client.
- Click on the client you created (not the one that Google created automatically for the service account). You’ll need the Client ID and the Client secret.
- Also grab that “json” file that was downloaded when you created the Service account. Rename that file “google.json” and put it into the KeyServer Data Folder on your KeyServer host. Delete other copies of it if you want to be extra careful. Remember that you can always create new keys (and a new json file) if you need to, in which case the new file will need to be placed into the KeyServer Data Folder (and re-named “google.json”).
- Run KeyConfigure, log into your Sassafras Server, then choose Config -> Admin Authentication. Select Google from the “Method” pop-up menu.
- Copy and Paste the Client ID and Client Secret into the appropriate fields in this dialog.
- Add a Label, which will be displayed in the Sign In page of KeyReporter (the button will be “Sign In with Xxxx”).
- You also must provide the name of an account in your G Suite domain that has sufficient access to see users, groups, and group members. The service account will only be able to view the basic user and group information, and will not be able to make any changes or see other data even if the given account has broader access.
- Click OK.
Reference the Admin Access documentation to learn how you can grant access to users who have accounts in your G Suite domain. You can assign roles manually to external accounts, or you can use group memberships to automatically assign roles. Do one of those things, then you’re all set up to use Google to authenticate your admin users in the Web UI.
Click here for a walkthrough of configuring Okta.
- Log in to your Okta management page
- From the API menu choose “Tokens”. Click Create Token button, give it a name (doesn’t matter what the name is). The token is displayed for you once and only once. Copy it and paste it somewhere you can get to it later.
- Open KeyConfigure and go to File -> Manage Scripts. From the “Library at Sassafras” section, drag the “Create Okta Apps” script up to the Server. Click OK. Alternately you can use the Web UI under Settings -> Scripts to enable the script.
- From the Tasks menu in KeyConfigure choose “Create Okta Apps”, or click the run button for the script in the Web UI. Enter the values as prompted.
- The App Name can be anything you want, it’s just used in various screens on the Okta UI side.
- The Service host is the FQDN (preferably) or IP address of your AllSight server Web UI, including the :port suffix if using a non-standard HTTPS port.
- Okta domain is the official FQDN of your Okta instance, NOT an on prem vanity DNS name. e.g. myorg.okta.com, NOT login.myorg.edu
- API Token is the value that you copied above.
- Assigned Group can be Everyone (if that group exists and does by default), or another group that you created. This is the group of users who are allowed to use Okta for authenticating to your server. Note if you don't use Everyone then you are adding a layer of complexity for troubleshooting. There are many controls in AllSight for dictating who can actually log in and get certain access levels, despite the ability to authenticate.
- Click OK.
- It may take a minute to run, but once finished you'll get a message that Admin Authentication has been configured for Okta.
- In KeyConfigure, open Config -> Admin Authentication
- Set the group/account mapping however you want, based on the groups you have/make in Okta.
- Note that most sites will set these options to Create account as Needed and then also link the Okta groups to specific Roles in Accounts.
- Note that Support is more than happy to help navigate the nuances of permissions access rights as this is a deep topic.
- You may also consider changing the Unknown External Logins to Disallow instead of Community. The latter gives a user "guest" level access which is redundant if you have Guest enabled. Again these nuances are up to the individual site preferences and Support is happy to discuss questions.
- Click OK.
- Now go to your KeyReporter in a browser, click the Sign in with Okta button, do whatever Okta wants you to do, and you should then be logged in through Okta.
- You can also log in via Okta in KeyConfigure, the Okta button should appear in the lower left once you put in the server address and click to the name field (possible short delay). You'll get a web popup window to do your normal Okta login.
Click here for a walkthrough of configuring Ping Identity.
Note this module was first added in 7.8.0.7.
Requirements:
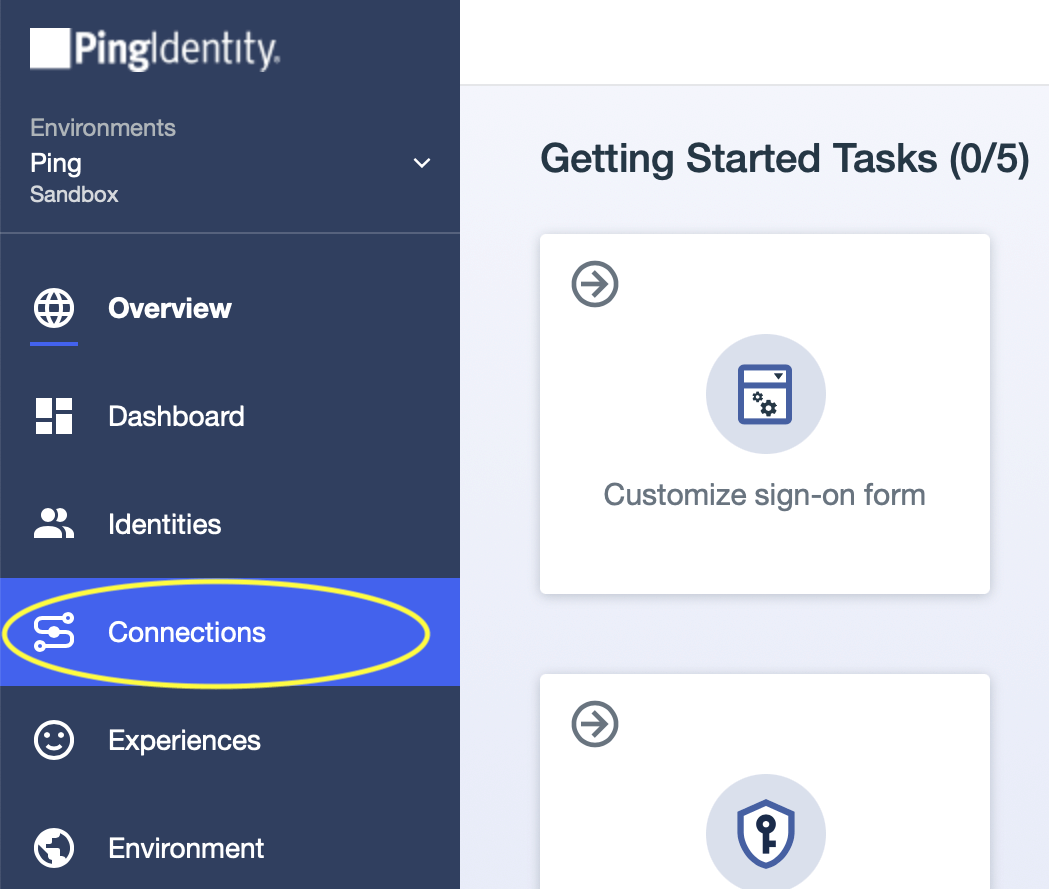
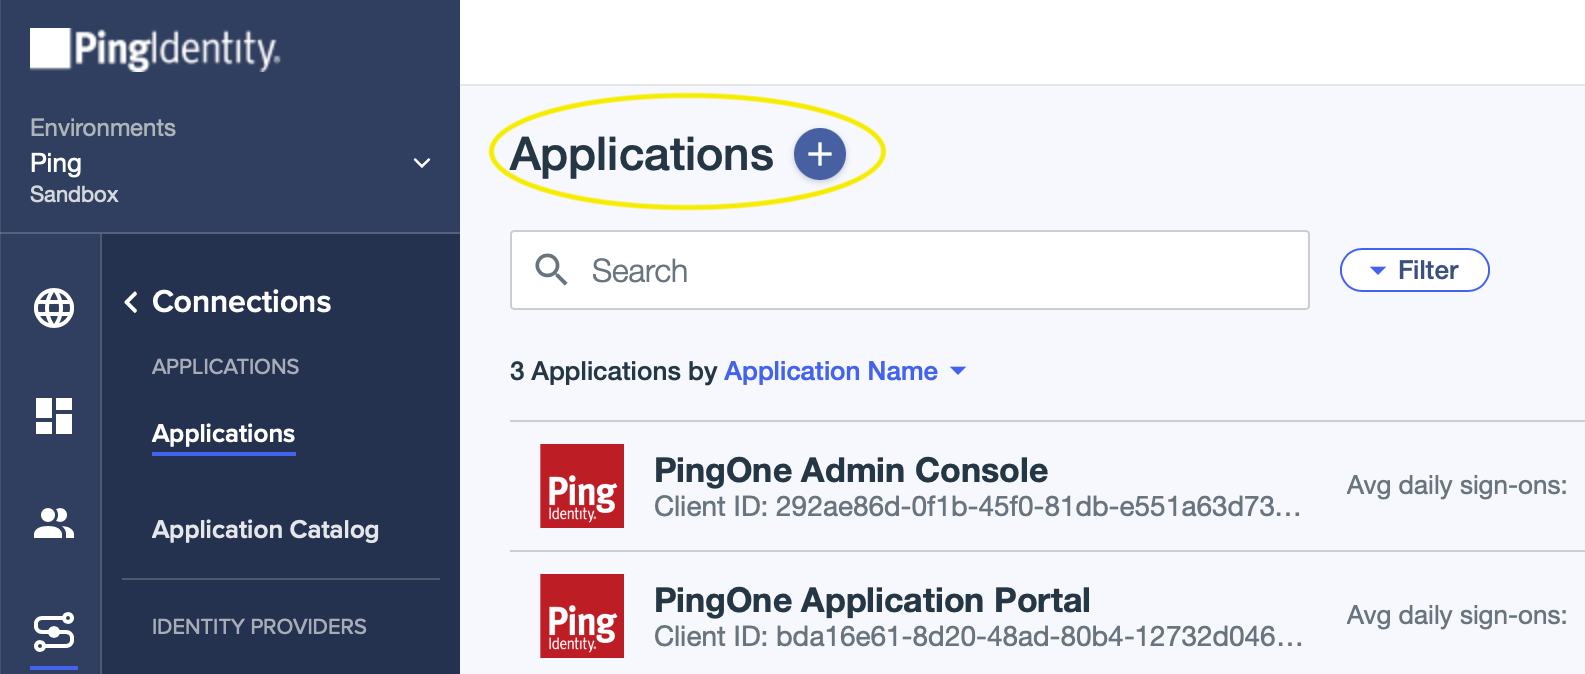
- Sign in to your PingOne dashboard (https://console.pingone.com or otherwise according to your location) and navigate to the Connections page.
- Click the + next to the “Applications” header to add a new Application.
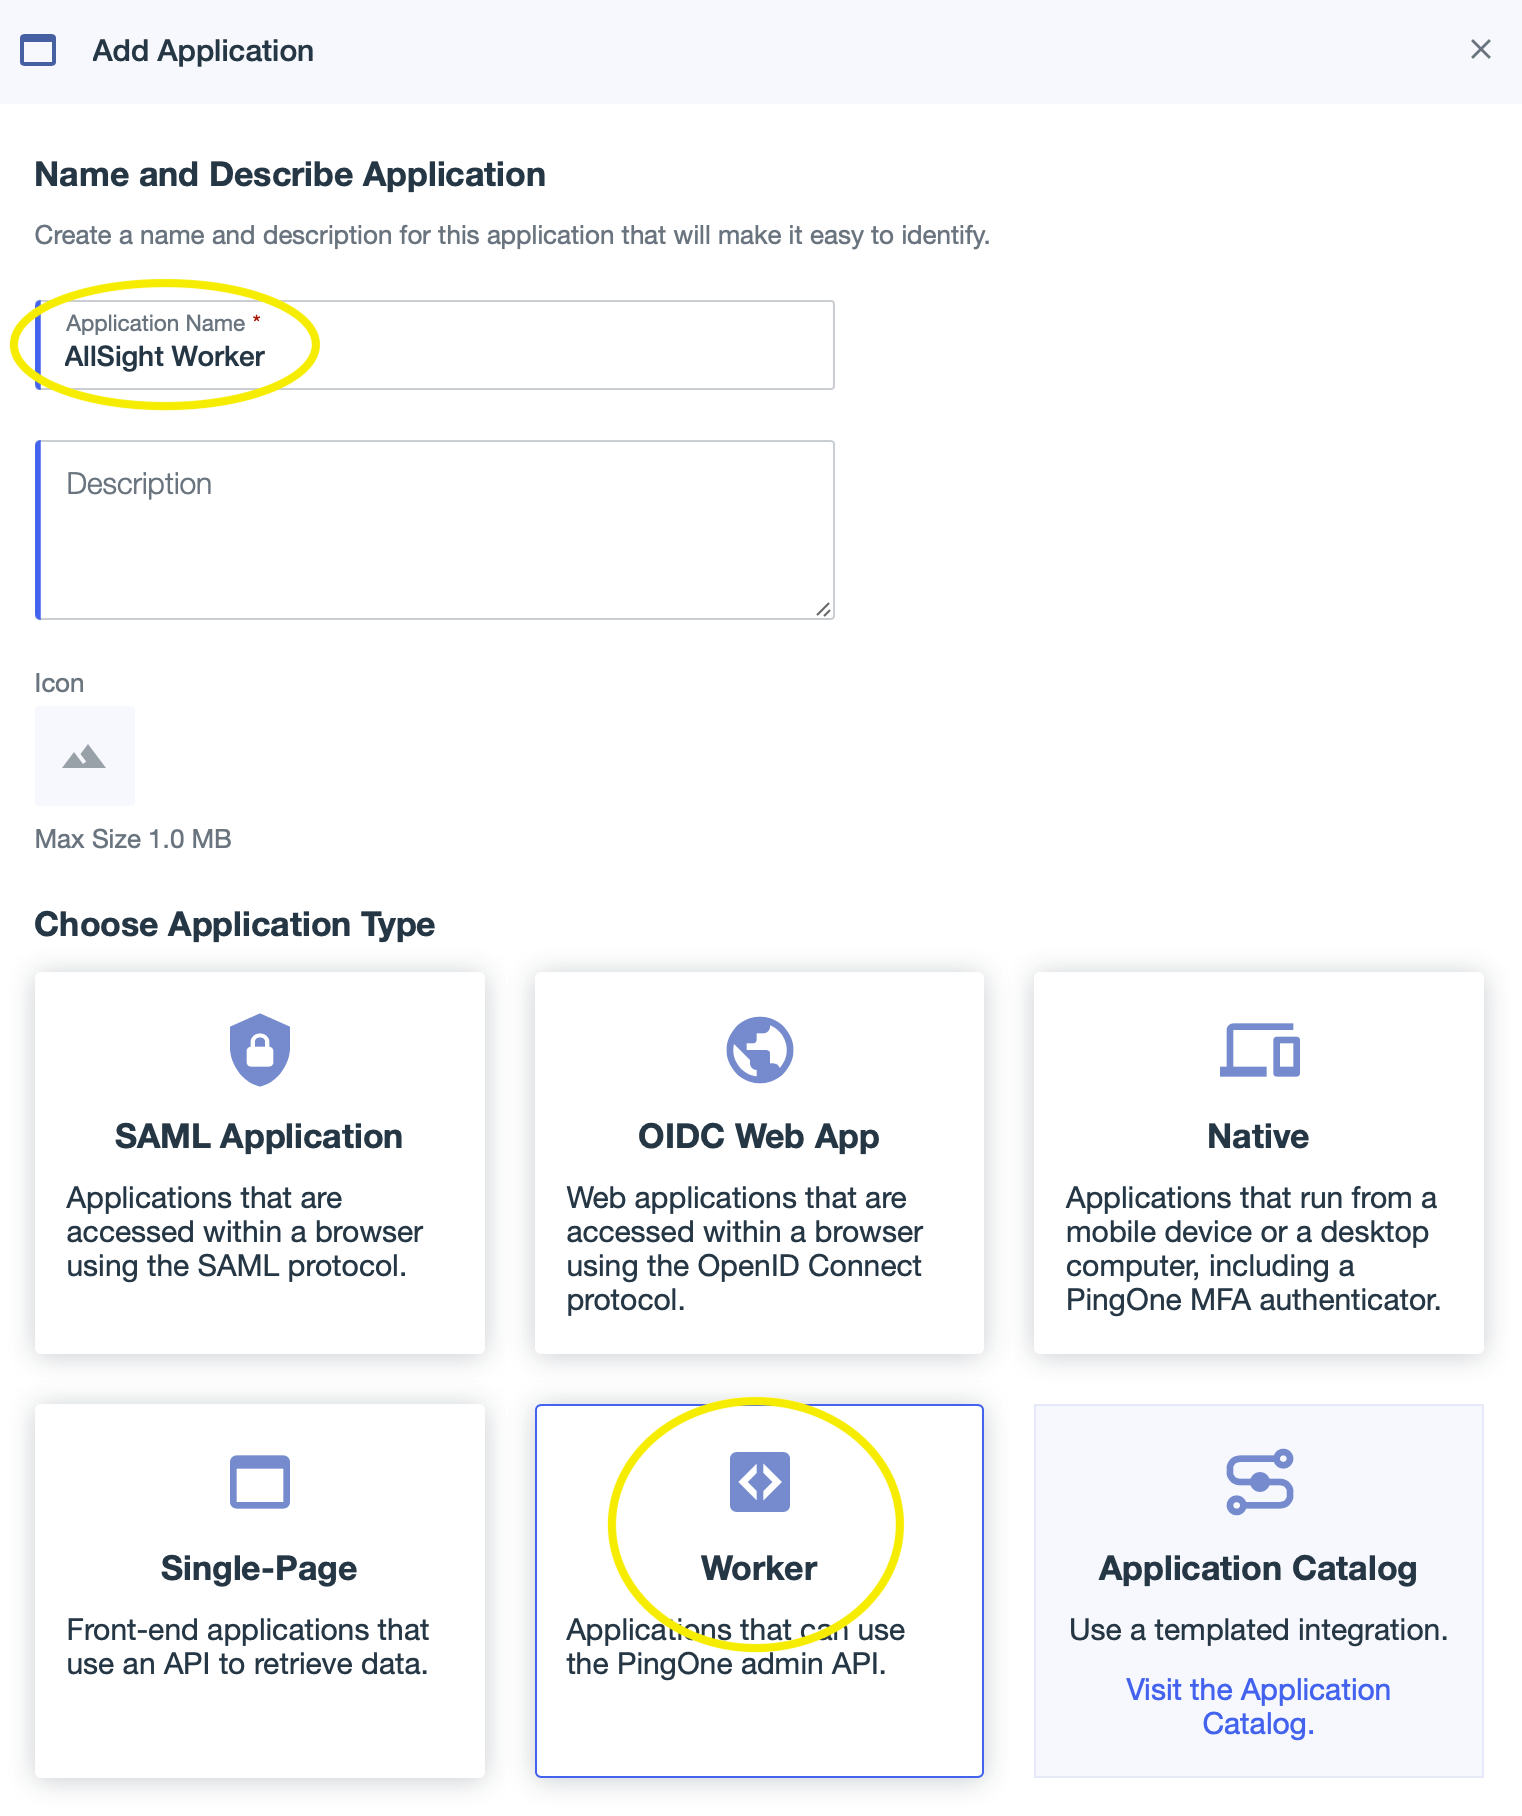
- Enter “AllSight Worker” as the application name (the name can be anything you want but should end with “ Worker”). Click the “Worker” application type, then click Save to create the new application.
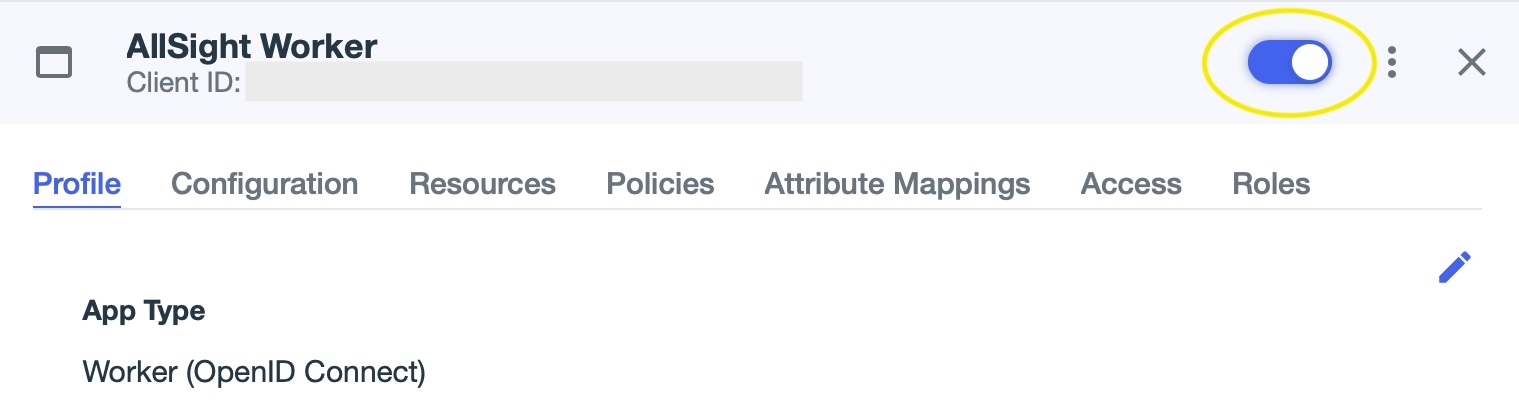
- Enable the application by clicking the slider button in the upper right of the app info panel.
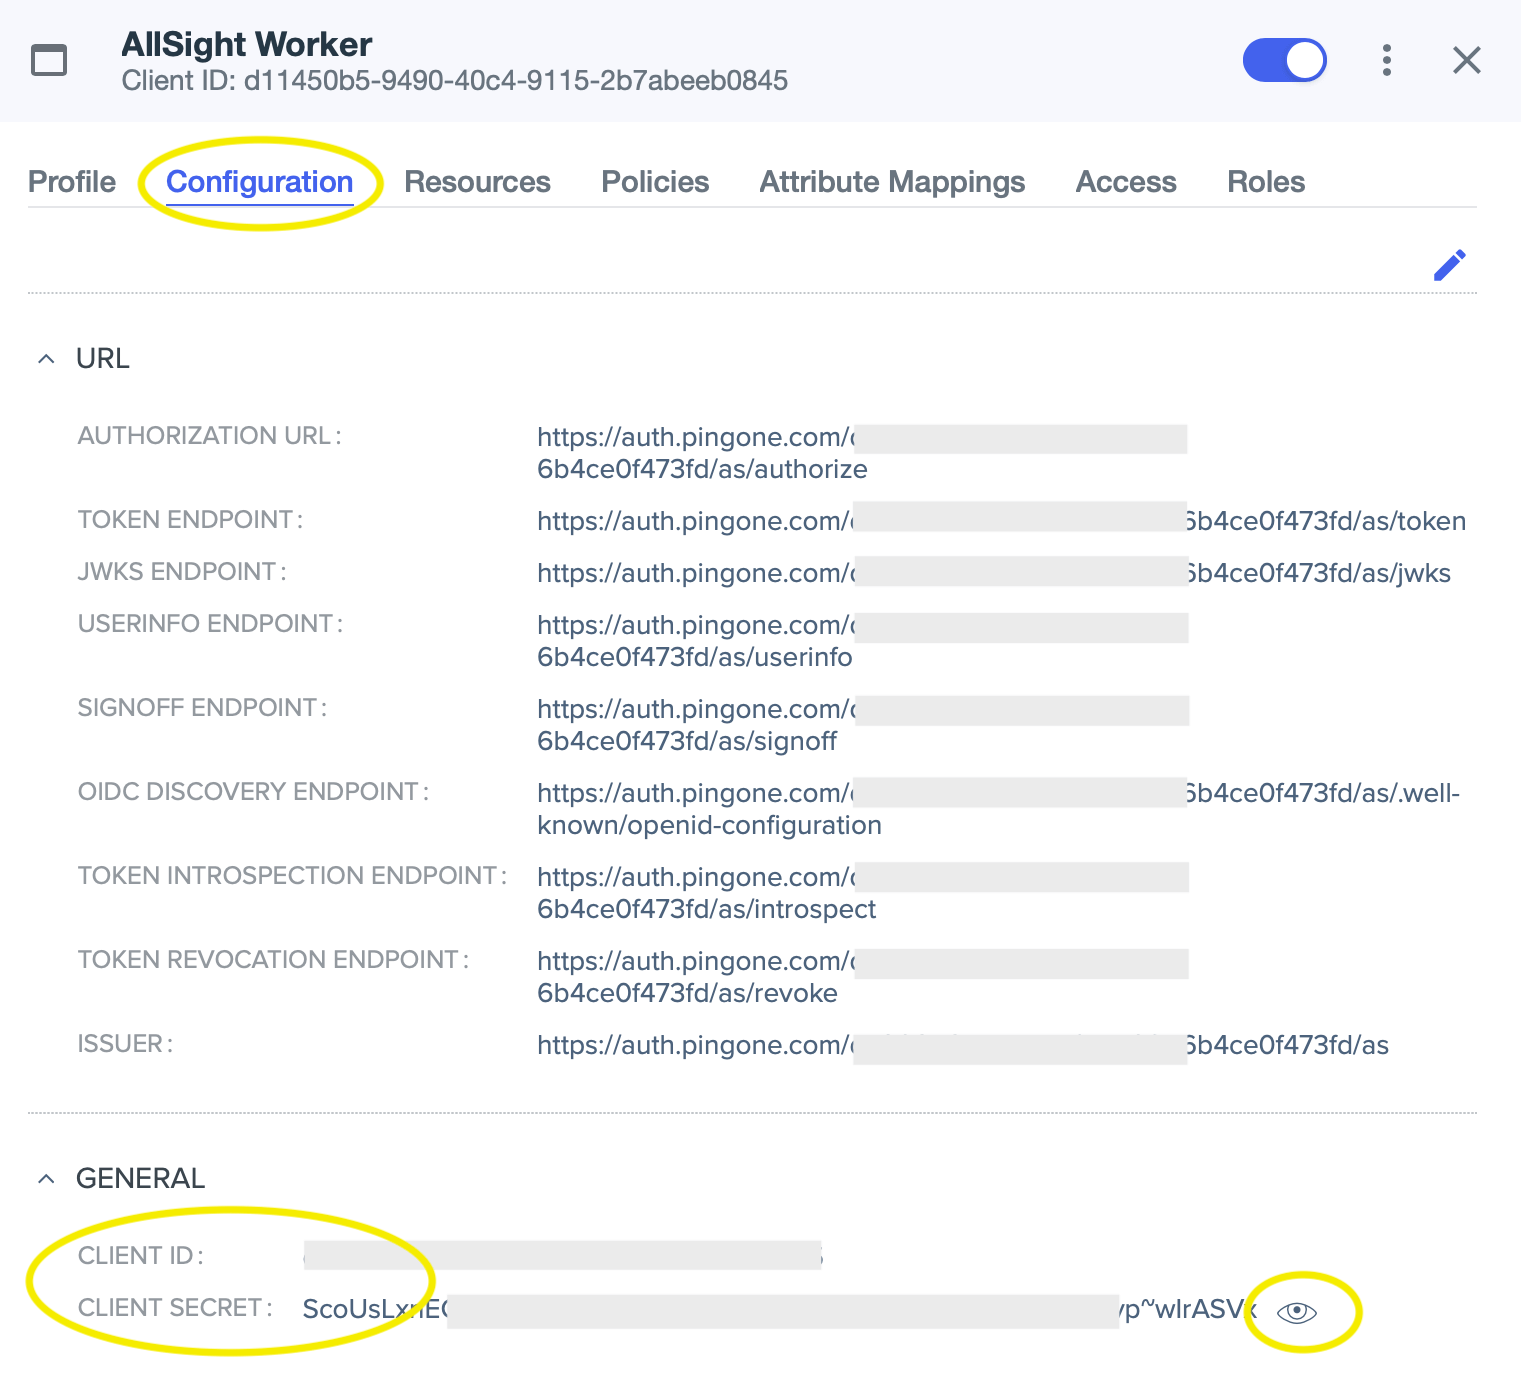
- Click on the Configuration tab, expand the General area if necessary, and copy the Client ID and Client Secret values to a convenient place (a new text document, etc). You’ll need to click the “eye” icon next to the secret in order to see the value to copy.
- Next, navigate to the Environment page.
- On the Environment page, copy the Environment ID to a convenient place.
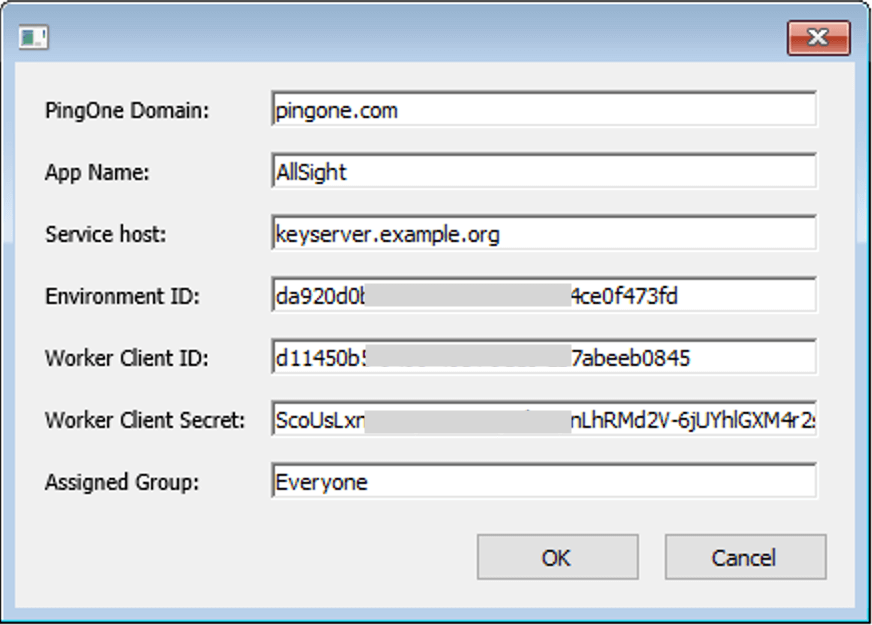
- In KeyConfigure, with the PingIdentity script installed, Choose “Create PingIdentity Apps” from the Tasks menu. The PingOne domain must be set according to your location, as required and documented by PingIdentity.
- Canada: pingone.ca
- Europe: pingone.eu
- Asia Pacific: pingone.asia
- Otherwise: pingone.com
For the “App Name” use “AllSight”, or whatever you chose for the name of the Worker app above, without the “ Worker” suffix. The Service Host should be the host name of your KeyServer host computer. Copy and paste the next three values from wherever you saved them above. Leave the “Assigned Group” as the default. Click OK to proceed with the configuration. An additional web app will be created in PingIdentity, and your KeyServer will be configured to use PingIdentity for Admin authentication.
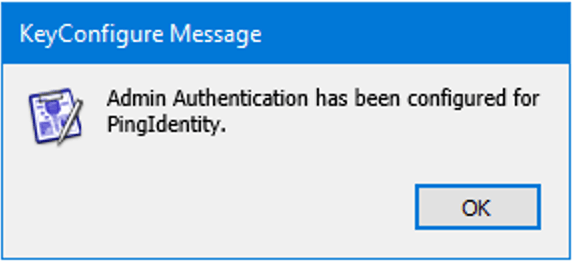
- Once everything is set up you’ll see a message like this:
Advanced:
If you want you can use an existing Worker app to create the app(s) that KeyServer needs. This app should have sufficient permissions to create other apps. By default, Worker apps have the necessary permissions. If you use this method, the script will create two additional apps in PingIdentity. The worker app you use in the setup script will not be referenced or used in any other way once the setup process is complete.
The worker app used by KeyServer (whether you create it manually or have it created by the script) only needs permissions to read users in your directory. By default, worker apps have more permissions than are needed when initially created. You can edit the permissions by changing the Roles assigned to the Worker app. Be sure to test each change that you make, and reverse the changes if they break your admin authentication.
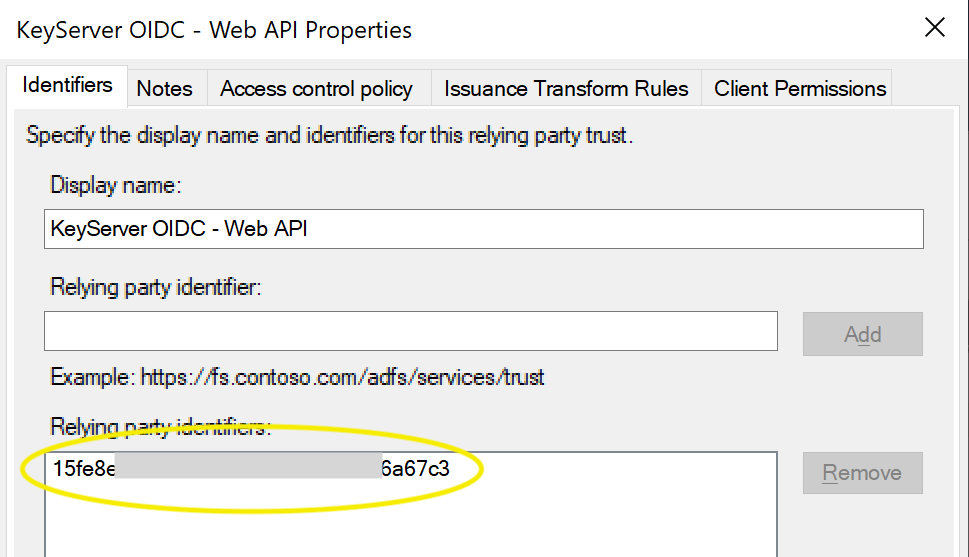
Click here for information on ADFS.
The configuration of ADFS is complex and largely left to the customer. Note in our experience IIS, Certificate services, and all related interactions with ADFS need to be set up first. Following are points on creating the OpenID Connect configuration for KeyServer to such an implementation. This is guidance only and not guaranteed to be precise to your environment.
Add an OpenID Connect configuration to ADFS
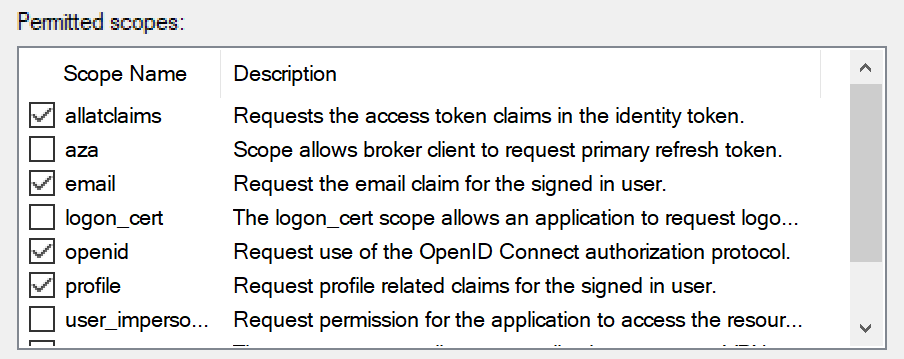
Configure OpenID Connect to provide user groups as claims
Check that everything is configured as needed
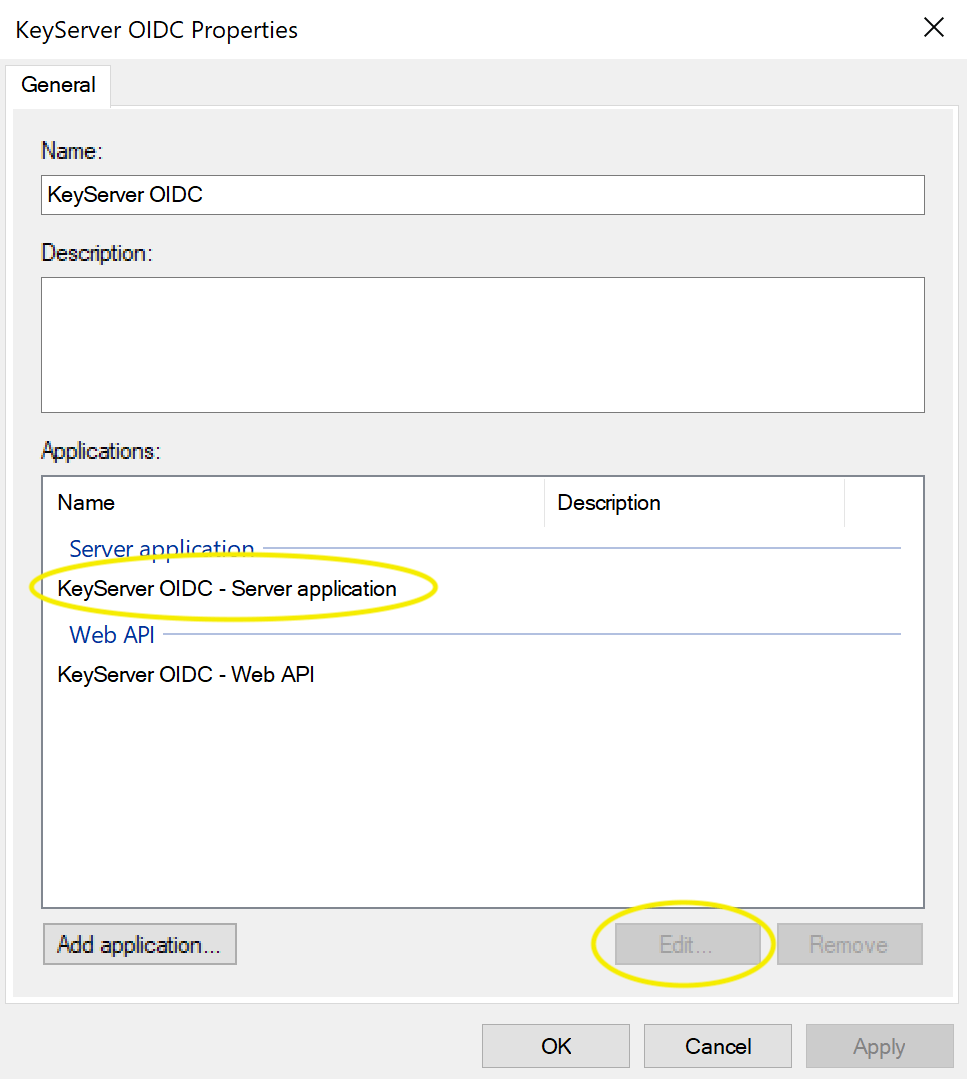
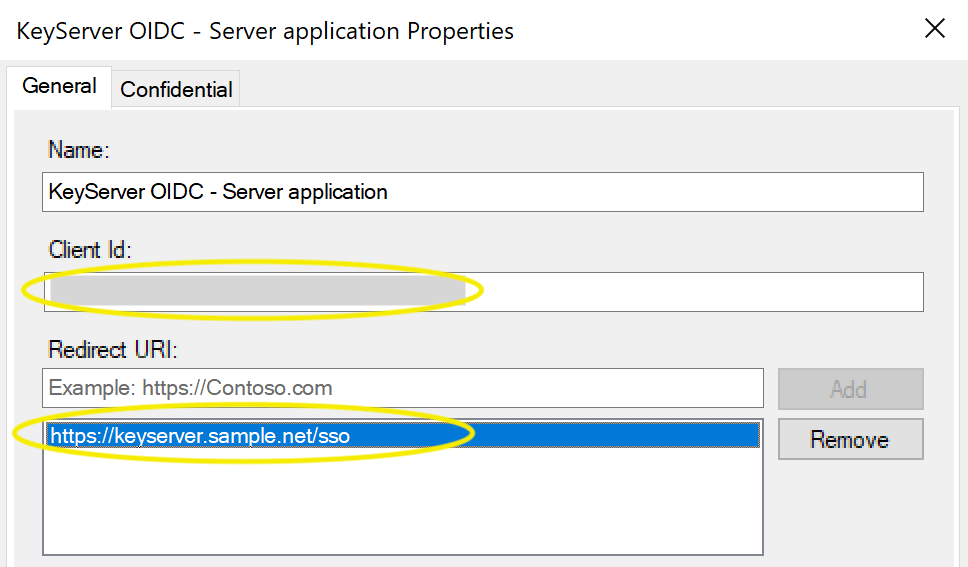

You should now be set up for ADFS Authentication. Enter the Client ID, Secret, Redirect URI, and ADFS Host into the Admin Authentication module in KeyConfigure.
Click here for details of OpenID Connect.
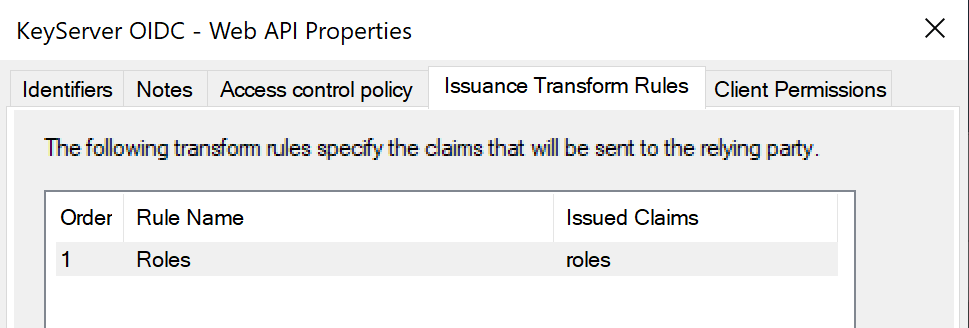
This module is generic for any other OIDC service. Results are not guaranteed as it's generic and not specific, so for example group queries may not work. We are always interested in adding functionality so contact support if you're having difficulties. As an example, DUO is known to have OIDC as an option now, and a configuration for that service might look like this:
Note in this case DUO calls the one field "Discovery URL" and it is in URL syntax. As shown above, our Discovery host/path does not use the URL syntax, just the host and path (i.e. remove https://).
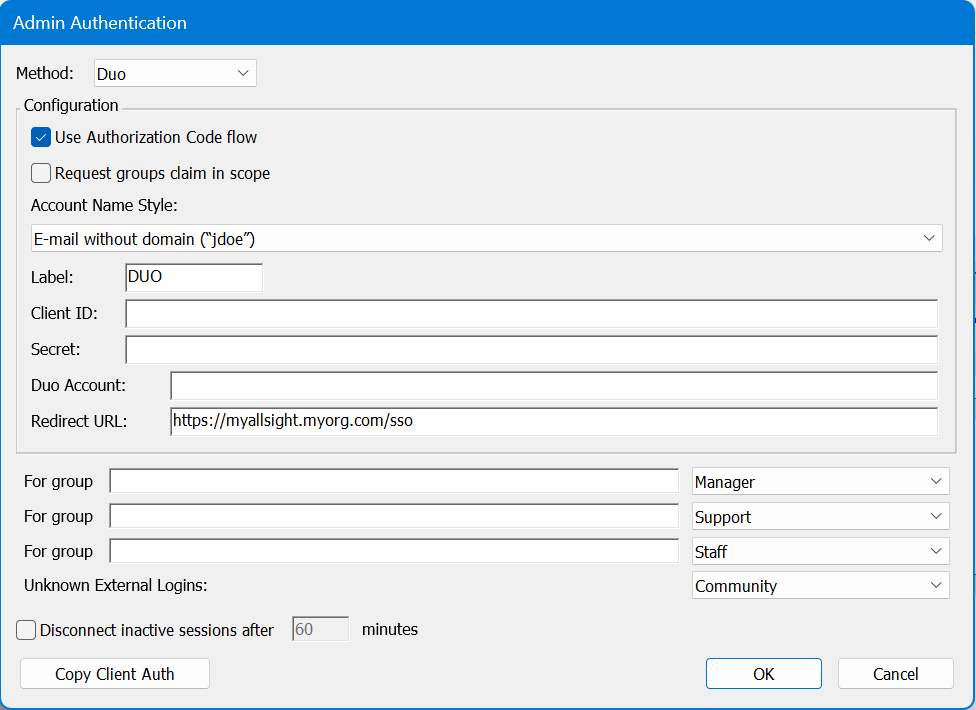
Click here for details of DUO.
This module was specifically added for the DUO implementation of OIDC. It allows for more robust interaction than the generic open ID connect module. The Client ID, Secret, and DUO Account information comes from your DUO instance. We do not have any more detailed walk through at this time for setting up the DUO side as these concepts should be fairly common for the administrator.
SAML
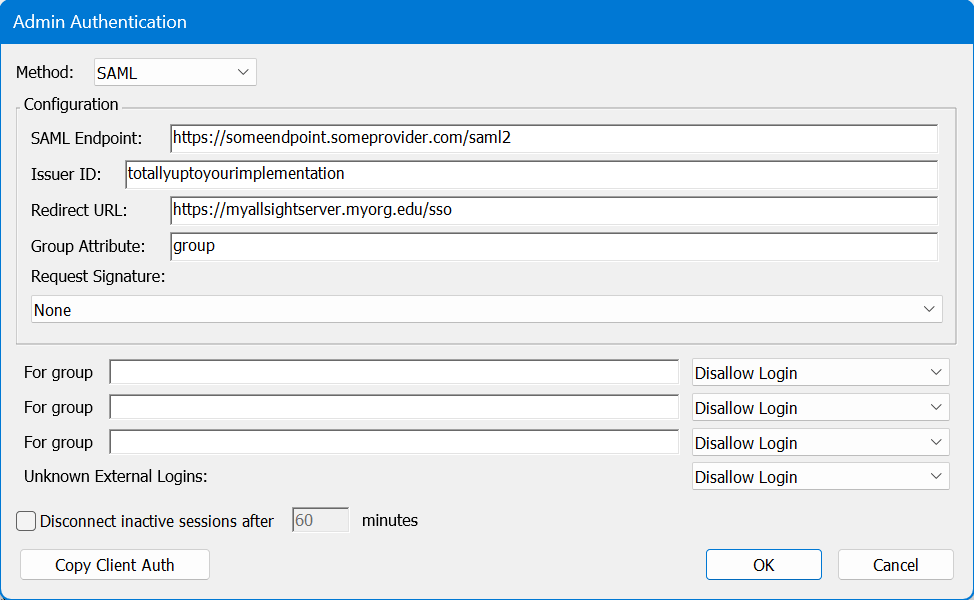
This module supports generic SAML authentication. Prior to 8.0.0.3 it was very limited in functionality. Currently it now support use of metadata files to configure. You can still populate the fields manually if desired, but the result may not be fully functional.
Configure with metadata
- Click Settings on the left-hand nav menu, then select the Account Setup topic. From the menu at the top, select SAML and click Save.
- Still on the Settings page, select the Advanced topic. You will see the SP metadata file listed there (saml-sp-metadata.xml). Click on it to download. Use this metadata file on your SAML IdP server.
- From the SAML server, get the IdP metadata file. Change the file name to “saml-idp-metadata.xml”, then drag and drop the file onto the Advanced panel where it says “Drag a configuration file here…”
- Refresh the window and switch back to the Account Setup topic on the Settings page. Check the setting to make sure they are what you want them to be. If you make any changes, be sure to click Save.
CAS
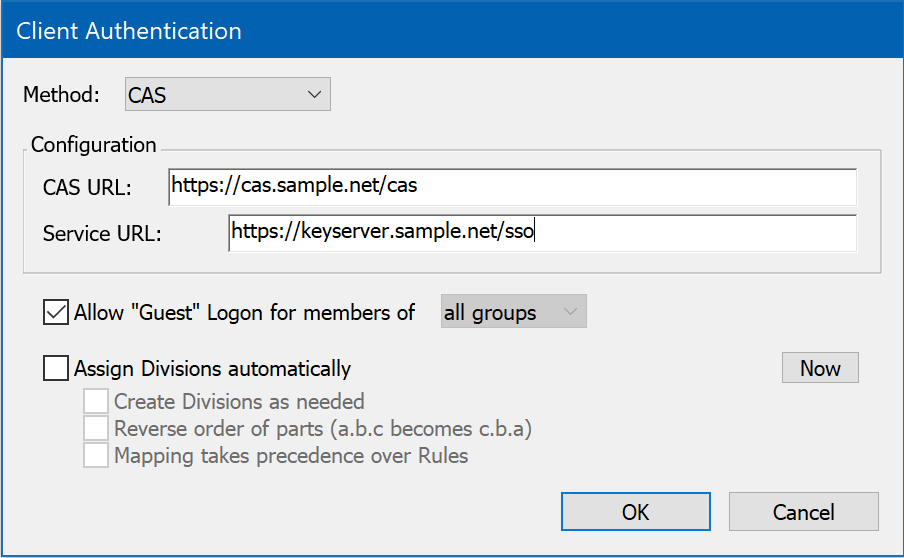
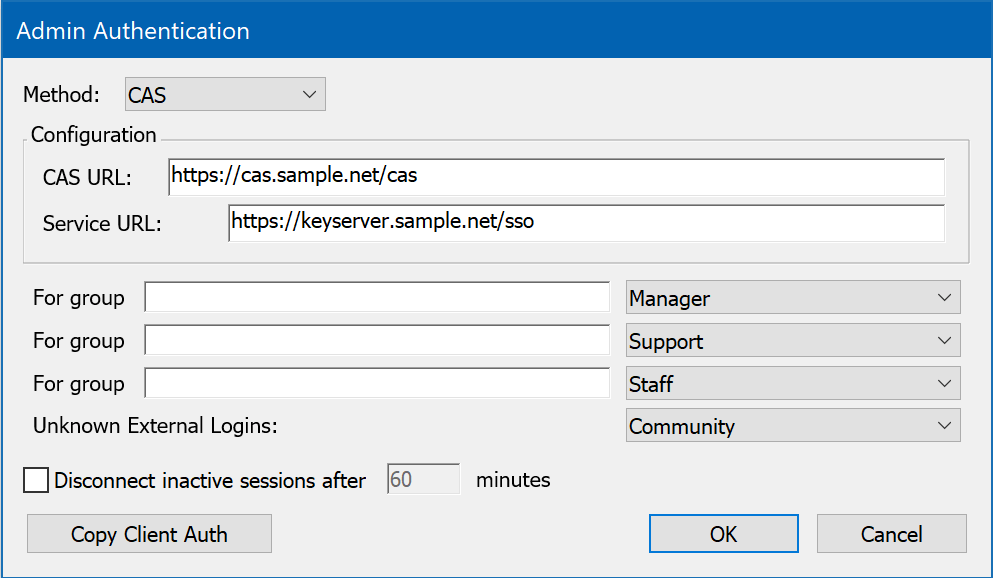
If you are running a CAS server to provide Central Authentication Services, you might consider using this method for externally authenticating Administrator accounts. This module supports CAS's single sign-on functionality for browser logons to KeyReporter (assuming the default configuration: KeyReporter is co-hosted with KeyServer). In order to use CAS for KeyConfigure logons, the CAS server must support the CAS REST API.
To configure CAS authentication, enter the CAS URL (this is the URL that other CAS-enabled network services are configured to use). The Service URL must be configured with the KeyServer/KeyReporter host name and appropriate port, if non-standard. For example, if you are running KeyReporter on keyserver.sample.net, using the custom port 8443 for secure HTTPS service, the Service URL would be https://keyserver.sample.net:8443/sso.
If your CAS server supports the CAS REST API, it is possible to use it for Client authentication but it is better to use a more efficient authentication method if available. CAS does not support group membership so it cannot be used to "Assign Divisions" in the Client authentication nor use external groups in admin authentication/ admin access.
SQL
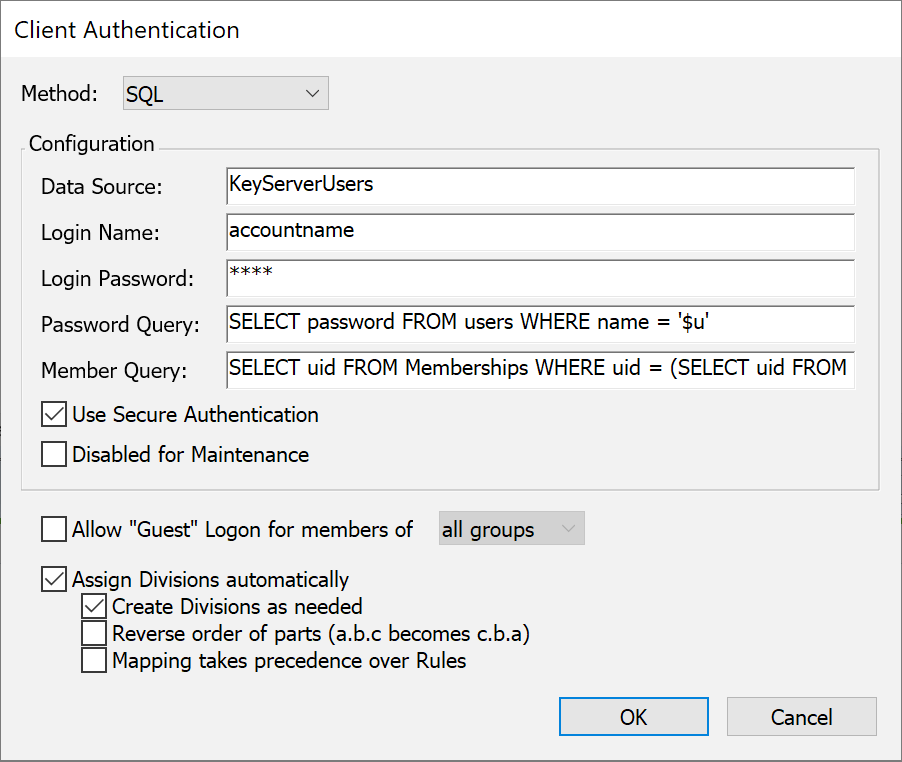
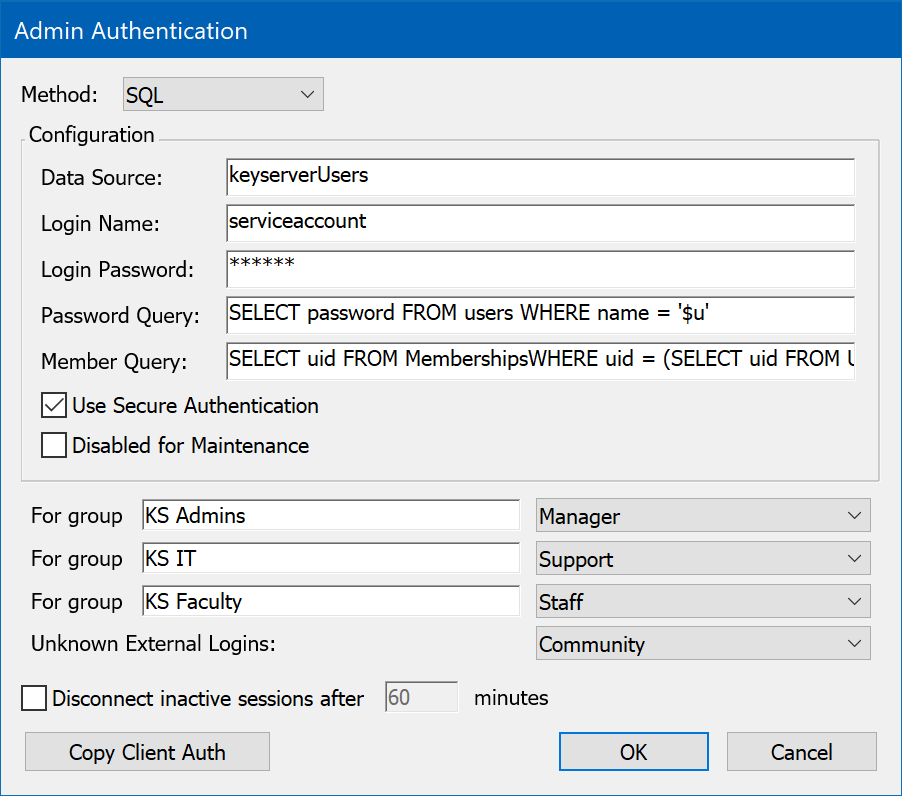
Sites that maintain a database of users in an SQL database can set up KeyServer to use that database for authentication and authorization. This authentication module uses ODBC to connect to the database, so any ODBC data source that supports SQL can be used. However, since there is no convention for storing and retrieving passwords in an SQL database, passwords sent from KeyServer to the SQL server will likely be sent over the network as clear text when you are using this authentication module (depending on the specific implementation of the ODBC driver). Unless you must support KeyAccess versions 5.0.5 or older, be sure to check the Use Secure Authentication option so that passwords will be securely transmitted from KeyAccess to KeyServer.
To use this authentication module, you should already be familiar with SQL and your chosen RDBMS, and you must know how to set up an ODBC Data Source.
To configure the SQL authentication module, you must first set up the ODBC data source that is to be used. This can be done within the ODBC Data Source control panel on Windows. Once the data source is set up, enter the data source name (not the name of the database -- that was specified when setting up the data source), and the login name and password if they are required (sometimes these can be specified when you set up the data source). KeyServer will only need read (select) access to the database. In the example above, the data source was named “KeyServer Users”, although you can give the data source any name you wish. You can also use an existing data source if that is appropriate.
For example, consider the simple database design pictured below. This database has three tables: one containing user names and passwords, with a unique numeric “user ID” as the primary key; one containing group names and a unique “group ID” as the primary key; and the third being a “junction table” that defines a many-to-many relationship between users and groups. This third table defines each group's set of member users. Note that your database does not need to have this same structure. Your database can have any structure you wish, as long as you can form SQL queries that return the information needed by KeyServer, in the formats described below.
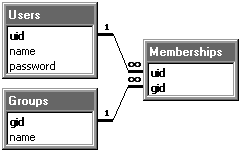
Simple SQL database design
When KeyServer verifies a user's password, it submits an SQL query that must return exactly one row, with the first column containing the password. KeyServer compares this column to the password that the user provides. In our example, this query will require only the “Users” database, using the SQL query:
SELECT password FROM Users WHERE name = '$u'
In the above query, the “$u” will be replaced by the name provide by the user. This query must return exactly one record, otherwise the authentication will fail. Since KeyServer only checks the password in the first column, that is the only column that is requested in the query.
When KeyServer needs to check if a user is a member of a group, it submits an SQL query that must return at least one row, although the data in the row can be anything. In our example, we use a complex query that uses the Users and Groups tables to look up the user and group IDs, and then the Memberships junction table to check for membership. The SQL query looks like this:
	SELECT uid FROM Memberships
		WHERE uid = (SELECT uid FROM Users WHERE name = '$u')
		AND gid = (SELECT gid FROM Groups WHERE name = '$g')
In the above query, the “$u” will be replaced by the user name and “$g” will be replaced by the group name. KeyServer checks that this query returns at least one row. The “uid” column is returned, but this is ignored and could be anything.
If your RDBMS is not able to do sub-selects, then you can most likely work around this with a slightly more complex query. For example, the above member query could be re-written as:
	SELECT Memberships.uid FROM Memberships,Users,Groups
		WHERE Memberships.uid = Users.uid
		AND Users.name = '$u'
		AND Memberships.gid = Groups.gid
		AND Groups.name = '$g'
Some additional values can be used in queries (some of these are only available with version 6.2.0.2 or newer of the SQL authentication module):
- $u - user name
- $c - computer name
- $i - computer id
- $d - computer id starting with second character (e.g. the MAC address portion of a MAC address based id)
- $e - portion of computer id starting after first slash, if it contains one
- $g - group name
When forming a query, remember that your RDBMS might be case sensitive on table names and/or column names. To be safe, always use the same capitalization in your queries as is used in the table definitions in your RDBMS.
When entered in the Authentication dialog box, the Password Query is limited to 127 characters and the Member Query is limited to 255 characters. If your queries need to be longer than this, you can direct the SQL authentication module to read a query from a text file. To do this, enter “@” as the first character of the query, followed by the name of the file in which the query is stored. The file must be stored in the Authentication Modules folder within the KeyServer Data Folder. The entire contents of the file will be used as the query, and separate files must be used if you choose to store both the Password and the Member Query in files.
If you do not want KeyServer to require a password, leave the Password Query field empty. If you do not want KeyServer to check for group memberships, leave the Member Query field empty.
The SQL module will not Assign Divisions automatically.
Windows NT
Sites that use Active Directory or Windows NT domains to manage user accounts and privileges can configure KeyServer to relay its authentication queries to this same service using the Windows NT authentication module. All group membership information defined in the Active Directory for the Windows domain will be available to the KeyServer process for use in controlling application access. Because KeyServer must access the information directly from a Windows Domain or Active Directory, this authentication module is only available when the KeyServer process is hosted on a Windows computer. If your KeyServer runs on Mac OS or Linux and you wish to access user and group information from Active Directory, consider using the Kerberos or LDAP modules.
To use this authentication module, you should already be familiar with the basic Active Directory configuration and maintenance for NT Domains.
|
In order for KeyServer to be able to access the names and passwords, it must operate with the user right “Run as part of the operating system”. This advanced user right can be enabled via the Windows User Manager tool. If your KeyServer runs as a service in the LocalSystem account, that account already has the necessary user rights. |
|
If the Windows NT Guest account is enabled on your NT domain server, any user will be able to logon to KeyServer using any name and password. It is recommended that the Guest account be disabled on your NT server, since this account creates a large security hole for your NT server and for other services that depend upon it. This may require two steps. First, turn the guest account off in the User Accounts Control Panel. Then use the “Local Security Policy” Administrative tool, and edit Security Settings -> Local Policies -> Security Options -> Accounts: Guest Account status. Make sure that this item is set to Disabled. |
With the Windows NT method selected, enter the name(s) of the domain(s) from which users will be authenticated in the NT Domain List field. If you leave this field blank, the local domain of the KeyServer machine is used. Users may specify the domain they belong to when they login using the standard notation: DOMAIN\name. If the user does not provide a domain, all domains listed in the authentication module configuration dialog will be searched in the order given.
There are four options for password verification:
- Passwords not required
With this option, users will not be prompted for passwords. The current user name of the computer login account is assumed to be correct and authentic, and will be used when checking group memberships. - Use Compatible Authentication (legacy)
Use this only if you must support very old KeyAccess clients, 5.0.5 or older! By default, such old clients are not permitted to logon to KeyServer. This is not recommended because the password will be conveyed in clear text all the way from client to KeyServer to authentication server. Users will be prompted for their password by KeyAccess once per login. - Use Secure Authentication
Users will be prompted for their password by KeyAccess when it logs on to KeyServer. To take advantage of “single sign-on” when available, choose the NTLM authentication option instead. - Use NTLM Authentication
NTLM Authentication supports “single sign-on” for Windows OS versions – Windows 98 , Windows NT 4, and better. These operating systems retain authenticated user account login information so that KeyAccess can make use of the previously validated credentials without itself prompting for a password. For Mac or Linux clients (or old KeyAccess versions), this option falls back to the Secure Authentication behavior – users will be prompted by KeyAccess for a password when it logs on to KeyServer.
Access can be restricted to members of a particular group, as well. If a group name is specified in the “Restrict to Group” field, access will only be granted to users who enter their correct name and password and who also belong to this group.
There are also a few options for how KeyServer determines whether a user is a member of a group. By default, KeyServer will look for groups in both the Local groups (groups stored on the computer that runs KeyServer) and the Domain groups (groups stored in AD or on an NT Domain server). You can disable either or both of these options by checking Ignore Local Groups or Ignore Domain Groups.
Typically, group membership is determined based on the name of the user who is logged in to KeyServer. In addition, the Windows NT authentication module can check for group membership based on the name of the computer from which the user is logged in. To enable this option, check the option "Check Computer Members".
It is recommended that, if possible, you use Active Directory for determining group memberships. Check Use Active Directory and enter the DNS host name or IP address of the Active Directory server, as well as the name and password of an object on the server that has permissions to check group memberships (this means the object must have read rights to the “member” attribute of a group object). The object MUST be qualified with the NT domain, as in "DOMAIN\accountname", or must be in one of the domains listed in the "NT Domain List". This account does NOT have to have admin level privileges.
|
If your Active Directory server runs only in “native” mode and not “mixed” mode, this authentication module cannot retrieve the list of groups from the server. However, you can still use the groups on your AD server simply by typing them into the Scope field in any policies. The group name must be entered as it appears on the AD server (just the group name, not the fully qualified name). After entering a group name in a policy be sure to test launch a program in that policy under an account that is a member of the group so you can be sure that the group name was typed correctly. |
When specifying group names in Policy Detail windows, you can “qualify” the group name with a domain name using the standard notation: DOMAIN\name. This tells KeyServer to look only in that Domain Group for the user. If the group is unqualified (i.e., no Domain is given), then KeyServer will look in each listed domain for a group of that name, and if the group exists, it will be checked for the user.
Active Directory allows for "nested groups", where if group A is a member of group B, then all members of group A are also members of group B. This feature can simplify management of users and groups with Active Directory, but it is also more computationally intensive for programs to check for group membership. Therefore, support for nested groups is disabled by default in this authentication module. If you use nested group in your Active Directory, you can enable KeyServer support for them by checking the "Use Nested Group Check" option. This option is only available when you are using Active Directory to determine group memberships. Lastly, the "AD Login" account described above must have sufficient permission to read the "memberOf" attribute for users and groups.
The Active Directory and Windows NT authentication methods use OUs to determine what division to place a computer in. Within these modules you can choose between using the first, last, or all OUs for for divisions. For example, if a computer has the distinguished name (dn) "cn=computername,ou=sales,ou=northeast,dc=company,dc=com", then:
- Choosing "Use first OU" would result in a division name of "sales"
- Choosing "Use last OU" would result in a division name of "northeast"
- Choosing "Use all OUs" would result in a division name of "sales.northeast"
Note that computers must be in OU containers in order to be mapped to a division. The default configuration of Active Directory places most computers into the Computers container, which is not an OU container. You must create OU containers in your Active Directory and place computers into these containers in order for them to be mapped to Divisions within KeyServer.
The final checkbox in this dialog allows the Administrator to specify which method should be preferred in any conflict between the Division Mapping settings and the Computer Discovery Rules.
Unix
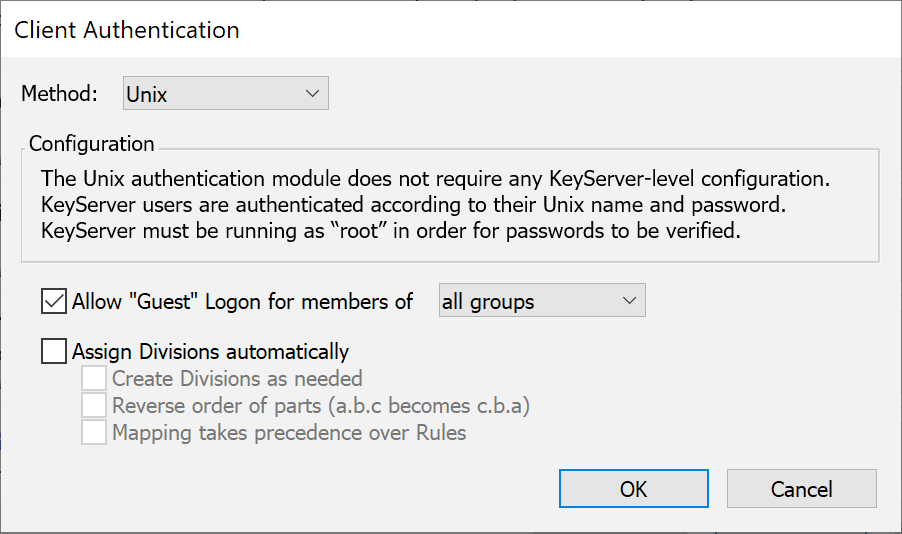

If you are running KeyServer on Unix, you can set up KeyServer to use the names, passwords, and groups. The unix authentication information can be sourced from a simple unix password file, or access can be re-directed through Open Directory Services or a PAM module (when hosted on Mac OS X). Note that if OS X is using PAM, you will have to configure PAM to allow the KeyServer process to use it. One quick method for this is making a copy of /etc/pam.d/sshd called ks, but the details of the desired PAM authentication are outside our software scope. Configuration on something like RedHat or Ubuntu is done using the various Unix administrator utilities for that OS. Check the unix manual pages for pam details for your specific distribution.
When configured for Client authentication, even though group information is available for some purposes, the Unix module cannot assign computers into Divisions.