Policies Window
The policies window displays each policy on the KeyServer, as well as a summary of current configuration and usage.
Policies are defined by administrators, in order to configure what happens with usage of programs within a product. A policy can have an action of Manage, Observe, or Deny. It is important to note that if there is no Policy for a Product, no usage tracking will occur. Inventory is always tracked, but to have detailed usage reports for software you must at least have an Observe policy in place that includes the given Product. A Manage Policy can impose usage limits and access restrictions on a product (which is comprised of a program or group of programs). Most importantly, a policy can enforce a Purchased number of entitlements. However, policies can also restrict who uses products, when, and for how long. Lastly, a policy can Deny launch of a program entirely if you want to prevent use of certain applications.
Note: Only Observe policies are available in the LabSight tier of the Sassafras Server product. Conversely, Observe policies are available but not very useful in the KeySight tier as they will cause you to fill your license usage quickly. Only the AllSight tier fully unlocks the power of policy management.
See also our Tutorial Video on this topic.
A default policy (KeyVerify Policy) is created at installation. All other items in this window are defined and maintained strictly through KeyConfigure. Unlike the Computers, Programs, and Connected Clients Windows, items are never automatically added to the Policies window, regardless of user activity.
In many cases, a product will be associated with a single policy. Conversely, this policy will only apply to that one product. However, a product can be associated with multiple policies, and similarly, a policy can apply to multiple products. The most common reason to have two policies for a single product is to Manage the product for computers within a certain scope while Observing or Denying it on other computers. For more about Scope, see the Policy Details Window documentation.
In short, a policy can be thought of as a particular set of access and usage rules being applied to one or more items in the Products Window. When a user attempts to run a program which is part of a product, each policy which is associated with the product is used to determine whether the program launch will succeed.
Left Side — Display column
The Display column on the left of the Policies window is used to restrict the policy list on the right to a selected subset. It is divided into four panels. Each one classifies the policy records on the right according to various attributes. Multiple check marks within the same panel increase the selection set - the conditions are OR'd together. Check marks in separate panels decrease the selection set - the conditions are AND'd together. Clicking on the double-check icon that appears between the Display column (left) and the Policy list column (right) will toggle between the current selection and all selected.
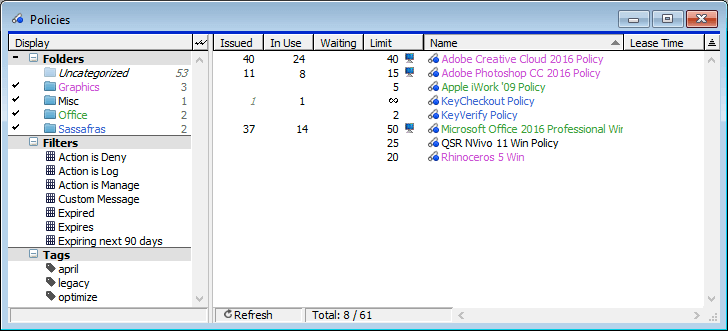
- Folders panel: by default, there is a single Uncategorized folder which includes all policy records. To create your own Folders, use right click in the white area to bring up the context menu item, “New Folder....”. Policies can then be dragged into the various Folders as needed. In the table view of policy records on the right, the optional “Folder” column will display the folder for each policy (except for Uncategorized policies, which are listed with a blank value).
- Filters panel: there are a number of other sample filters that are configured by default. You can also use the “New Filter....” menu item under a right click in the white area to create a new filter, defining your own search criteria. Clicking to the left of a filter will select it. Only one filter can be selected at once.
- Tags panel: Tags are arbitrary strings that are assigned to computers, policies, products, and users. This panel lists all Policy Tags, and will initially be empty until you have added some tags. For more, read the Tags documentation.
Main Columns
The columns in the right hand side of the Policies Window give you a simple overview of all policies. They show the most basic configuration options, as well as a summary of the current usage. Additional columns can be added to the Policies window by right-clicking a column header and selecting “Arrange Columns”. Of the default columns, only Name applies to all Policies with all Actions. The rest are only used for Manage Policies.
- The Issued column shows how many copies of the policy have been issued. This is the number which is checked against the policy limit. For a Concurrent policy, it is the same as the In Use count. It is blank if no copies are allocated.
- The In Use column shows how many copies of the policy are currently in active use. It is blank if no copies are in use. This will be shown for Observe as well as Manage policies.
- The Waiting column is blank unless at least one user is queued and waiting for a license from the policy to become available, so that they can run a program which is in a product managed by this policy.
- The Limit column shows the total number of entitlements which are managed by this policy. If the policy is a Node-Locked policy, a computer icon appears to the right of the number. A Lease policy will show an icon of a computer overlaid with a stopwatch. Similarly, User and User Lease policies use icons showing a user and a user overlaid with a stopwatch.
- The Name column shows the name which has been chosen for this policy. For policies which Manage a single product, this is usually the product name, plus the word “Policy”. This column also shows an Icon indicating the type of Policy.
Creating Policies
One way to create a new policy is to drag a product from the Products Window into the Policies Window. You can also right-click in the Policies Window and select Create New Policy. Either way, you will be taken to the Policy Wizard, which will walk you through creation and configuration of a new policy. Alternatively, if you have entered information for the purchase of the product before adding a Policy to manage the policy, you can use the purchase record to create a new Policy according to the Rights & Conditions defined in the purchase record.
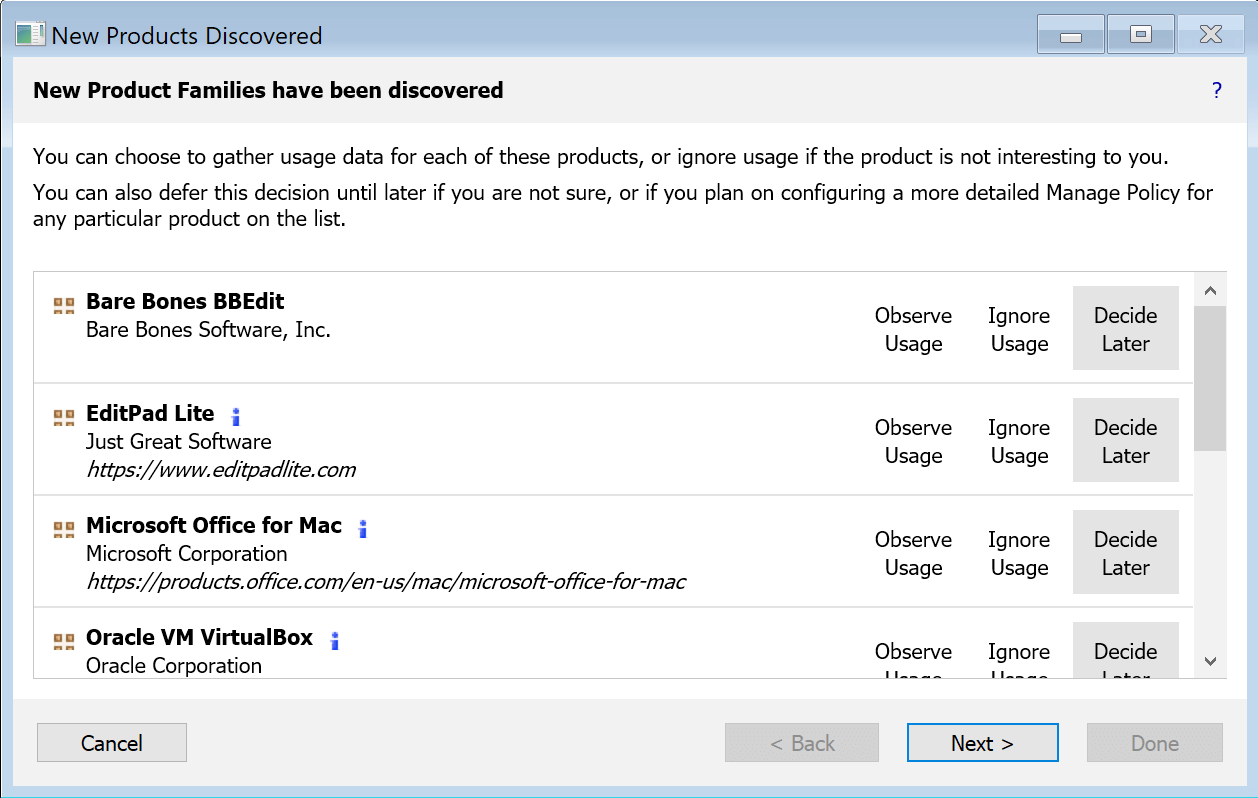
In 7.6 we added Automatic policies which pops up a wizard listing all detected Products you currently have no policies for. You will be asked if you want to create observe policies for these products, and it is separated into two batches. The first is products we find "interesting", which is to say they are likely paid products. The second will be things like web browsers and other free applications, which will default to not creating a policy. For each item in the wizard, you can select to Observe, Ignore, or Decide Later. Observe policies created this way can easily be changed to Managed policies later if needed. These policies are based on product Families so they are "future proof" as new versions come out and our Product Recognition Service updates.
Modifying Policies
Most policy parameters are modified from the Policy Details Window (double click on a particular policy) but some drag actions are also supported.
Additional products can be associated with an existing policy simply by dragging an item from the Products window onto a particular policy item in the Policies window – the policy will immediately apply to the product without a confirming save dialog. Use this procedure to easily aggregate several products under the influence of a single policy. Note however that it will be more common to aggregate several programs into a single "suite" product, and then create a policy which still applies to a single product.
Vendor Policies
Some vendors work directly with KeyServer as their license management solution. These vendors will provide you with a Product license file to add to the KeyServer Data Folder, along with the relevant instructions and information. Once added, you will see a Policy with a green Icon for the Product. You can view the policy details of this by double clicking just like any other Policy. However because the license is vendor created certain fields will not be editable (like the metric and number of seats) for obvious reasons. Questions about the license in general should be directed first to the vendor.
Context Menu Actions
Right-clicking on a Policy in the Policies window allows you to Reconcile or Edit ACL. Additionally, you will see a list of reports that can be run on that policy.
- Reconcile will bring up a window that lists purchases vs policies for the product associated with the particular product you right-clicked. For more on this see the Reconcile Product documentation.
- Edit ACL allows permissions for this particular policy to be specified on an administrator by administrator or role by role basis. For more about ACLs and multiple administrators, refer to the Administration and Management documentation.
Right-clicking anywhere else in the policies window allows you to create a New Policy....
Drag and Drop Actions
Policies in the Policies Window can be Dragged and Dropped into the policies list in the Policies pane of a product details window. This associates the product with the policy.