Team Dynamix Integration
About
Data gathered by the AllSight platform can be exported to your TeamDynamix (TDX) helpdesk instance. These instructions walk through that integration. Set aside approximately 60 minutes to walk through the steps outlined below. Most of the work is done in TeamDynamix, but a few steps near the end are performed using the "Sync with TeamDynamix" script in the AllSight web interface or KeyConfigure admin console. Make sure you test in your TDX sandbox before syncing with production.
This document was updated April 25th 2023 for the latest script and functionality at that time. If you were running an older version of AllSight and the TDX script, there will be differences and fewer features. See This Blog Post for more details if you were a previous user.
Cautions
Be aware that it's difficult in most cases to delete items in TDX. For example, if you import a large number of records they can not be bulk deleted. Instead, you will have to delete them one at a time, or delete the entire application and start over. We advise the following:
- Start by using your Sandbox instance, not production.
- Initially, don’t turn on the "Include Software Audit Relationships" option.
- Right-click a single computer in AllSight and run the Sync with TeamDynamix script to test sync with a single object.
- Once the above are tested, turn on Software Audit if that’s something you ultimately want to use. Note that if you run the script on a single selected computer, no software data will be synchronized.
- Once you are satisfied with the above, try running on a larger set of computers, then finally all computers (and schedule the script).
Objects created by the Sync
- Assets (one per computer)
- Manufacturers and Models (if using "Sync to TeamDynamix")
- Statuses (Lifecycle Stages) (if using "Sync to TeamDynamix")
- Configuration Items (one per Discovered product, if Include Software Audit Relationships is on)
- Product Types (Desktop, Laptop, etc) As of 7.9.0.5 and the new script:
- Assets (one per Display, if "Include Display Devices")
- Vendors (if "Set Supplier from KeyServer")
- Locations/Rooms (if "Set Location/Room")
Setup
Verify Compatibility
AllSight/KeyServer 7.8 is a minimum requirement, but 7.9.0.5 is required for the latest features. The steps in this guide were tested with TeamDynamix 11.6. Some of the options will require the latest version of the script itself. If you have previously installed it, you may need to update the script in Settings > Scripts in the AllSight web interface.
Gather Prerequisites
- Determine the base URL of your TeamDynamix instance. (e.g. https://www.[myinstance].teamdynamix.com) Determine an appropriate Name and Password for a new TeamDynamix user record (to be created and assigned minimal permissions for the integration in a later step).
- Ensure that traffic initiated from the KeyServer host computer can reach the TeamDynamix instance on port 443 (i.e. generally that outbound traffic is not blocked).
- Although we assume customers are using the software audit functions of AllSight, it's important to note that if you have computer audits (set by Division or Computer) or the Product Audit (server General Settings) disabled, you will not have the related data to sync to TD.
NOTE: All of the following steps in TDX will be in the Administrator UI (TDAdmin), NOT in the end user facing UI (TDNext).
Create a User Account for the Integration
- Define a global security role for a new TDX integration user account (TDAdmin > Users and Roles > Security Roles):
- Name: AllSight Integration
- License type: Enterprise
- Permissions: Grant permission for creating and modifying accts/depts and locations. This is technically optional but without permission these things can not be created or updated and will generate permission failures in the log file.
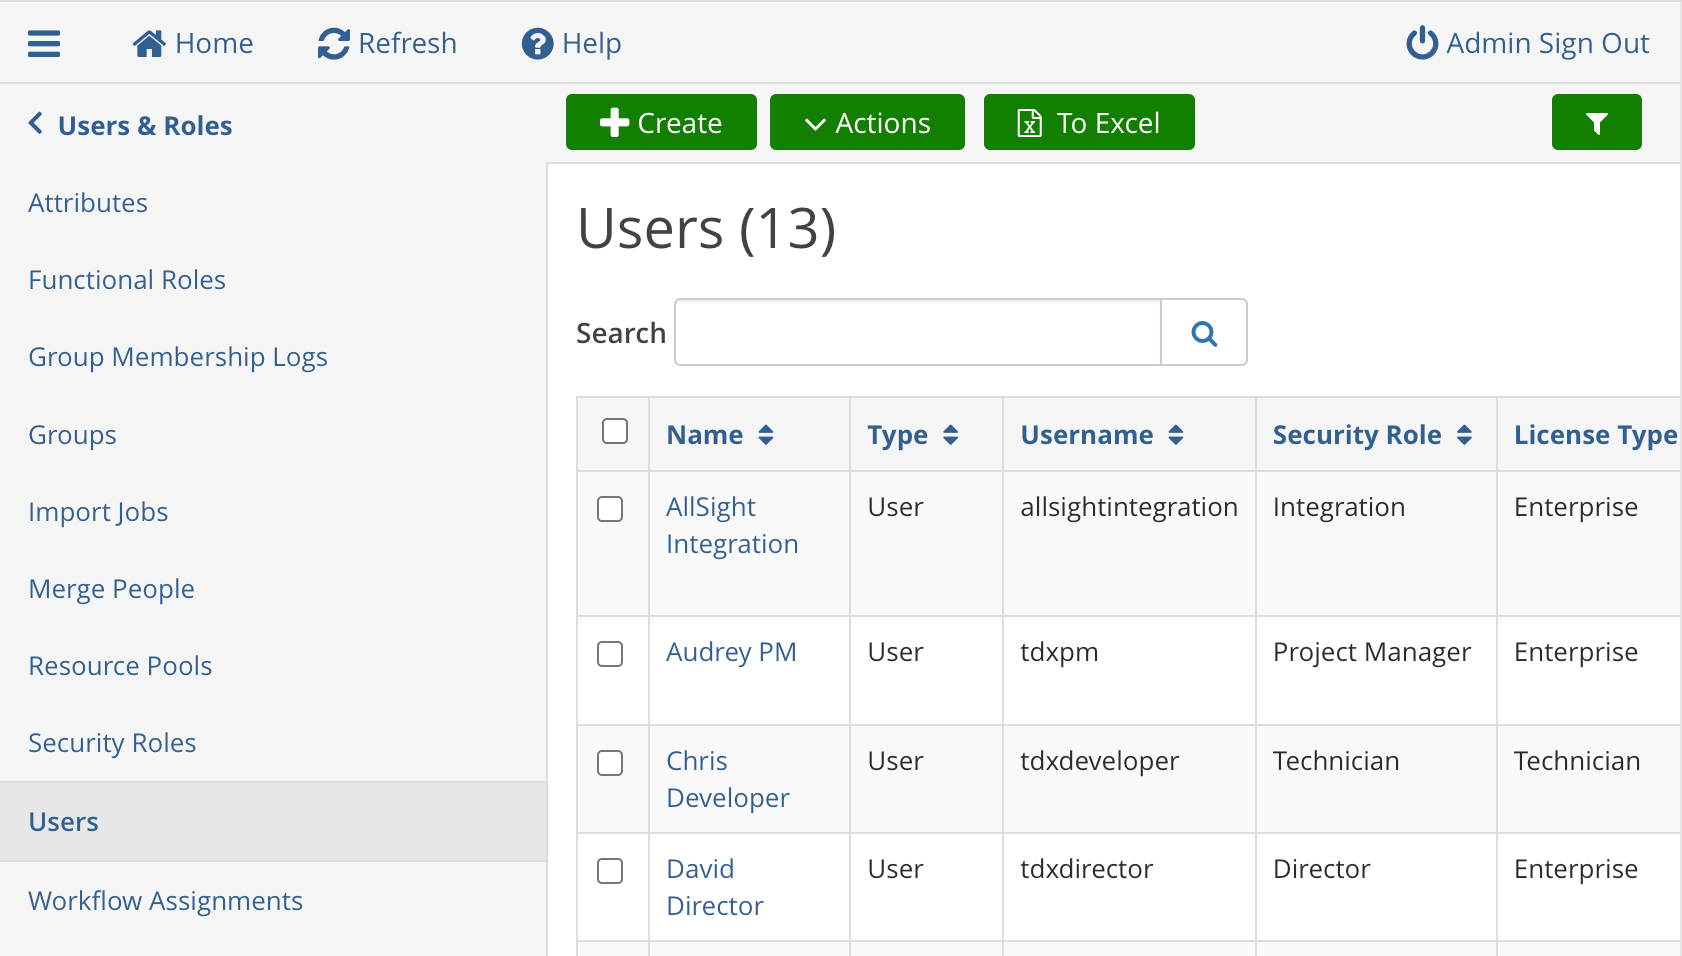
- In TDAdmin, create a new user (TDAdmin > Users & Roles > Users > + Create > Create User). Enter a user name on the first screen. We recommend using "AllSight Sync" so it will be clear which data has come from this integration, but you can use anything you like. On the next screen, enter the required fields:
- Security Role - Choose the global security role defined above ("AllSight Integration")
- First Name - e.g. AllSight
- Last Name - e.g. Sync
- Auth Provider - TeamDynamix
- Password & Confirm Password
- Primary Email and Alert/Notification Email
- Save
Configure Permissions Within Asset Application
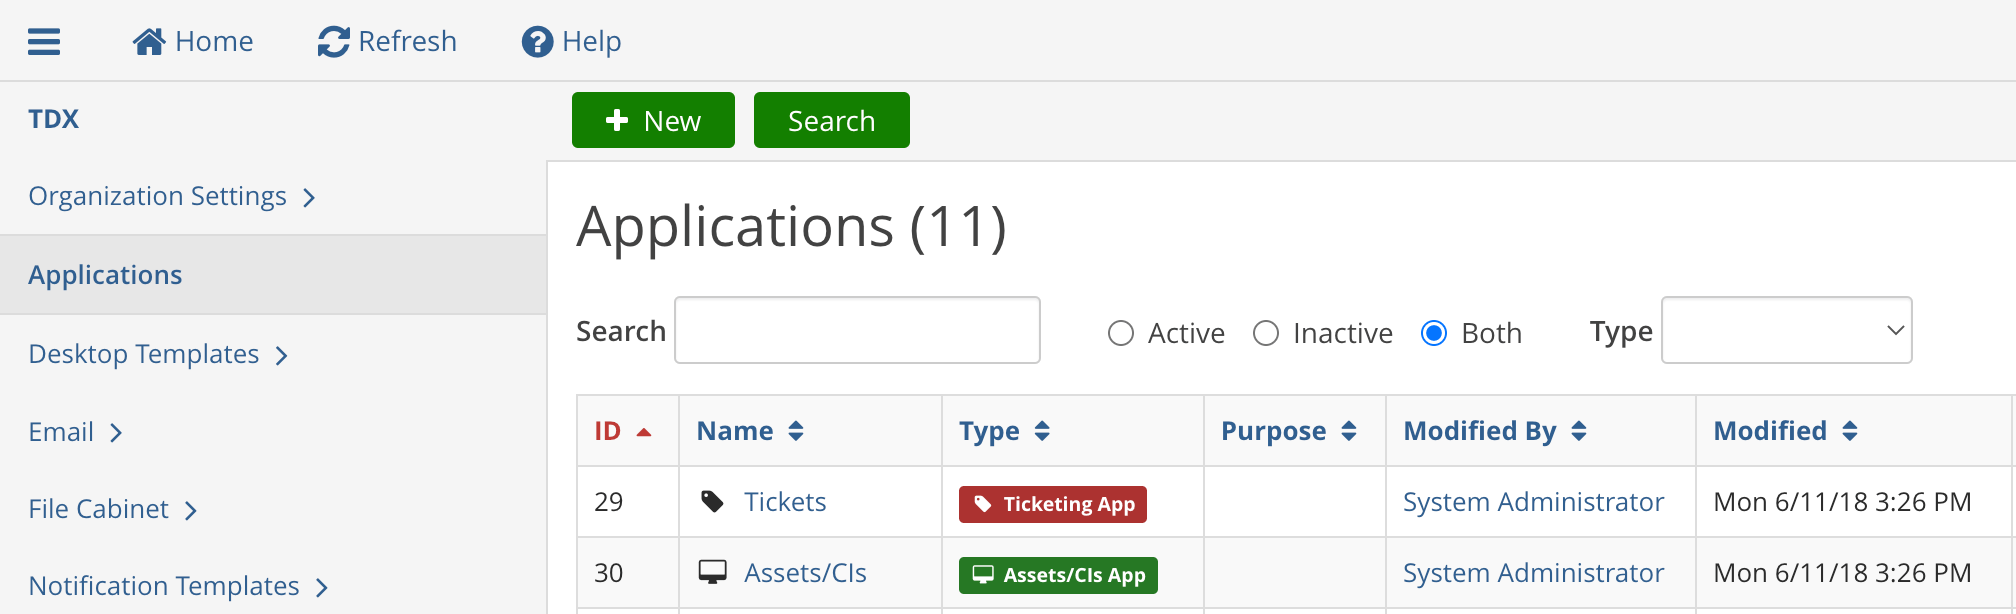
- From the TDAdmin Home page, click Applications.
- Choose an Application to sync AllSight data to (must be an "Asset App" like Assets/CIs).
- Record the ID of the Application (e.g., number 30 in the image above for "Assets/CIs").
- Click on the chosen Application to access its configuration options.
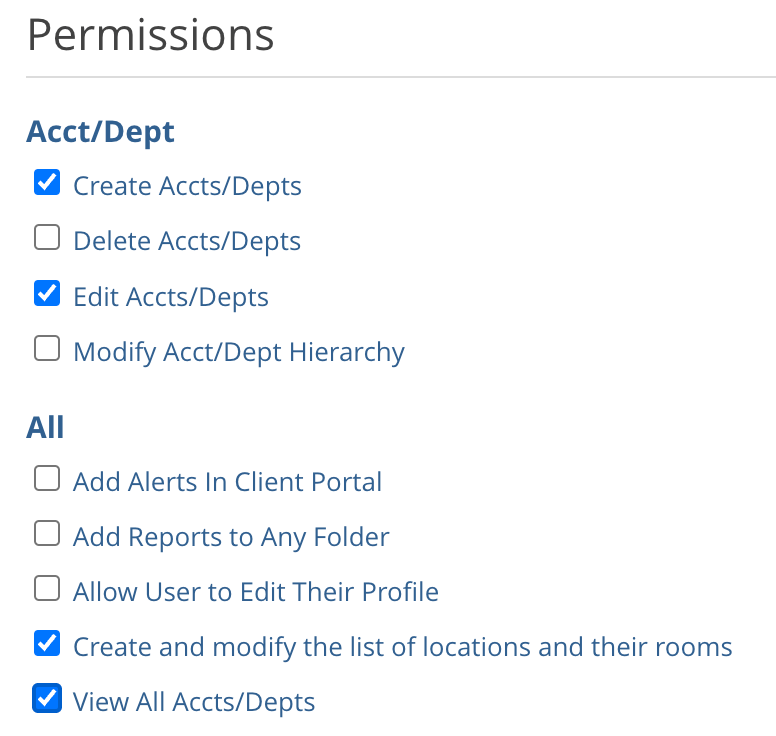
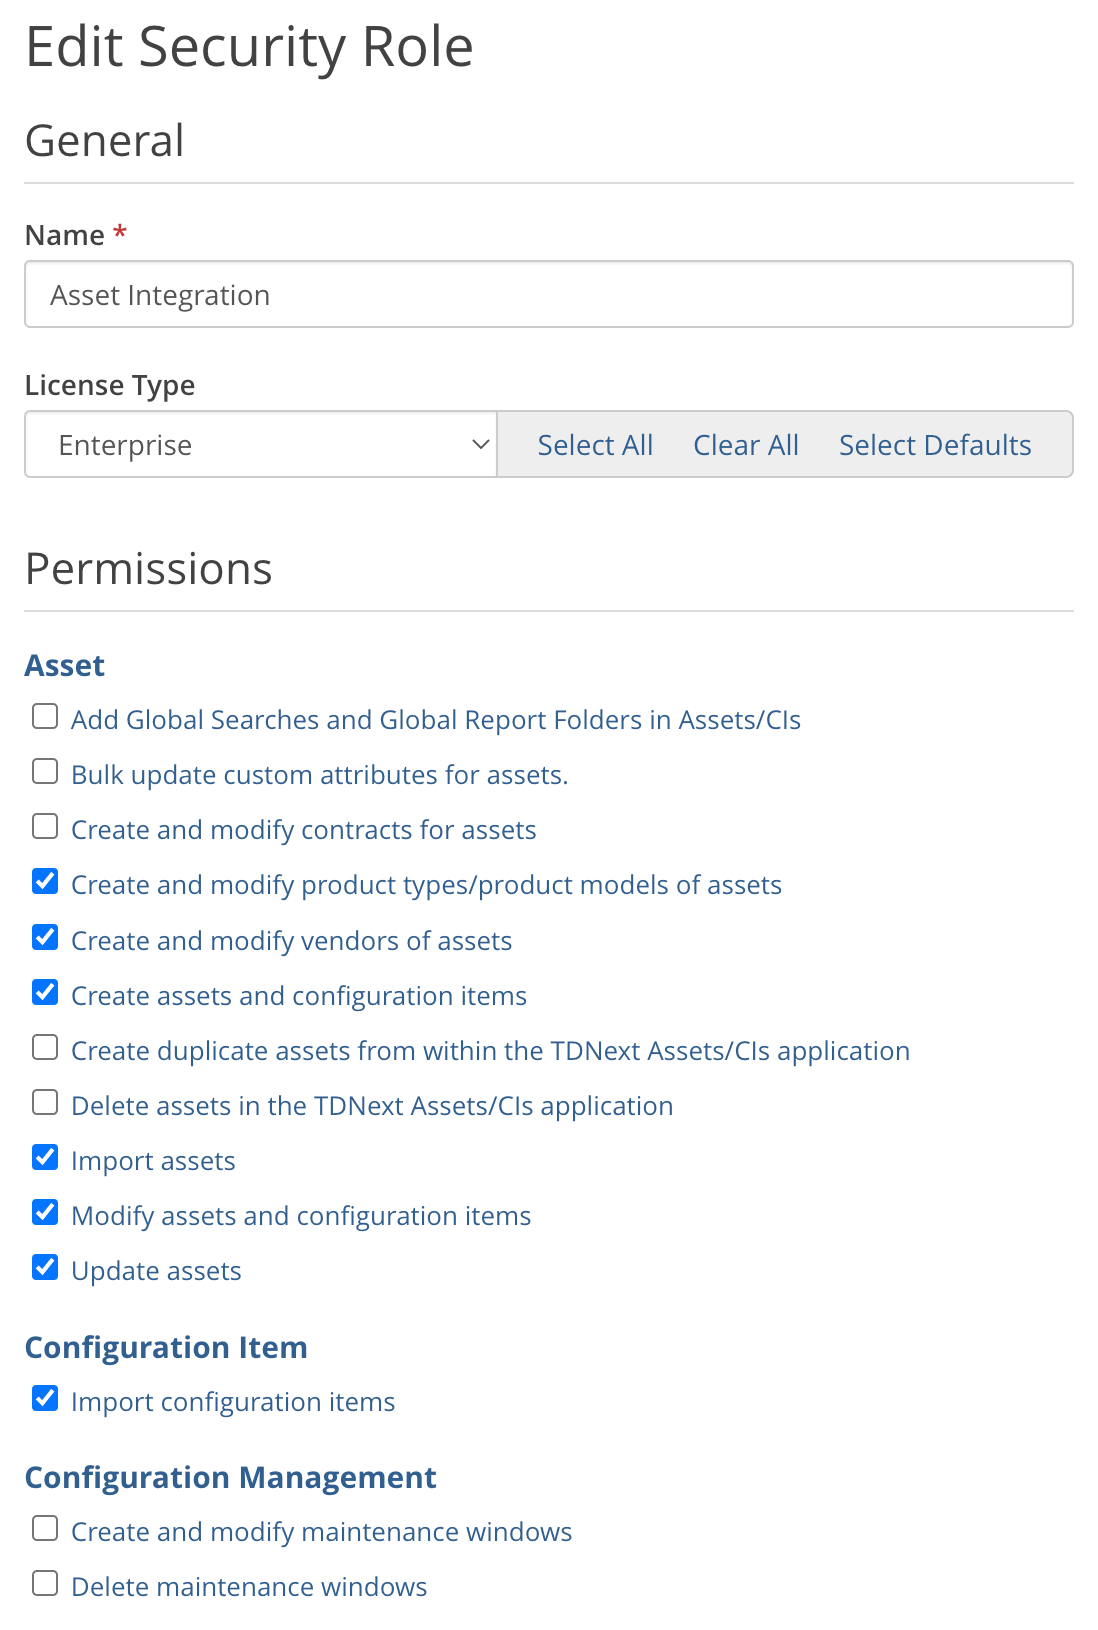
- Define an application security role, choosing a distinct name from the global role created above (TDAdmin > Applications > [Asset Application] > Users & Roles > Security Roles):
- Name: Asset Integration
- License Type: Enterprise
- Select security permissions as in the image below:
- Within the Application, head to Users (TDAdmin > Applications > [Asset Application] > Users & Roles > Users) and click "Add". In the dialog, choose the user account created for the integration (AllSight Sync), and the application security role created in the last step (Asset Integration). Enable the checkbox to "Add as Application Administrator(s)," which is required to allow the integration script to create lifecycle statuses in TD. Click Save.
Create "Attributes" for additional AllSight Computer and Product fields
A small number of fields, such as Computer Name and Serial Number, will be brought in from AllSight automatically after connecting with TeamDynamix. Additional hardware and software details are imported into manually created TeamDynamix fields. These steps demonstrate how to create and manage these new fields.
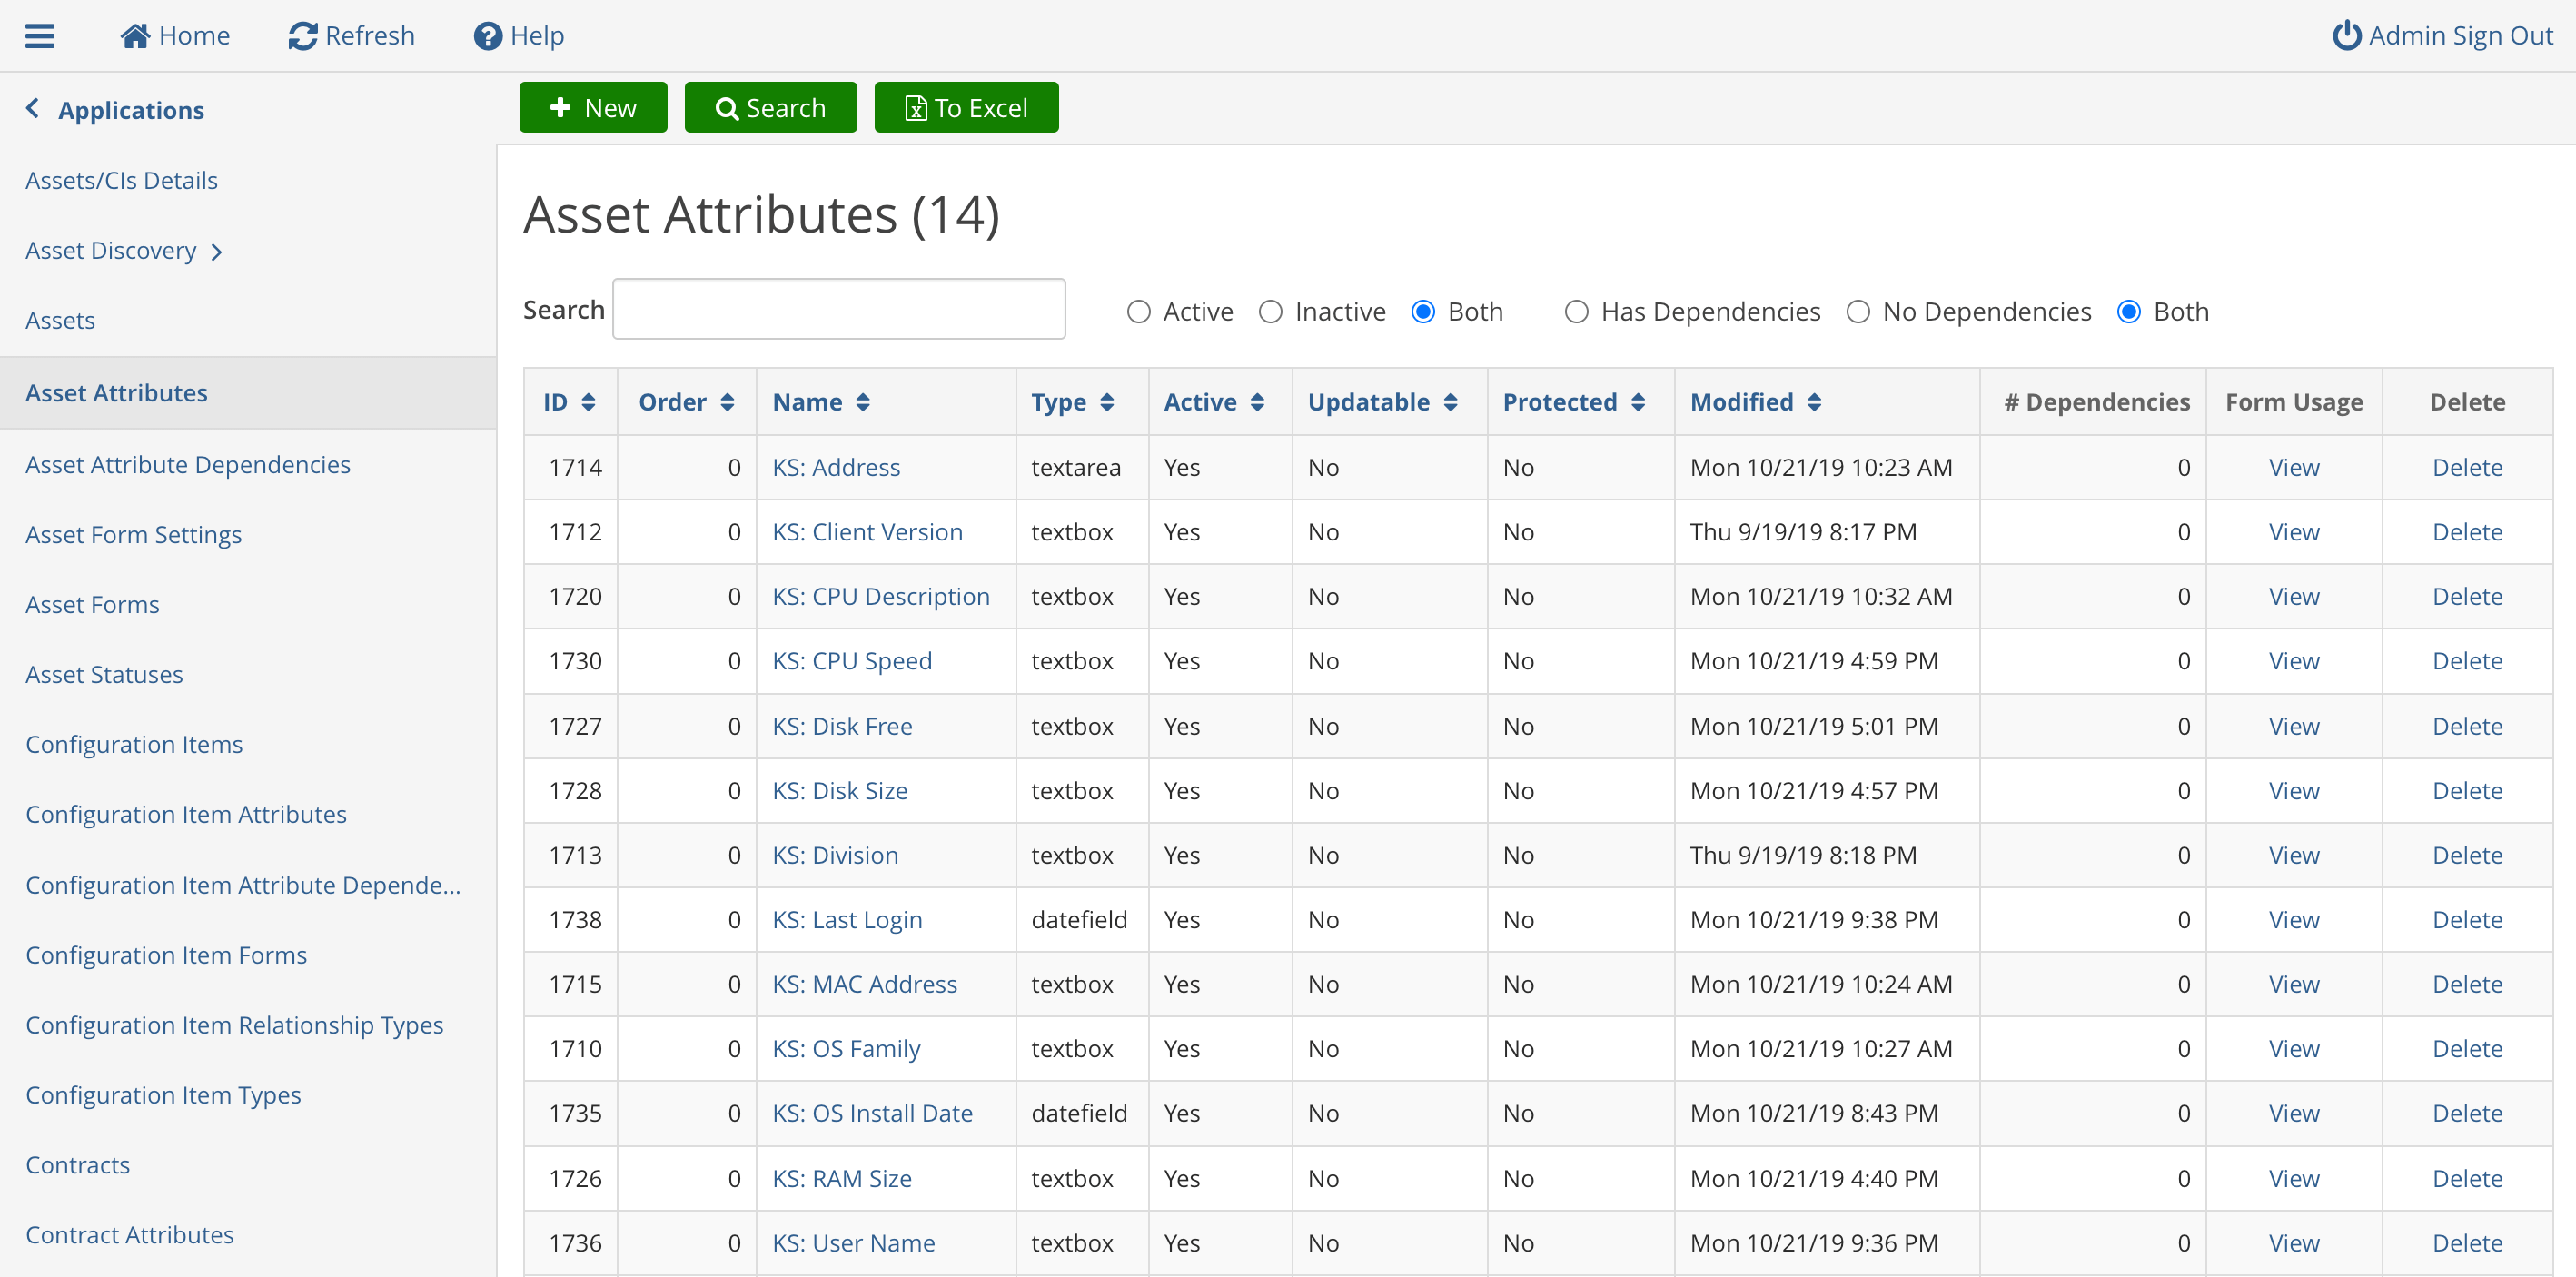
- For Computer fields, navigate to TDAdmin > Applications > [Asset Application] > Asset Attributes and click + New to add each new field (one at a time).
- The names of the new attributes should begin with "KS: " (unless you use the Prefix option mentioned below) and match the column names from the KSComputers KSProducts, and KSDevices tables (with spaces added between words). Note you drop the table name from the field (e.g. computerDivision becomes KS: Division). If you want to add specific properties beyond what is documented here, contact Sassafras Support for assistance as needed.
NOTE: For date fields, you can choose between Date/Time Picker (if you want to see the exact time) or just a Date Picker. All other fields should have an Attribute Type of "Text Box".There are several special fields that do not appear in the tables document that can be used in TD Attributes:
- KS: Disk Capacity - more human readable than built in kb base field
- KS: Disk Available - more human readable than built in kb base field
- KS: Disk Free Percent
- KS: Disk Used Percent
- KS: Last Login - changes frequently so use with caution due to feed traffic
- KS: Login Recent - yes or no value based on if last login was in trailing 7 days
- KS: TPMPresent
- KS: SecureBoot
- KS: UEFIBoot
- KS: DiskEncrypted - yes or no based on boot drive
- KS: ClientInstalled
- KS: DualBoot - yes or no based on the dual boot flag in Categorization being set
- KS: AutoUpdate - yes or no based on the auto update flag being set on the record (client self update override)
- KS: AssetLocked - yes or no based on the Locked toggle on the Asset pane
- KS: Display
- KS: IPAddress
- KS: Local IPAddress
- KS: Network - list of all network interfaces and MACs. (Use instead of MAC Array)
- Recommended Computer attributes are:
- KS: Address
- KS: Client Version
- KS: CPU Description
- KS: CPU Speed (includes number of cores, which is not always in the description)
- KS: Disk Available
- KS: Disk Capacity
- KS: Division
- KS: Login Recent
- KS: MAC Address
- KS: OS Family
- KS: OS Install Date (Date)
- KS: RAM Size
- KS: User Name
- KS: Model (optional)*
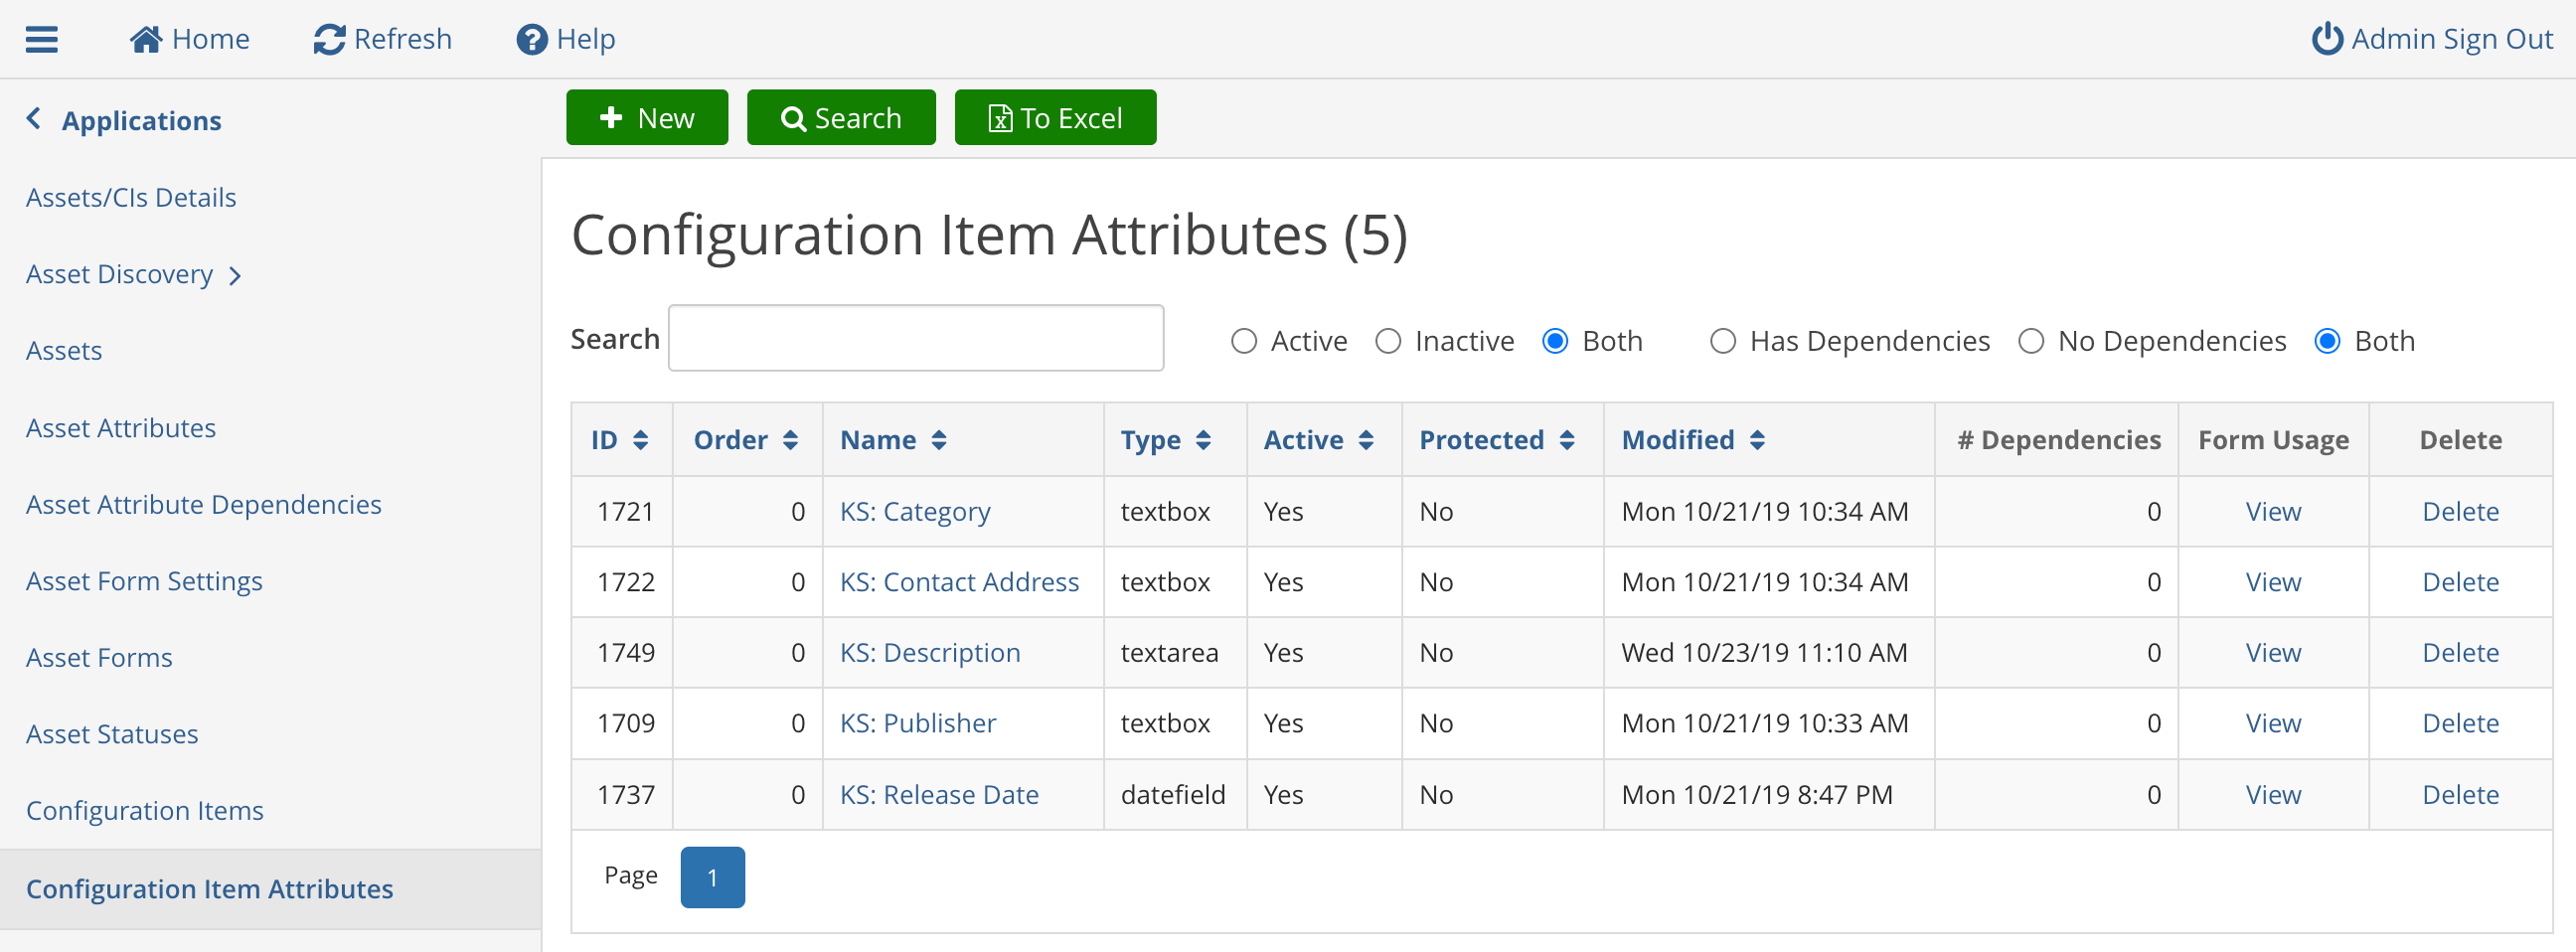
- To import software audit data from AllSight, you will need to create Configuration Item (CI) attributes to hold the product data. A "relationship" will then be established between Computer Assets and the Software Products installed on them. Begin by selecting "Configuration Item Attributes" in the left side column, and then click the + New button for each new attribute. Recommended attributes for Products are:
- KS: Category
- KS: Contact Address (Software Publisher URL)
- KS: Description (Text Area)
- KS: Publisher
- KS: Release Date (Date)
Set Up External Viewers
This section is optional, but demonstrates how to create links at the top of each TDX computer and/or product record that take users to the associated record in the Sassafras AllSight web interface. Note under our script there is also a way to create a link in the AllSight record back to the TDX record.
- Scroll to and click "External Viewers" on the left.
- Create up to three new external viewers as shown above, using your AllSight web address. Examples:
https://[yourdomain].sassafrascloud.com/detail/default/computer/{{ExternalID}}
https://[yourdomain].sassafrascloud.com/detail/default/device/{{ExternalID}}
https://[yourdomain].sassafrascloud.com/detail/product/{{ExternalID}} Note of course if you are self hosted you will put in the proper base DNS name. Also note if you wanted a computer or device link to open the records in a custom Form view you can do that by replacing /detail/default/ with /form/[form name]/. - Record the IDs of the new external viewers (they might not be 1 and 2).

Note that the Names given in this configuration are the names shown on the buttons in the TDX UI on the asset records.
Enable the TeamDynamix Integration in the AllSight web app
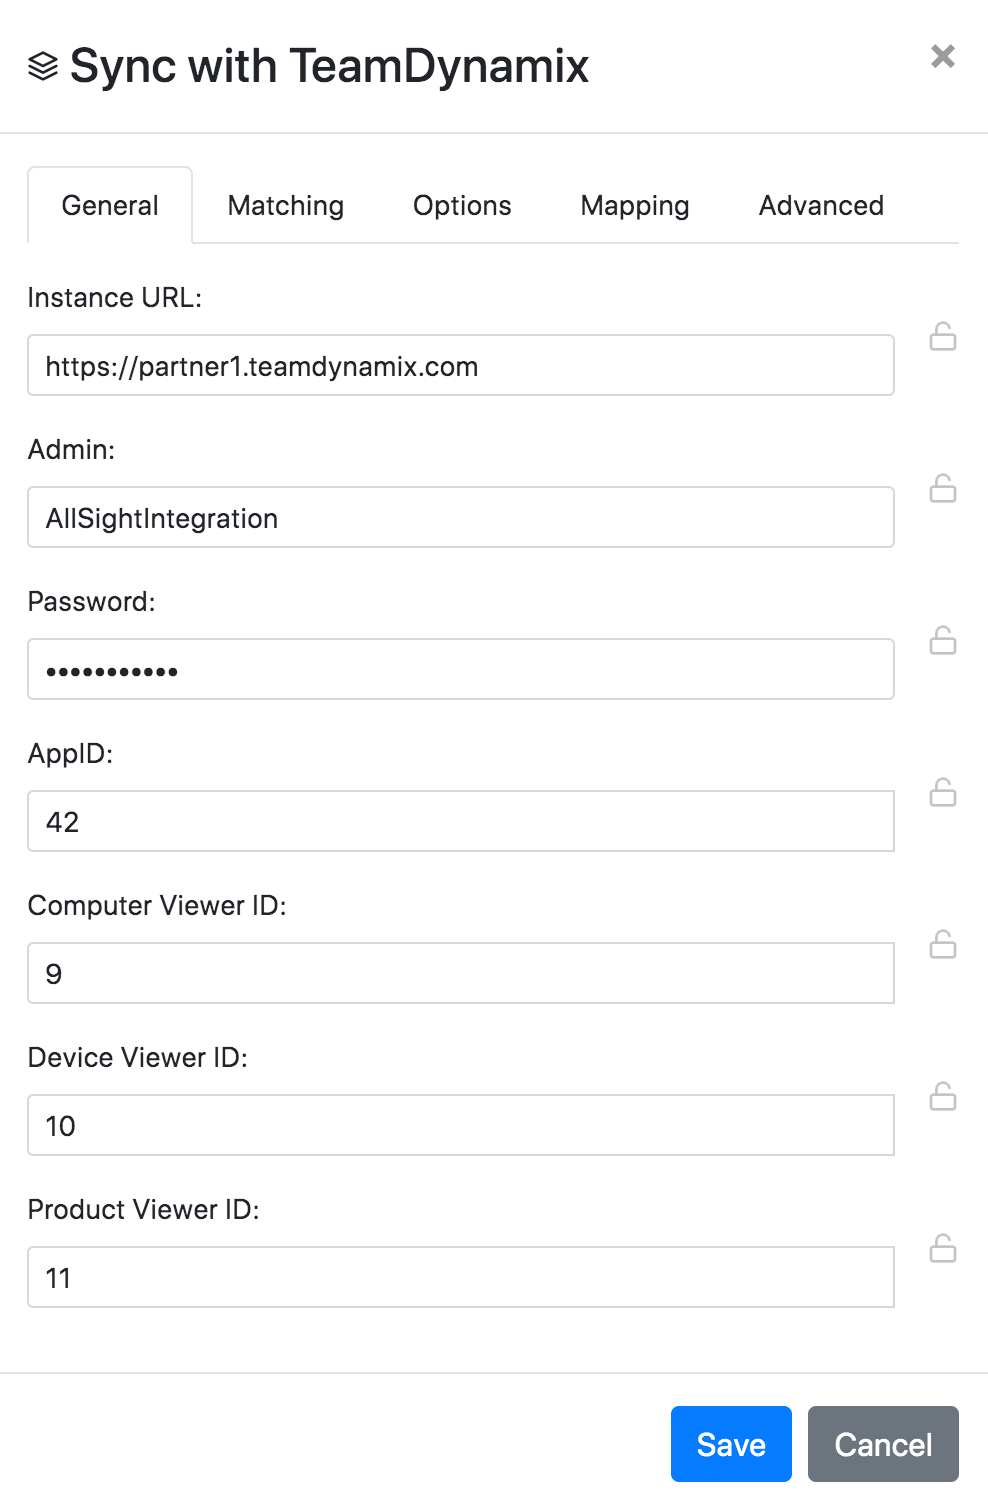
- Log into AllSight’s web interface and head to Settings -> Scripts, then check the box next to the "Sync with TeamDynamix" script to install it. Click the gear icon to enter the Settings dialog. Note if you have enabled this in the past, check on the right if there is an Update available.
- Enter the parameters gathered in the steps above. Note that the Viewers are optional but if invalid values are given the sync will fail.
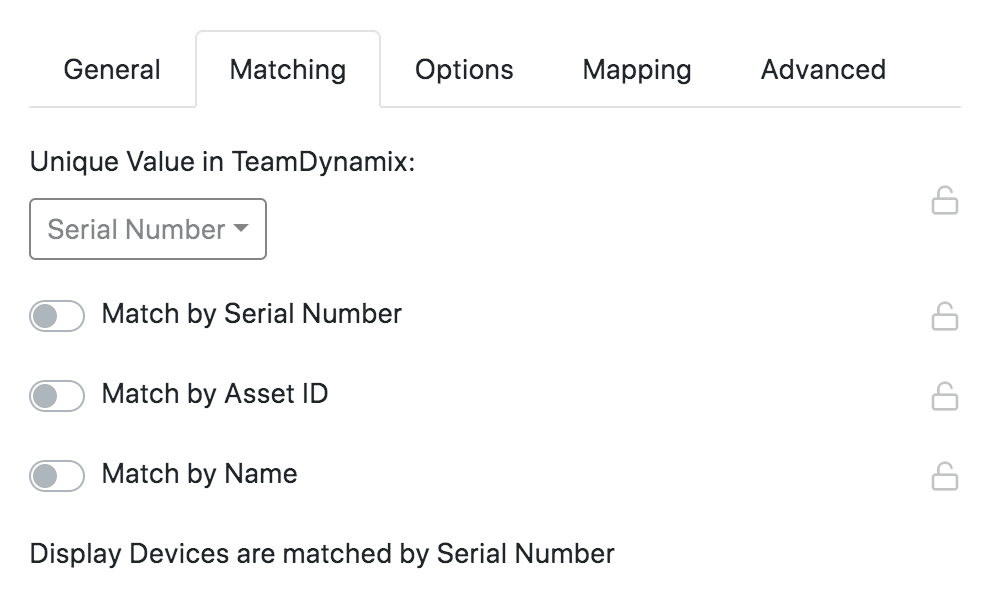
- Click on the Matching tab. In most cases, selecting Serial Number from the drop-down is the most reliable way to match AllSight Records against TDX records (as long as pre-existing TDX records have Serial Numbers recorded.) Generally, whether you have existing records in TDX or not, we recommend setting the "Unique value in TDX" option to "Serial Number". In this case, you do not need to enable any of the three toggles below the drop-down.
- If you’ve already created Assets (computers) in TDX, and they have names but not Serial Numbers, you can match against Computer Name instead. If no match is found, a new Computer asset will be created in TDX (unless you select the "Don’t Create New Assets in TD" option).
- If you simply want TDX to mirror Computer records from AllSight exactly, use External ID (which will map to the AllSight ComputerID).
- The three toggles for "Match by" are only used if you select "Best Match" from the drop down menu. This is an advanced option that is not needed in most settings.
- Review the various Options.
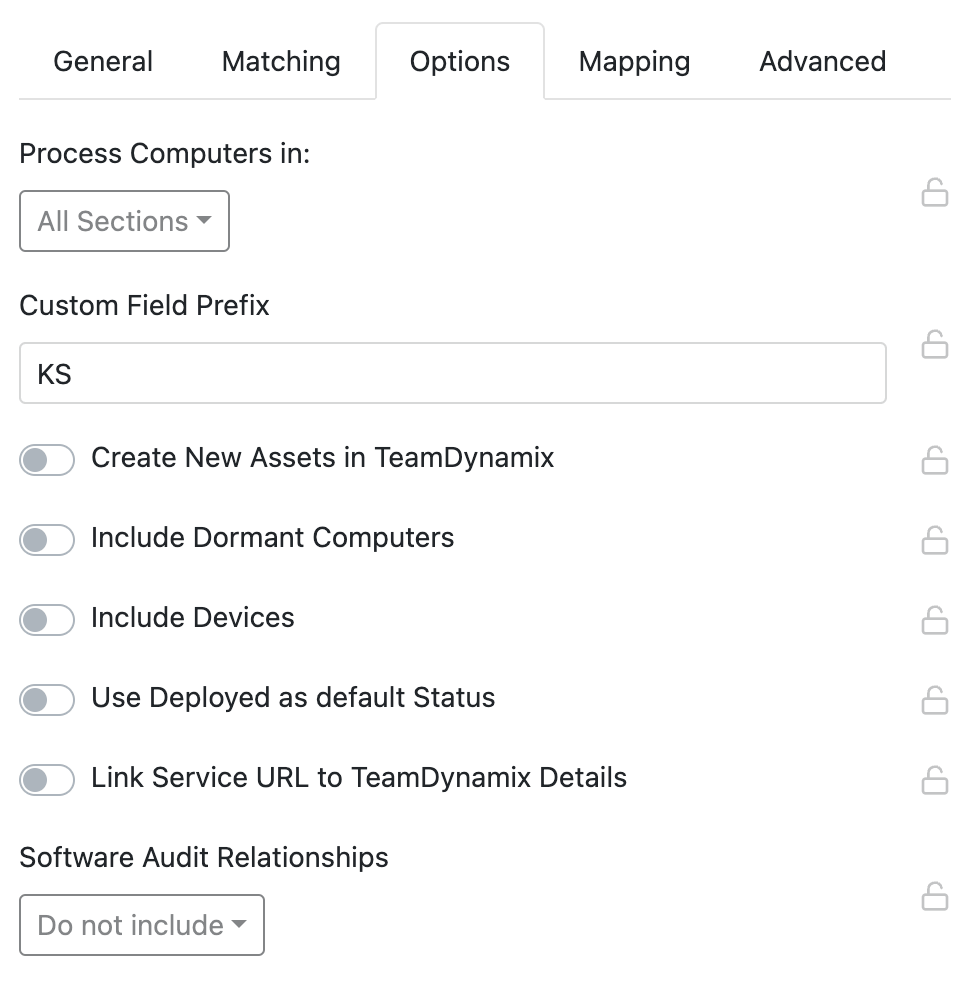
- If you want to only sync computers in a certain Section, you can make this selection at the top.
- You can set a custom Prefix for use in the Attribute fields in TD. In older versions this was KS: but you can now customize this as desired. The text used in this field will be appended with a colon and space when displayed in TD. Make sure you define the Attributes (above) accordingly (e.g. Sassafras: OS Family instead of KS: OS Family).
- You can opt to Create New Assets in TeamDynamix so that not only are records updated (using the Matching criteria), but they are created if they don't already exist.
- Decide whether to Include Dormant Computers records in the import. If your AllSight instance is fairly new, you may want to turn this option ON to make sure all of your computer records are synced into TD. If your AllSight instance contains a lot of dormant records for retired machines, you’ll likely want to keep this setting OFF.
- Decide if you also want to Include Devices in the sync operation. These will be created as Assets as well, and you can define Attributes for them like Width and Height to pull over that data. Relationships will be made between computers and devices as well. By default this will push over Displays, Printers, Network, and Storage devices. This can be Filtered on the Advanced tab.
When OFF, Use Deployed as Default Status will cause new assets with the AllSight default lifecycle of "Deployed" to correspond to the TeamDynamix default status "In Use". Likewise "Stocked" in AllSight will correspond to "Inventory" in TeamDynamix.
On the other hand, if you turn this setting ON, there will be no special translation - every lifecycle in AllSight will try to map to the same word in TeamDynamix, and vice versa. Because "Deployed" is the default lifecycle in AllSight, it will become the default for new assets created in TeamDynamix by this script.There are two caveats to creating new lifecycles or statuses, regardless of which option is selected here.
- If the mapping option is set such that AllSight takes precedence, the script will attempt to create any Lifecycle Stage from AllSight that does not exist in TeamDynamix. This will succeed if proper access has been granted in TeamDynamix to the account used for the integration. This means the default of "In Use" in TDX will never be used, because we will create our default of "Deployed" (unless you have created an “In Use” lifecycle in AllSight and applied it to some computers).
- If you specify a mapping option where TeamDynamix take precedence, then you MUST manually make any additional lifecycle stages in AllSight or no data will be pulled for those that don't match something. That is, the script will not automatically make new values in AllSight if there is no match. Specifically, if Use Deployed as Default Status is OFF, then you will want to manually create lifecycle statuses of "In Use" and "Inventory" in AllSight. But regardless of whether this option is ON or OFF you would also need to create AllSight lifecycles for any additional statuses you have created in TeamDynamix.
- Link Service URL to TeamDynamix Details will cause the Service URL field in each Computer record in AllSight to have the URL for the corresponding Asset in TD. This can then be easily clicked in the Web UI. Note this field is also used by our import from Jamf and InTune scripts. Therefore, it can be overwritten if you are using multiple scripts, so be aware.
- Include Software Audit Relationships determines whether Software Audit data will be imported into TD. With this option turned off, only hardware data is synced. You can also choose to send both Editions and Family products, or just Family or Edition.
- Make selections on the Mapping tab to determine if AllSight or TDX will be the "source of truth" data source for various fields when doing a sync.
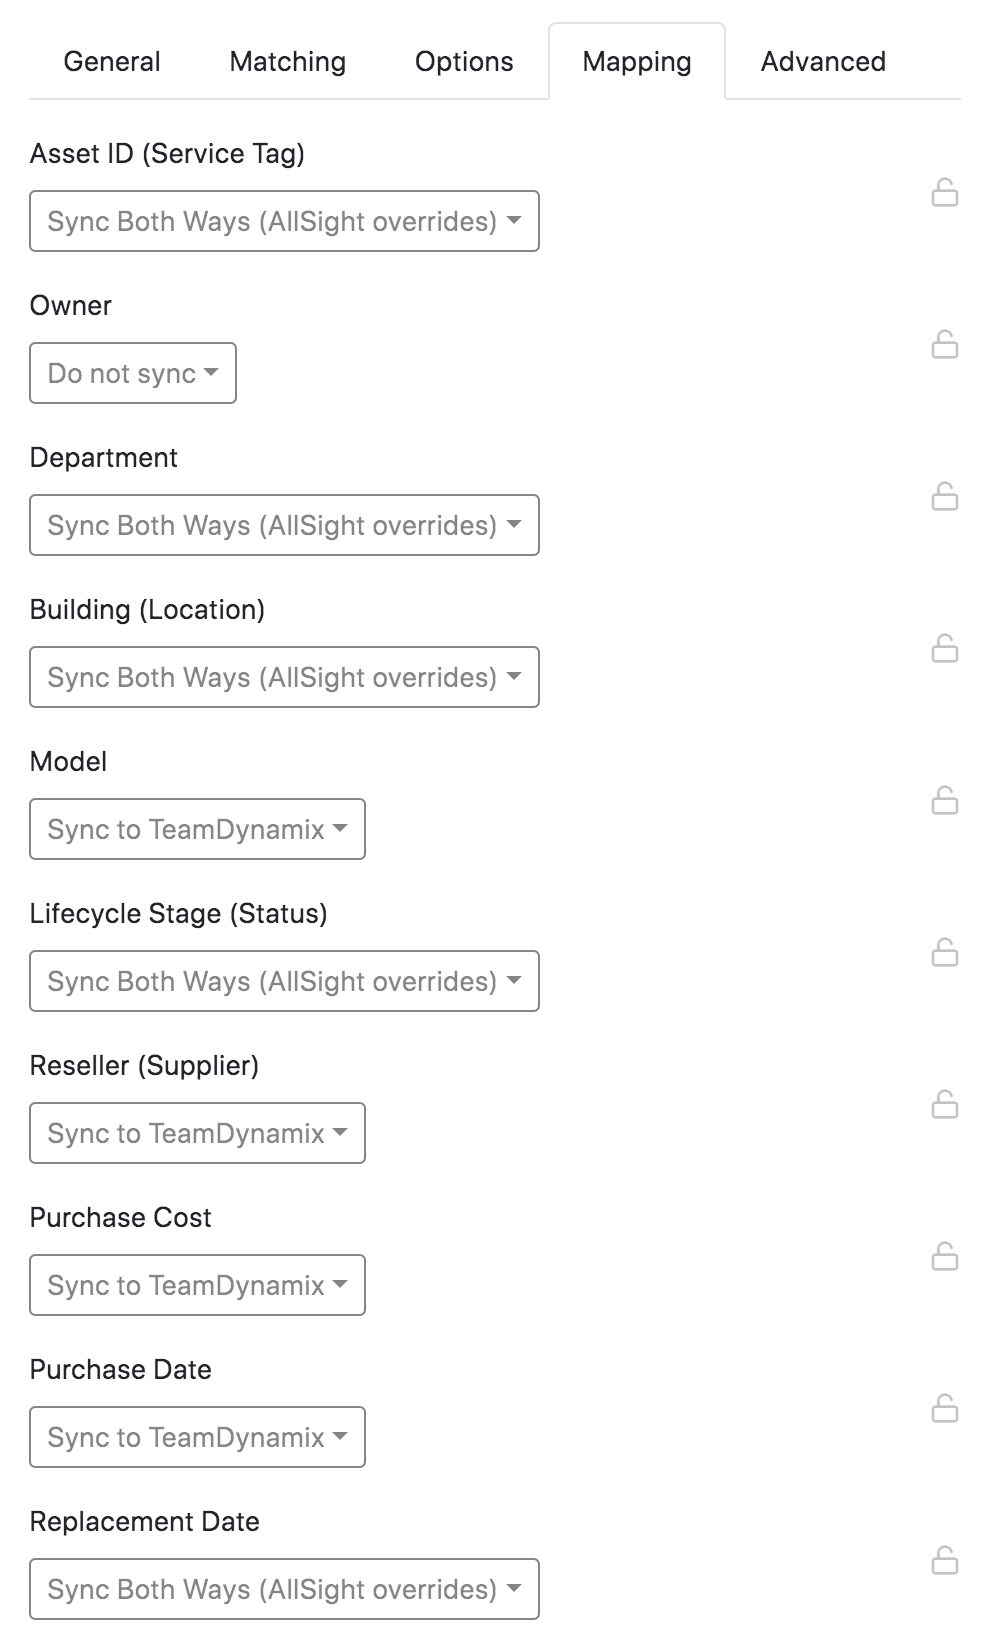
- Do not sync - No data will sync on this field
- Sync to TeamDynamix - AllSight will always overwrite this field in TD
- Sync to AllSight - TDX will always overwrite this field in AllSight
- Sync Both Ways - These two options are nearly identical to the above two. However, if there is a blank value on the side that takes precedence, it will take any value from the other side instead of leaving it blank. This allows a primary source for data while filling in gaps from the other side.
- Note that there are some fields that do not have all these options. Owner is never set from AllSight as it has relational impacts in TD. Model, Supplier, Purchase Cost, and Purchase Date can only sync to TD. They can not pull to AllSight because they are either set by the client inventory (model) or relational items to another database (purchase info).
- Note if AllSight is the source/override for any/all fields, you may want to use the Forms in TDX to make these fields Read Only (see below).
- Review the options on the Advanced tab as needed.
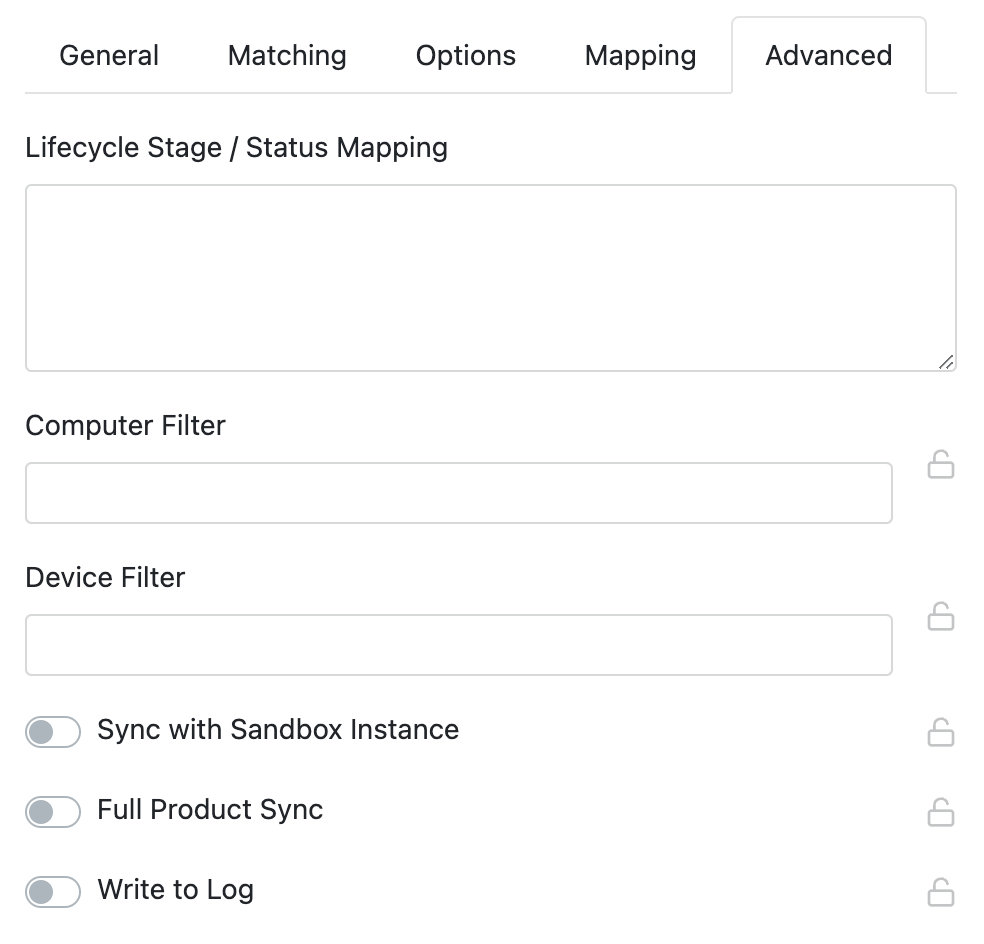
- You can use the Lifecycle/Status Mapping to custom map various lifecycle stages in AllSight to Statuses in TD. This allows for dynamic addition of other values on each side that are not hard coded into the script. Use the syntax of lifestage:status with one translation per line or semicolon delimitation.
- The Computer and Device Filter fields use our internal filter syntax to craft advanced matching for which assets should sync. A common one for Devices is (dcat!=3) which will exclude Storage devices.
- Sync with Sandbox determines whether you are syncing with your TDX test environment or production. With this option on, production syncing is off. Make sure you test in your TDX sandbox before syncing with production.
- Full Product Sync should always be OFF, unless you have deleted previously synced products and need them back.
- Write to Log is useful when troubleshooting. It will cause a popup window after the script finishes that lets you save out the log info.
Automatic Data Integration
In addition to data imports from AllSight Computer and Product fields as described above, some additional data is recorded in TeamDynamix for respective objects automatically:
- Asset Product Types named "Desktop Computer", "Laptop Computer", and "Virtual Computer" are created as needed.
- Asset Statuses are created as needed.
- Vendors and Product Models will be added as needed (for computer/asset entries).
- Computers will be added to the Assets list.
Additionally, if "Include Software Audit Relationships" is turned on:
- A Configuration Item Type named "Software Product" is created.
- A Configuration Item Relationship Type named "Installed on" is created.
- Products will be added to the Configuration Items list.
- Relationships between Assets (computers) and CIs (products) will be added according to audit info.
Additionally, if "Inclulde Display Devices" is turned on:
- Asset records for each display
- Asset Product Type for displays
- Relationships between Assets (displays and computers) will be added according to audit info.
Data Alignment
A few default fields exist in TD, and the behavior of how data is synced between platforms is chosen for those fields in the Mapping tab of our script. For clarity of those built in fields (as opposed to the Attributes you create for the rest), we offer this chart.
| TeamDynamix Attribute | AllSight Field | Service Tag | Asset ID |
|---|---|
| Owner | Owner* |
| Owning Acct/Dept | Department |
| Location | Building |
| Model | Model |
| Status | Lifecycle Stage |
| Supplier | Reseller |
| Serial Number | OEM Serial Number |
* Except for Owner, all of the values above can be pushed both directions. The Owner field is never populated in TeamDynamix from AllSight data.
Sync Scheduling
Once you have tested and run the script manually, you can schedule it to update data every 24 hours (or another chosen interval) on the Settings > Scripts page in the AllSight web interface. Click the clock icon next to the TeamDynamix script and define a sync schedule as desired. Note that you may not want to do this more often than daily depending on data size. Moderate to large sized sites can sometimes take several hours to sync all data due to the volume of records and network throttling for safety on the TDX side.
That’s the last step in the data integration process. If you have any questions, comments, or requests for bug fixes and/or feature enhancements, please let us know at support@sassafras.com, or give us a call at 603-643-3351.
Other Options
Forms
You can create your own form views for Assets in TD. This means that you could change the order in which fields appear. You could also label fields in a cleaner way that didn’t include the prefixes ("KS:" or any other one you configure with the newest version of the script like "Sassafras:"). If you are using AllSight as the source of data in your Mapping settings, you can also set the relevant fields as Read Only. This way no one makes a change in TDX that will simply be overwritten in the next sync.
Navigate to TDAdmin > Applications > [Asset Application] > Asset Forms to manage these view options.
Embedding
TeamDynamix has recently added the ability to embed content in their platform. AllSight has long had a rich set of options for embedding all of its content in various ways. This allows you to embed maps, software lists, widgets, and other elements in your TDX Dashboard.
For more information on embedding in TD, see their document HERE.
Simply, you can navigate to TDAdmin -> Organization Settings -> HTML Content Allowlists -> Iframe Sources and enter the address of your AllSight server.
Then to make an embed, navigate to TDAdmin -> Desktop Templates -> HTML Modules -> New and click the Source button and put in something like:
<p><iframe allowfullscreen="" frameborder="0" height="360"
src="//demo.sassafrascloud.com/frame-core/maps/std/4783dbdfa1074b2780322e31228ec25d"
width="640"></iframe></p>
Then navigate to TDNext -> Desktop, and click "edit blah Desktop" near the top, and your new embed would be a choice in possible content.
For information on embedding AllSight content, see our Embedding documentation.